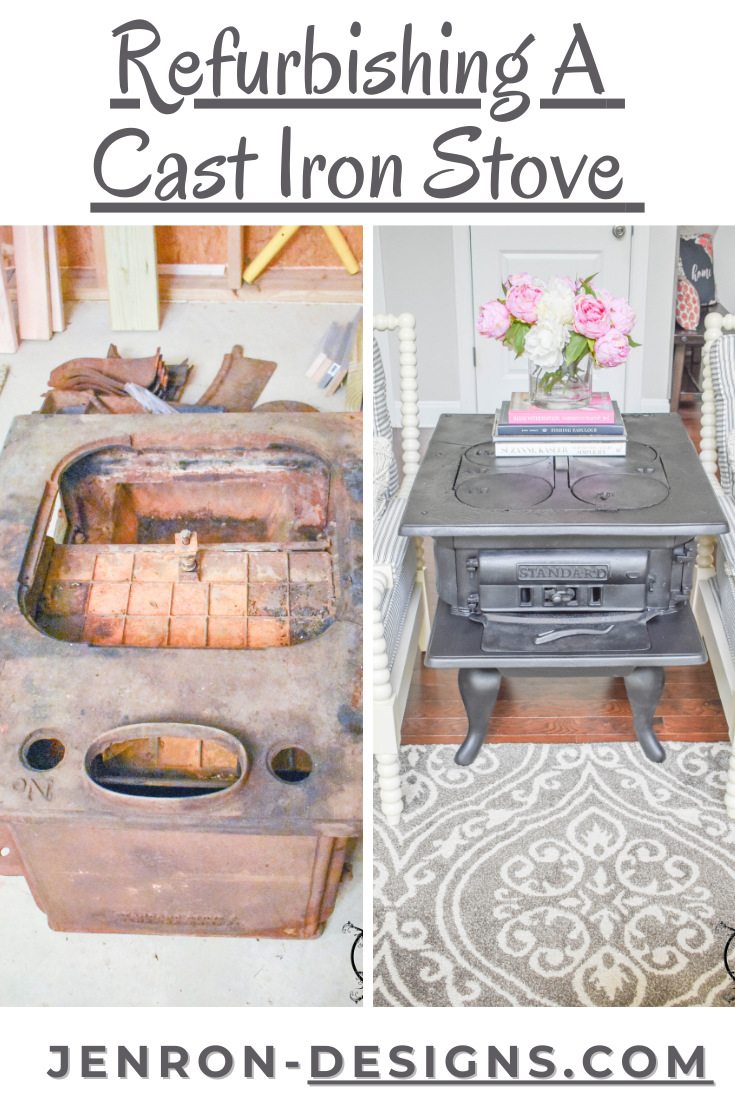
Refurbishing a Cast Iron Stove for an End Table
Today I am sharing my DIY on Refurbishing a Cast Iron Stove for an End Table.
Recently I ran across an old Cast Iron Stove that I wanted to refurbish. It was old, well used, and rusty, since it had been left out in the weather when I found it. Oh and it was completely full of of water too. So now I am set to start Refurbishing a Cast Iron Stove for an end table for my living room. 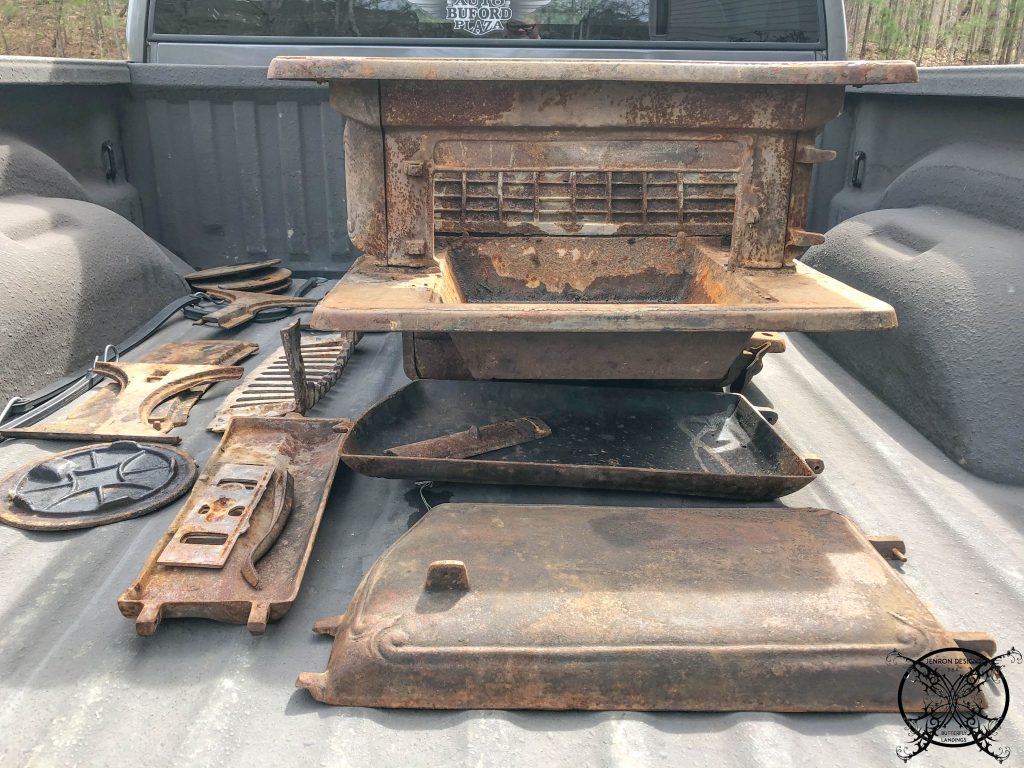 Here she is in the back of Kota, which is what I loving call my 20 year truck! We actually disassembled her at purchase just to make her a little lighter to lift into the tailgate. We figured since we have to clean her up anyways we might as well save our backs now, because we would be taking her apart anyways. You may have noticed I have assigned her, as a she, and she will have a name before this project is through but I just don’t know it yet.
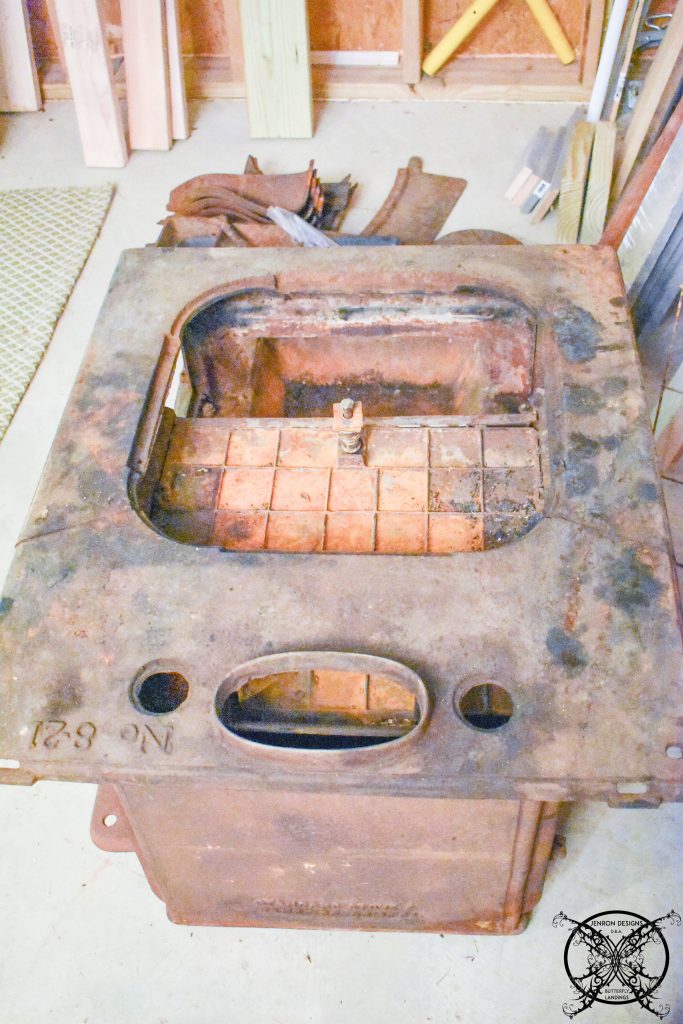 So we have her in a resting place to get dried out in our basement with the dehumidifier. This will help us assess the amount of grease verses rust that will need to be removed in this process. So now we wait until she is all dried up.
 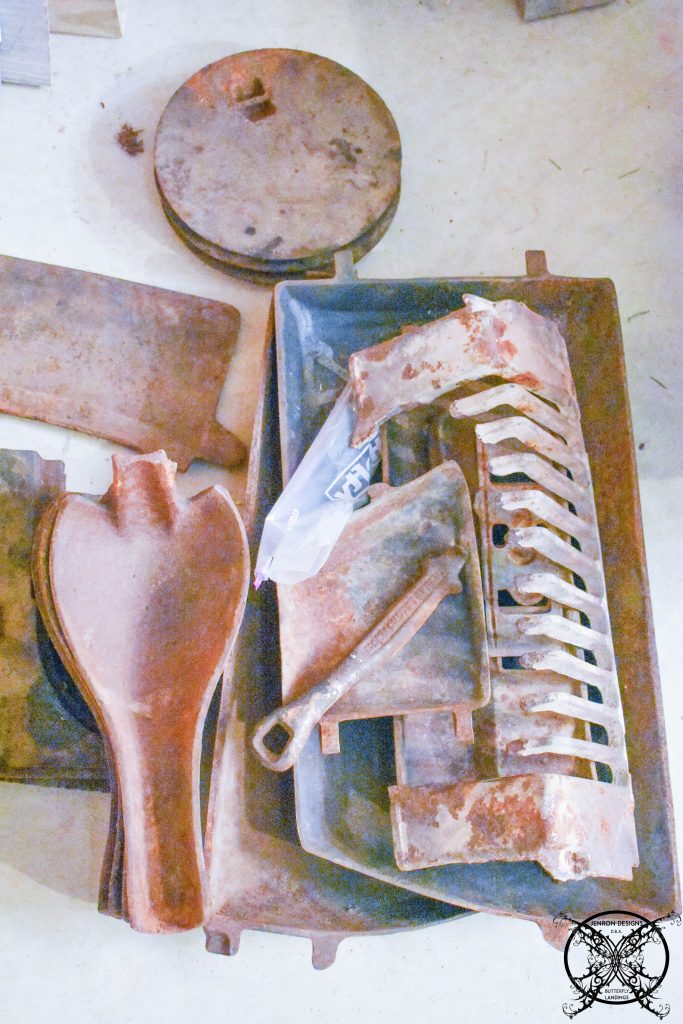 Okay so after several months had passed, because I got busy with the One Room Challenge we actually came back to this project on Memorial Day weekend. We were actually slated to have a delivery of Shiplap for our Master Bedroom Ceiling DIY and DIY Window Shutters from last week. However, our delivery reached Atlanta but did not get delivered to our home before the Memorial holiday weekend. After a long phone call I found out that Estes would be delivery my shipment to me on Tuesday, after the holiday. So we now have a free weekend for a project.
 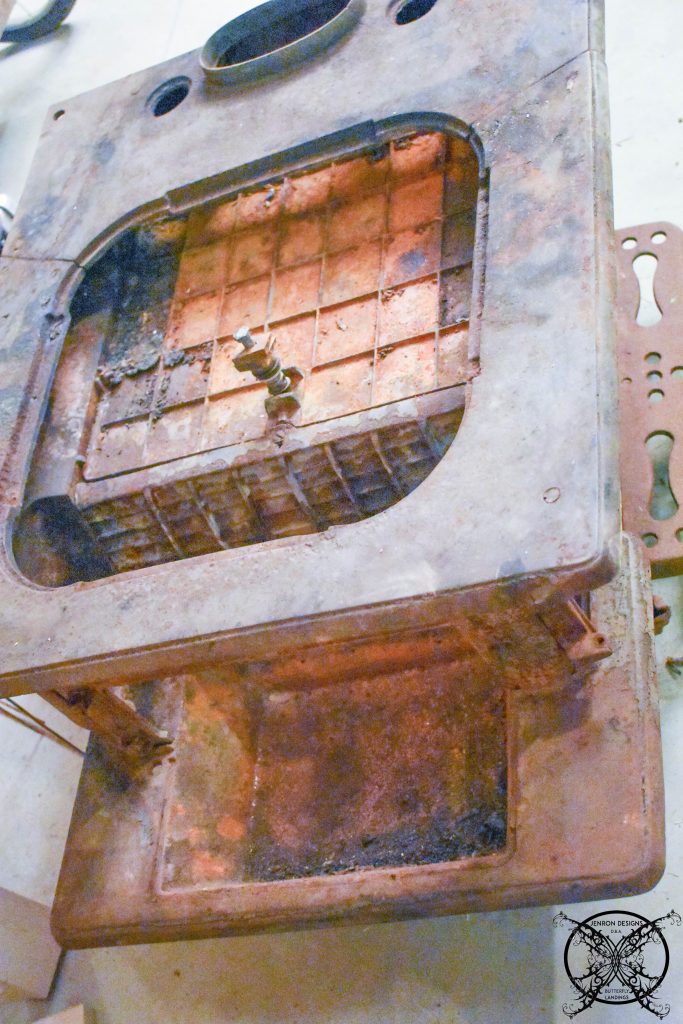 We decided to test a few pieces with a cola method Ron had read about online to see if it was going to work prior to investing in a lot of cola since we do not actually drink sodas anymore.
 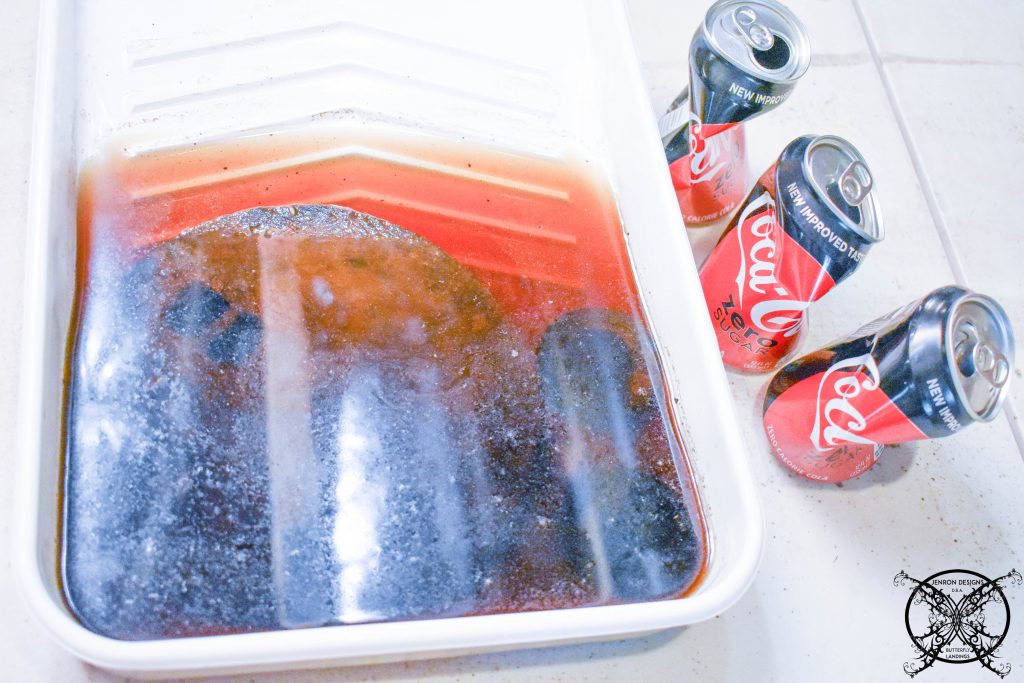 After soaking a few pieces in soda for about 30 minutes Ron used a wire brush to buff across the rusty part of the stove. Sure enough the rust came right off.
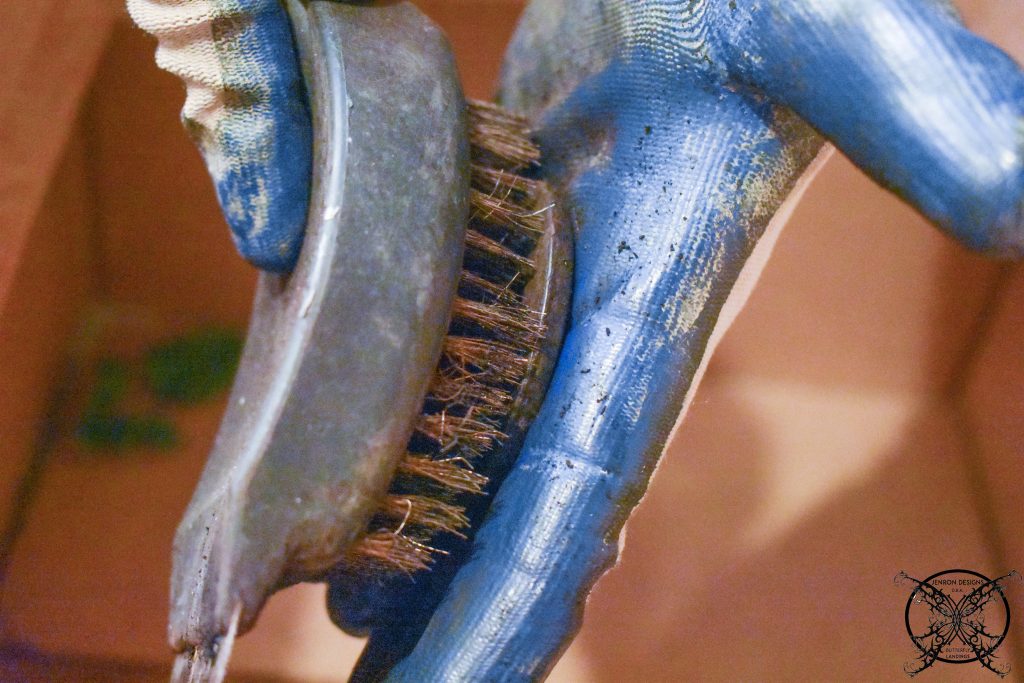 It clearly would take more buffing than a single pass, but the cola method was indeed the way to go. As you can see from the first pass picture below.
 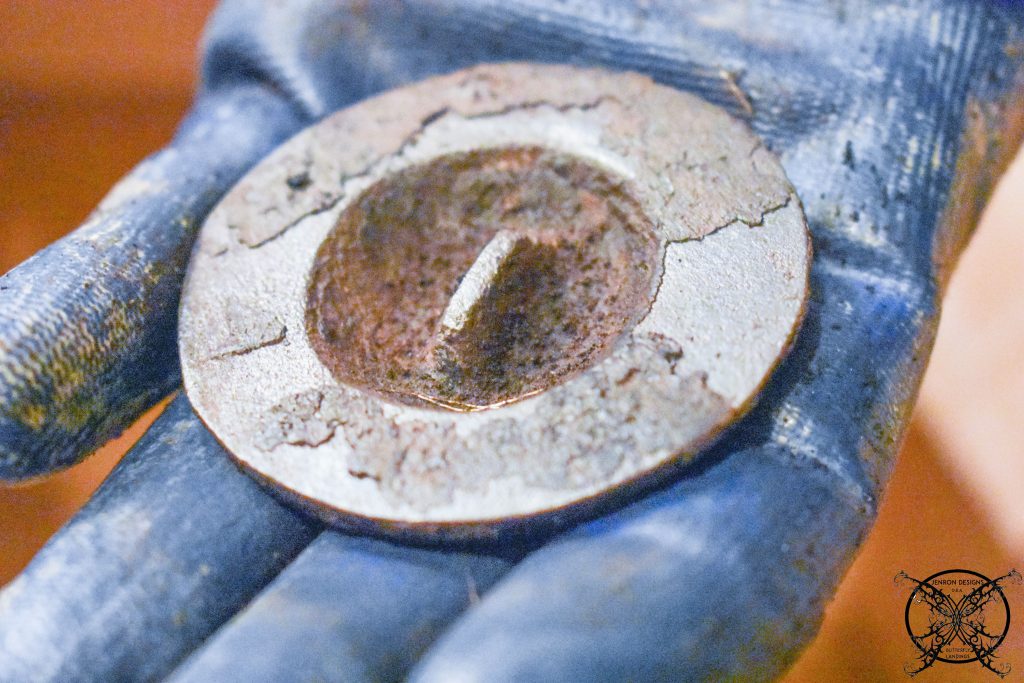 After a fair amount of buffing on both sides we were able to achieve this matching stove cap seen below. We decided that we had enough supplies with gloves and cola to do the small pieces like this that evening. Then first thing Saturday morning we would go pick up more supplies for the bigger job.
 *I was compensated for the post. Please note this post contains affiliate links for your convenience. These involve no extra cost to you, but may result in me receiving a small commission should you decide to purchase after clicking on my links – for which I am very grateful! You can view my full advertising disclosure here.
 Most of the Supplies we picked up at the Dollar Tree, just to save us money on the project. Since we were clearly going to ruin the brushes and items anyways through this cleaning process, might as well go for the least expensive option out there.
The Basic Cleaning Supply List:
- Soda- any kind works, we bought 3-liter bottles at Dollar Tree
- Steel Wool
- Putty Knife
- Plastic Spray Bottle
- Wire Brushes
- Disposable Gloves/ Garden Gloves
- Toothbrushes
 For the body of the stove we decided to take it outside where we could use a hose pipe to rinse if needed. I filled a plastic spray bottle with cola and started spraying the body of the stove and let it sit in the sun before we started to scrub.
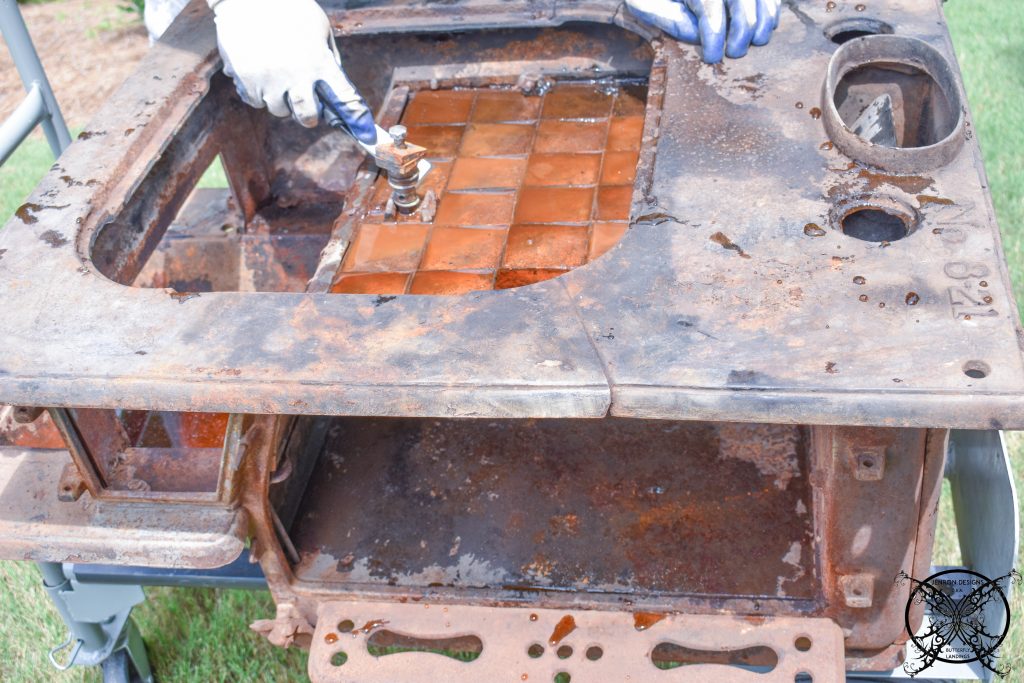
 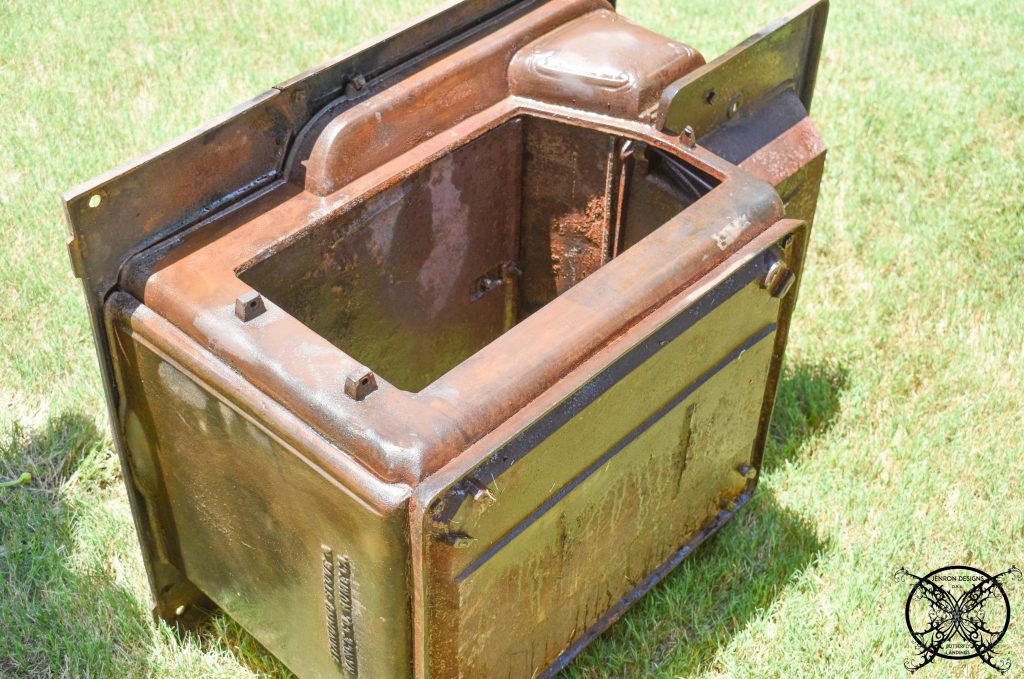 After a single pass we had got a layer of rush off and we needed to do a second pass to get all the grease build up off as well. Like I had mentioned this was a working stove at one point and time so it did have all the grease layers as well. Which is where the brake cleaner came into play. While the soda cleaned off the rust, the break cleaner took off the grease layers and the remaining caked on rust.
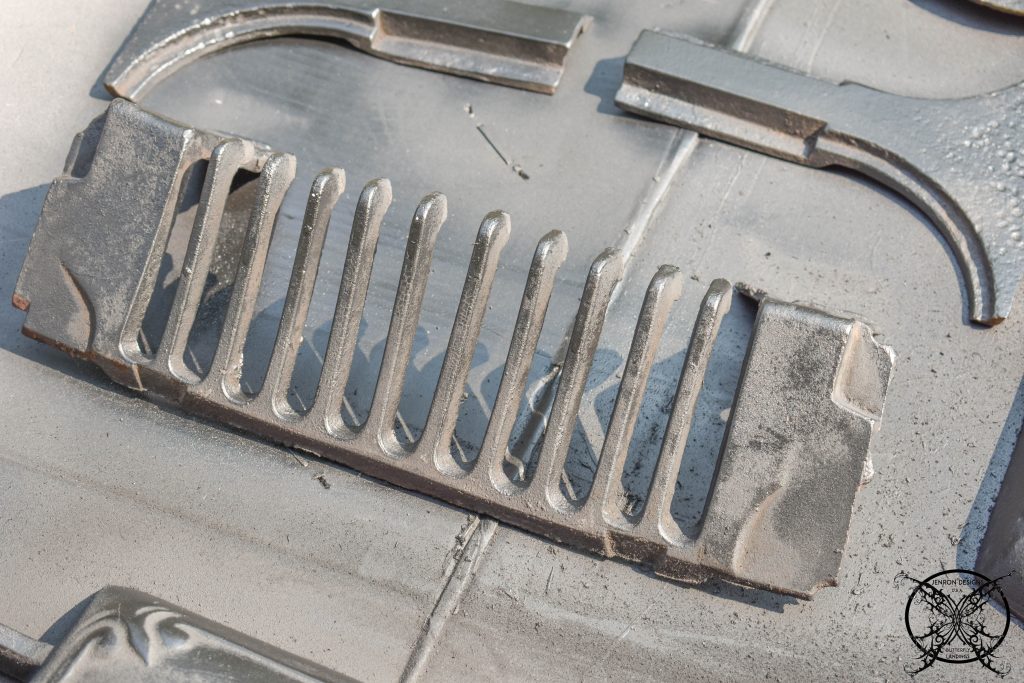
  It was also very handy when we got into the tight areas like the grill inside the stove here. This particular area was better suited to being cleaned with the break cleaner and tooth bush, much the same way you would clean a gun, or an antique gun.
 I actually did a little repair on some old antique rifles that belonged to my father and grandfather. After sitting out on display for my entire childhood on a gun rack on the wall, the Georgia humidity pretty much had ruined the barrels and chambers of them making them in-operable. They were very old, and beautiful. I was so inspired after visiting the Sarah Winchester House in San Jose to see her old collections, and how they had been restored.
 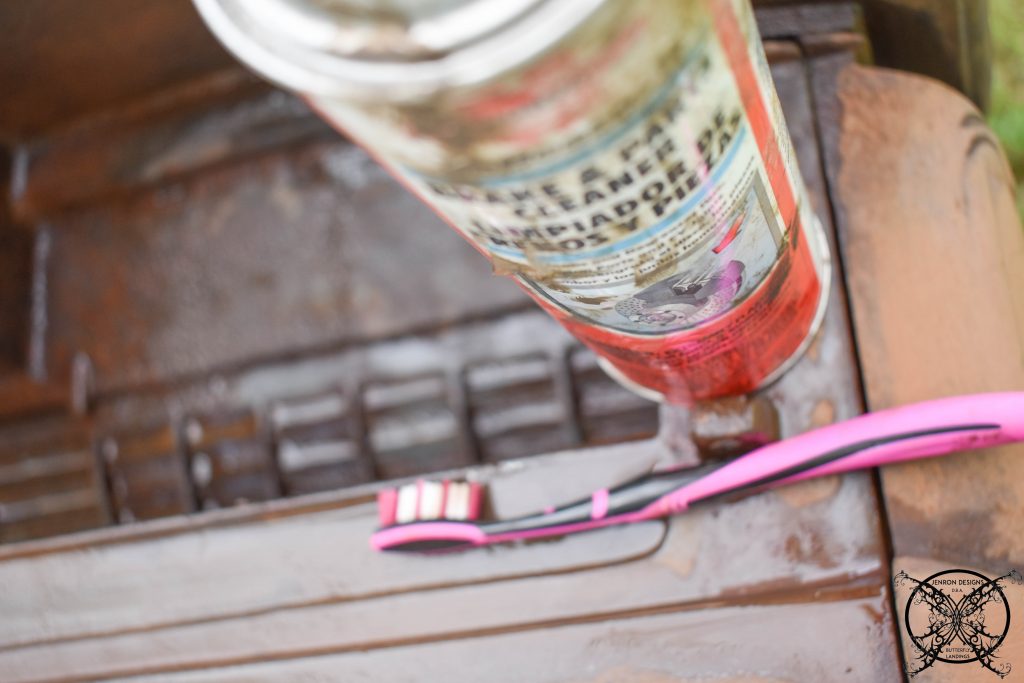 I came home and wanted to make sure that these beautiful old rifles would once again refurbished to their beautiful original states. So I learned how to fix them, and preserve them for the future generations of my family. Now they are properly stored in airtight cases, except when I want to take them for a spin, because I earned that reward. Besides I know how to fix them.
 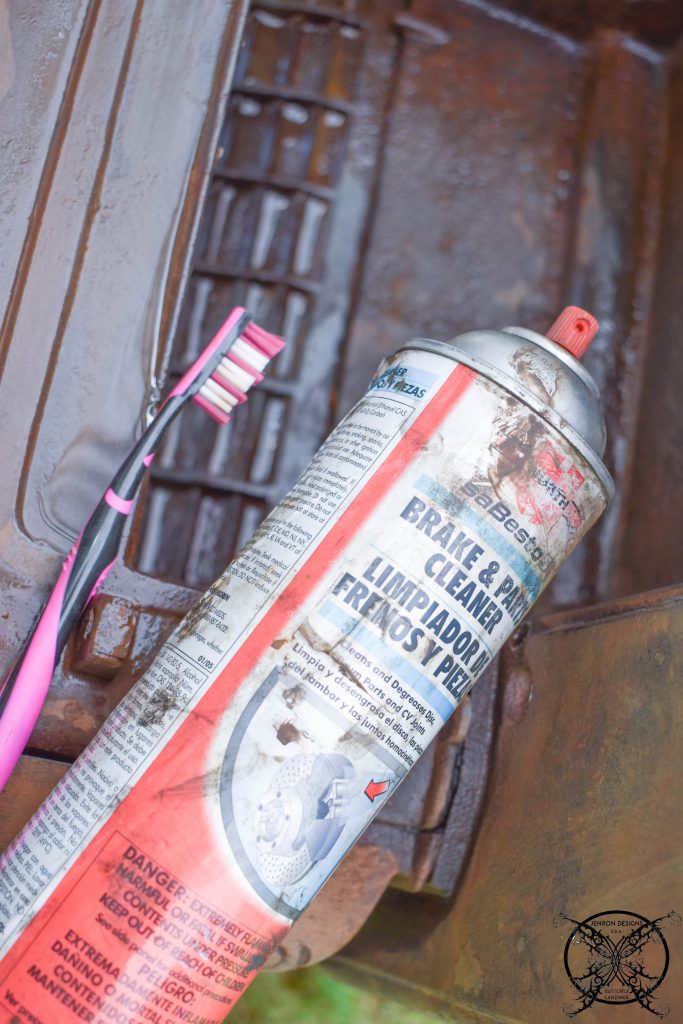 The secret weapon is brake cleaner people, and steel wool, without going into to too much detail this combination will restore iron and metals to a base finish. You will have to repaint, dip or refinish the metal to seal it again, but this is how you get it to bare metal without sandblasting.
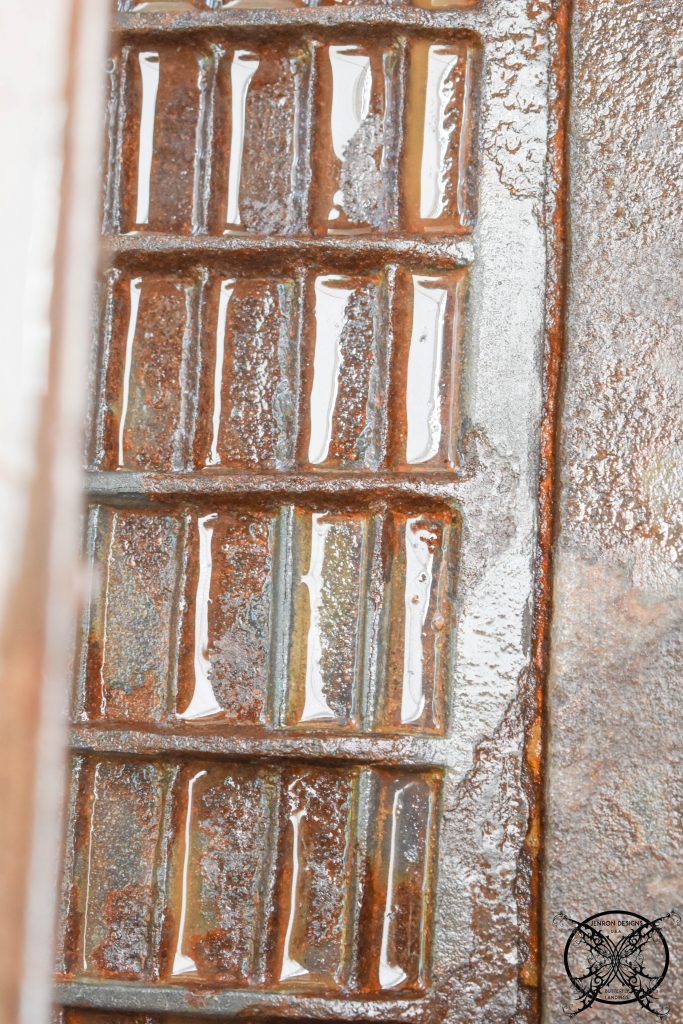
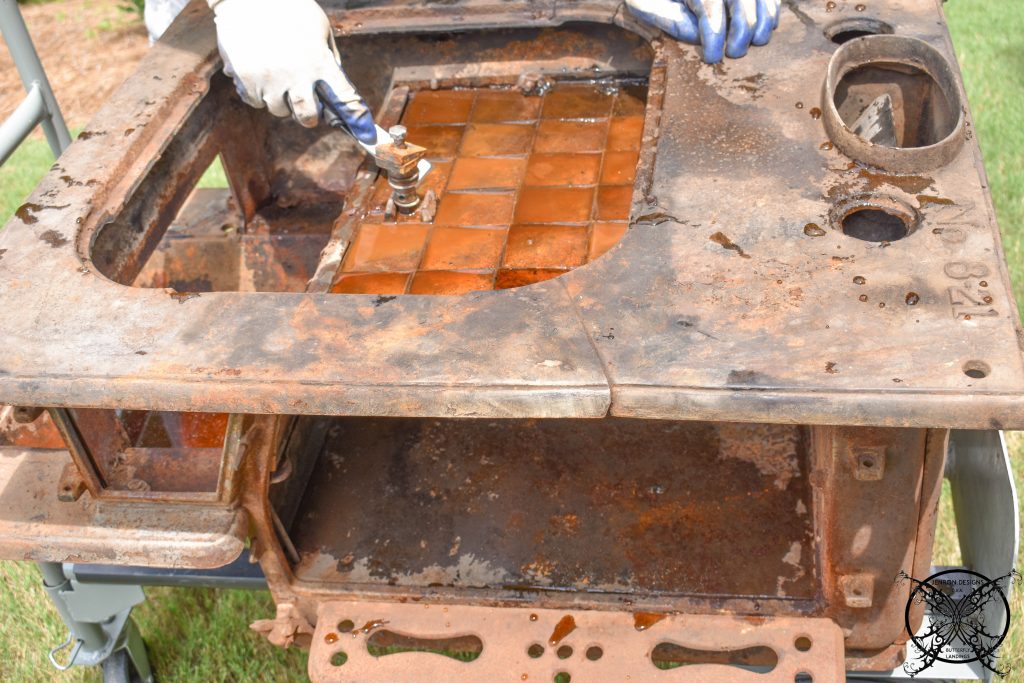 You can see all the grease and rust that is just melting away in this picture below. See how the red rusty squares are still visible but the closest squares are completely clean? We did use a putty knife to lightly scrape along the edges of these squares to get a nice clean line.
 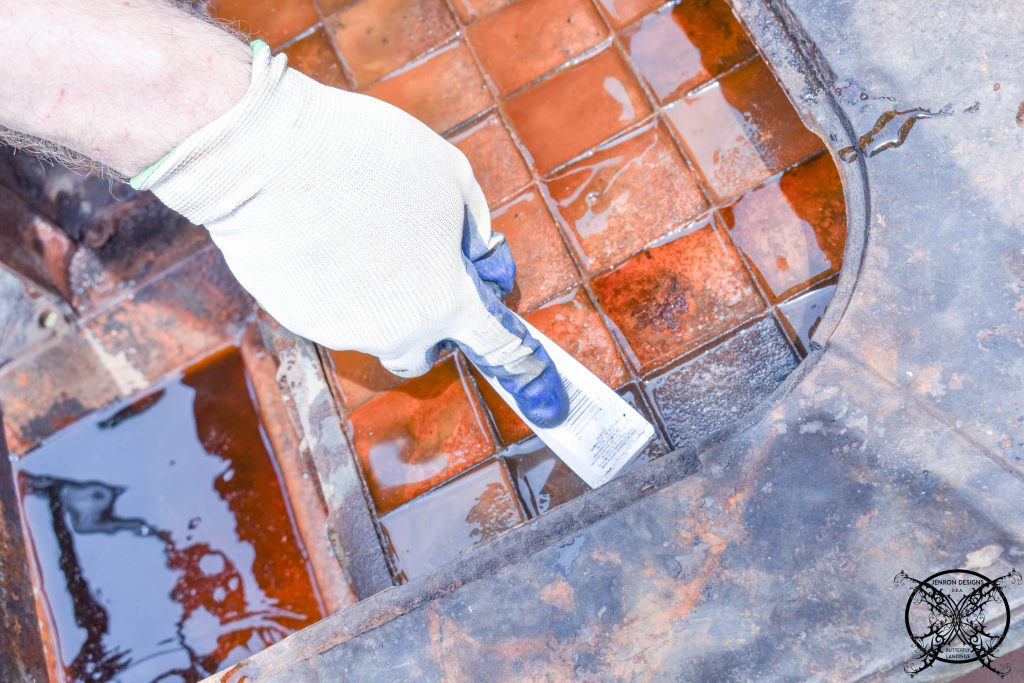 Once we got all the years of grease and rust build up removed and lightly sanded the piece, it was time to reseal our girl, I am lovingly calling her Black Betty, with some high heat matte black grill paint.
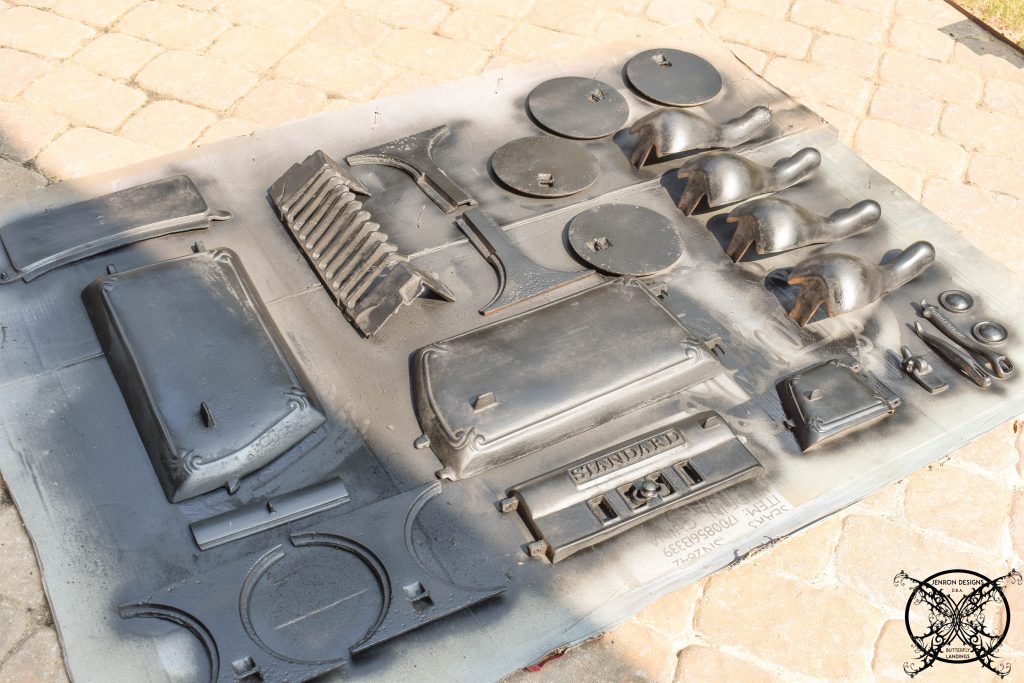 The first thing I did was layout all the pieces on some large pieces of cardboard. Just a tip, I tend to keep large pieces like this, just like a pack rat, because I am always spray painting something. I do not want to ruin my grass or have over spray on my patio. So I just slide these skinny sheets back behind my garden supplies until needed. If you look closely you can see the outline of my last project which was my front door wreath, lol.
 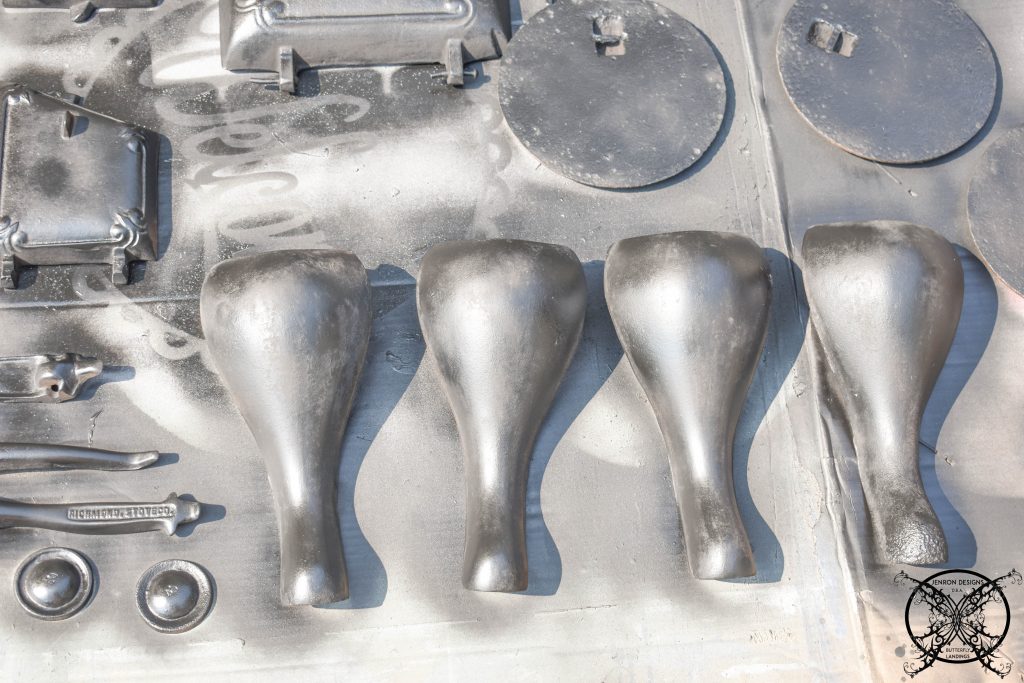 I usually put several thin layers of paint on when I am spraying, so it is vital to have a nice sunny day with lower wind to prevent things getting blown into your paint. This is especially important of furniture pieces.
 Once I got all the smaller legs, caps and grates done. I moved on to the body of the stove and the main parts like doors and vents.
 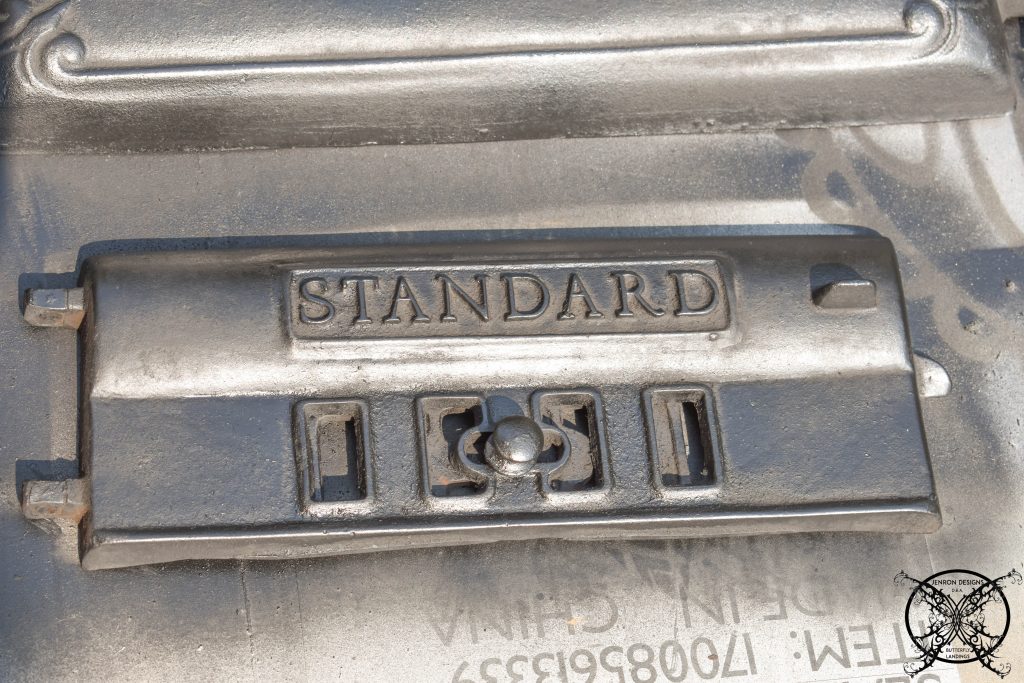 Above is the the main front vent used to control the amount air flow into the stove, and needs to be a moving part. Therefore this piece needed to have very light thin layers of paint with the vent opened at different degrees to get a good coverage.
  The side door is where the wood was loaded into the stove to burn, so again this piece has pivoting parts that will need to move and be operational upon assembly. Even though we are not planning on using it as a stove, we want it to be authentic and have the ability to be used should we decided to.
 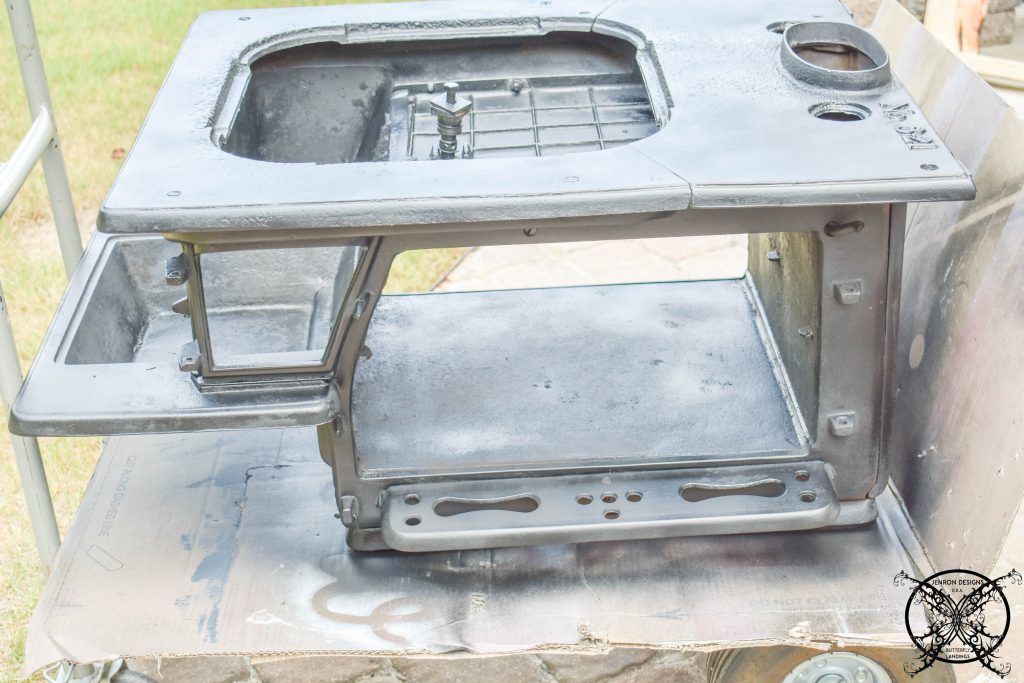 Next, I moved on the main body of the stove which would get a single coat all over inside and out. Then two more final coats on the outside. One to seal and final to make it pretty.
 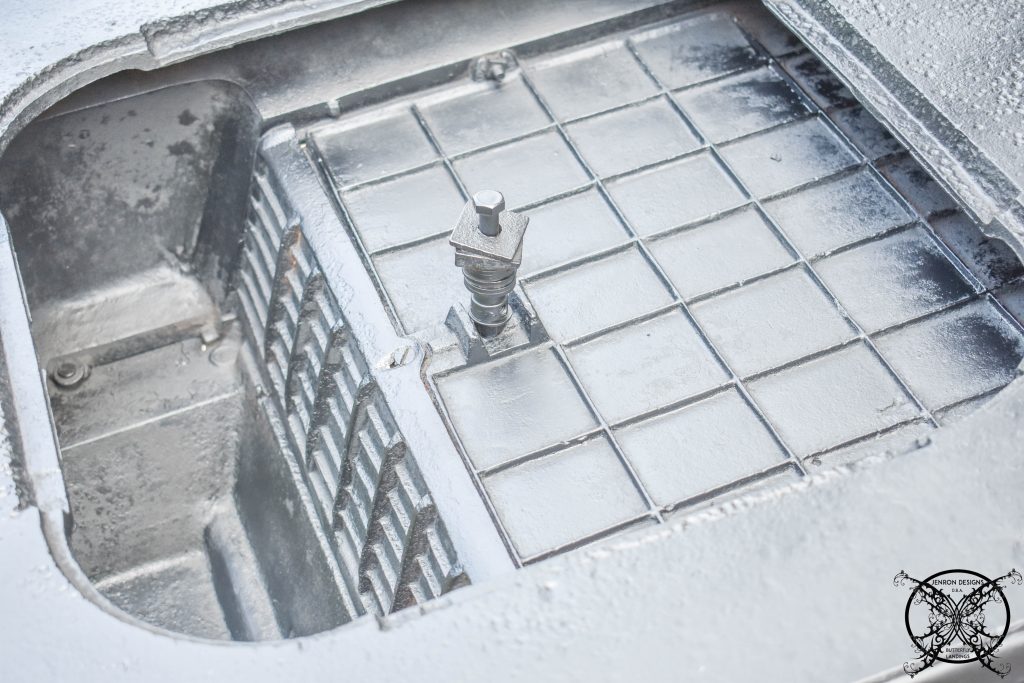 Once the final coat was on and dry, it was time to take her in and reassemble her in her forever home of our living room. We thought it would just be easier and lighter to build her on site since she is quite a hefty gal.
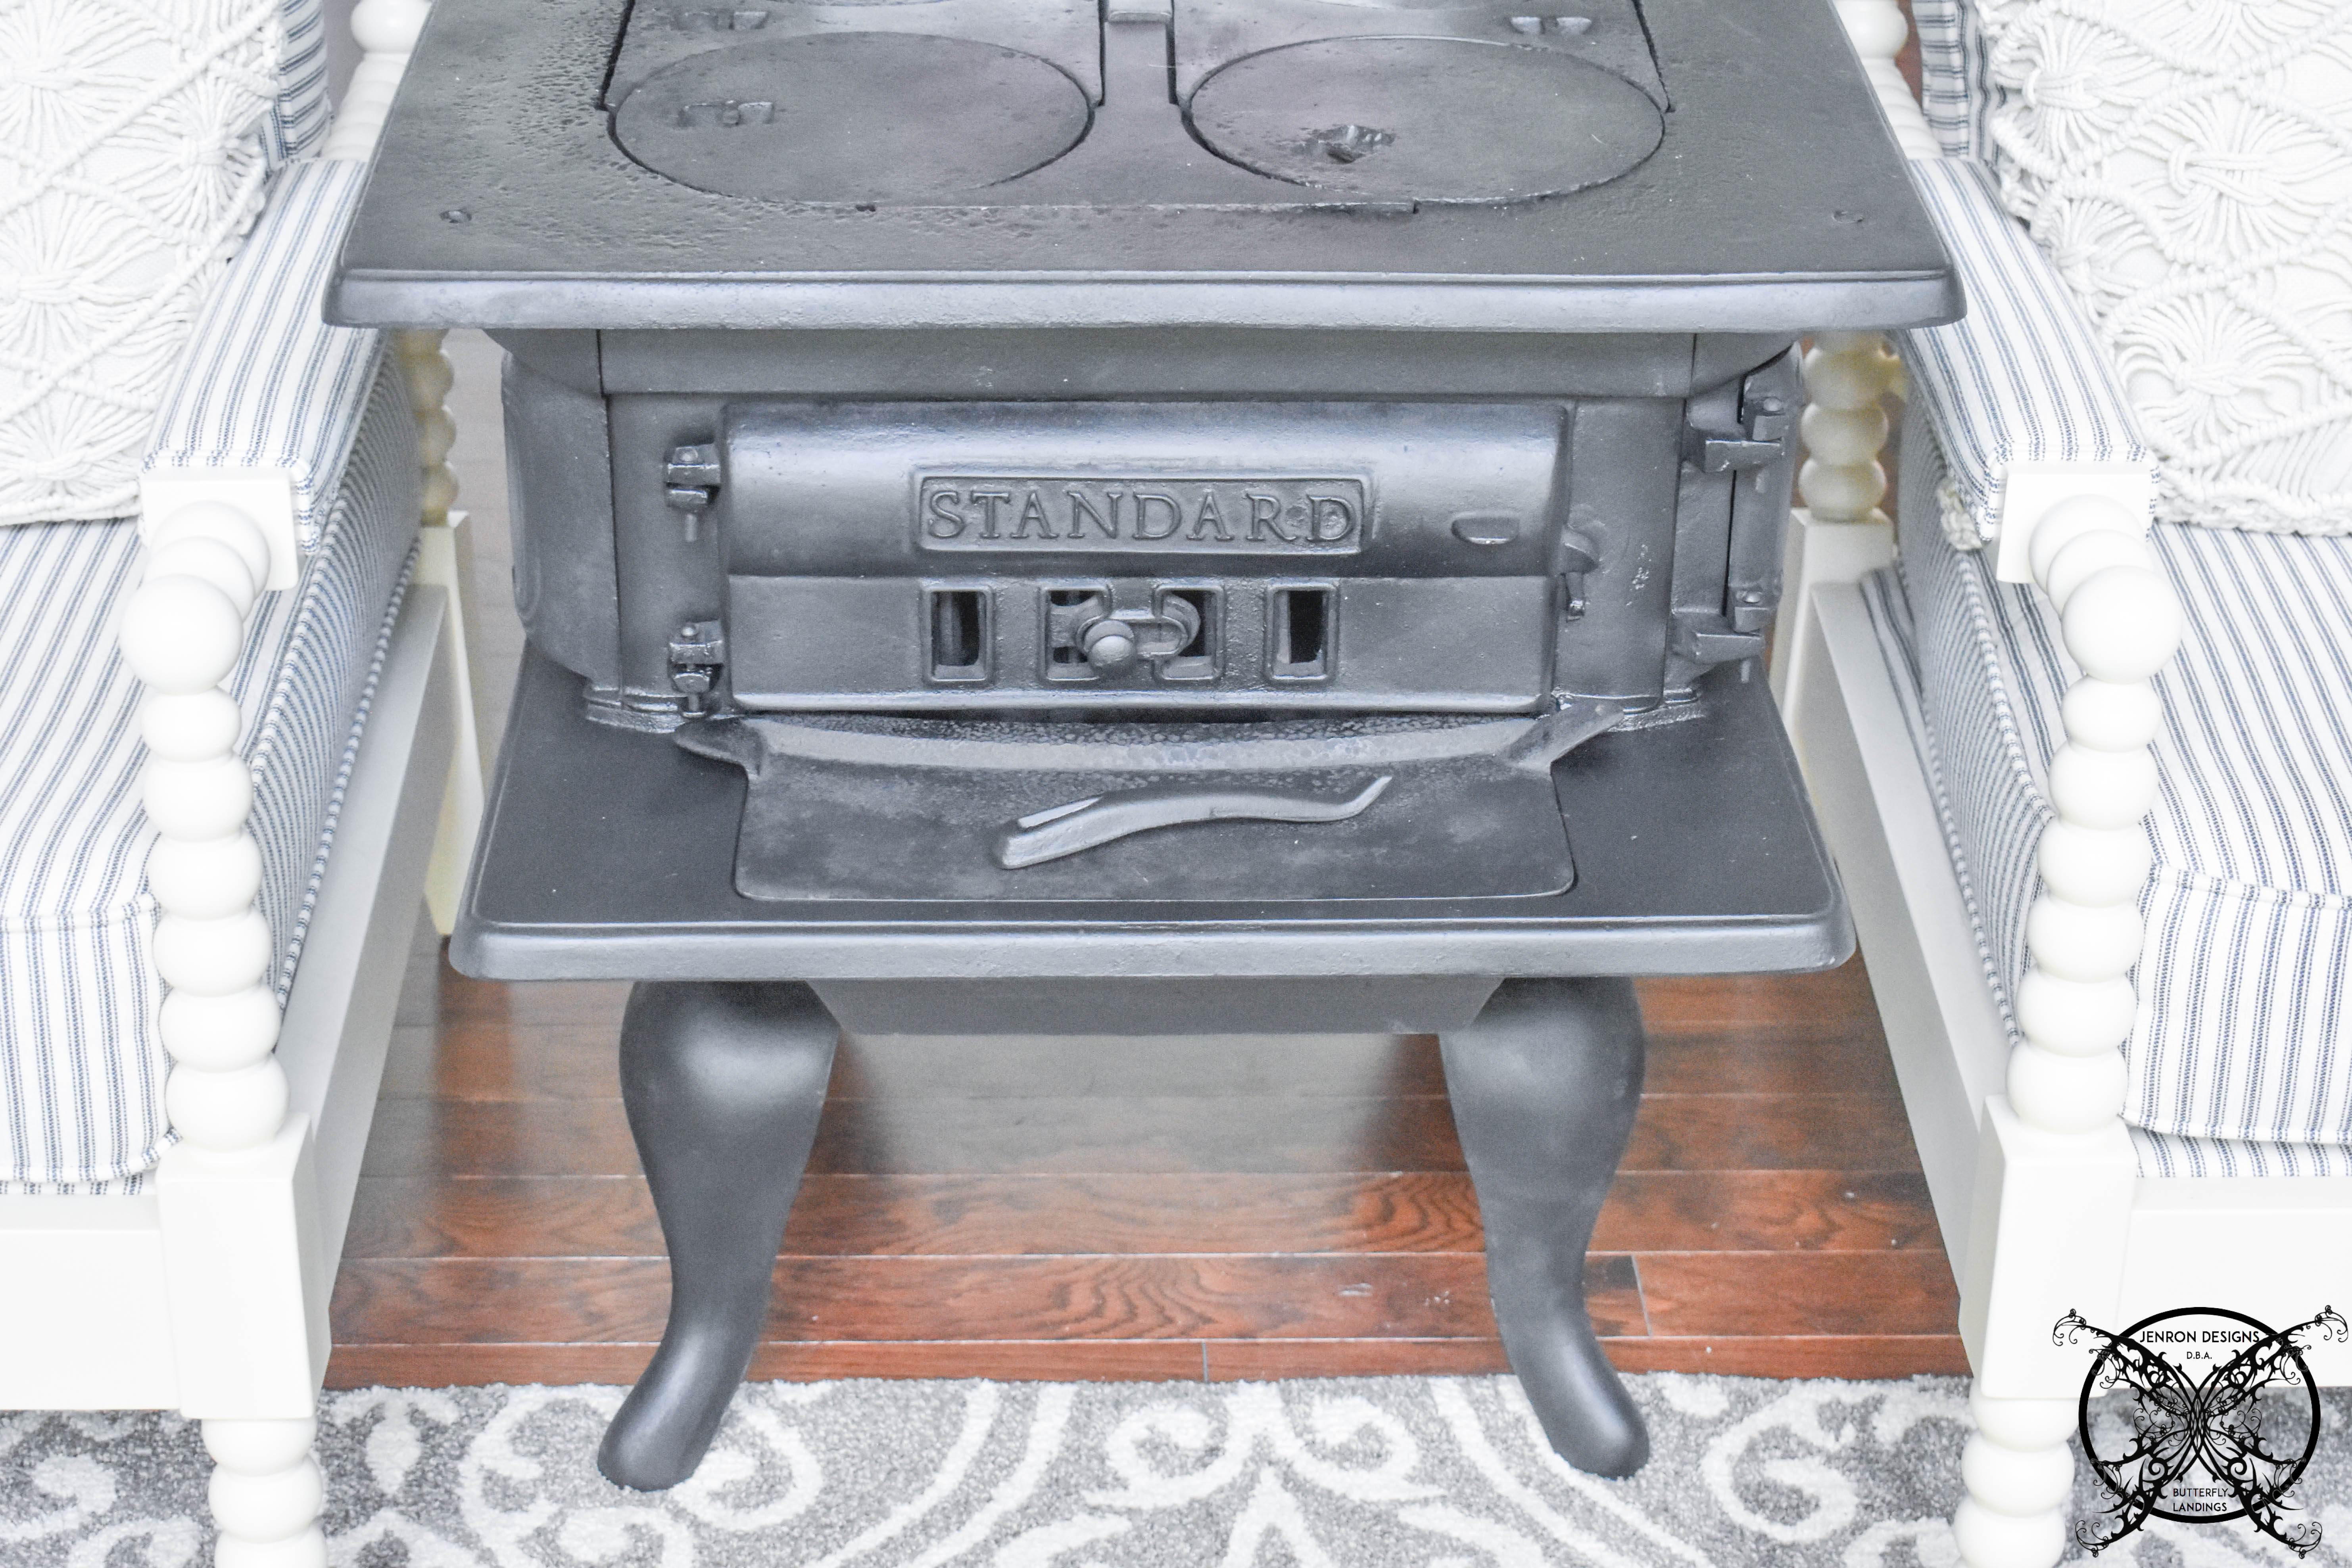
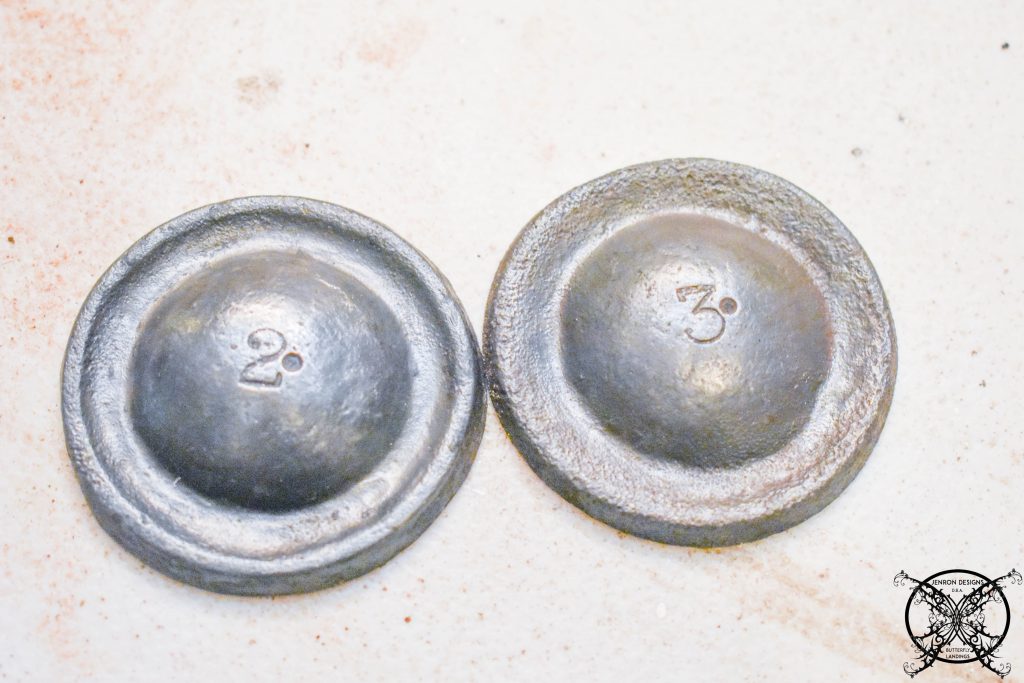
 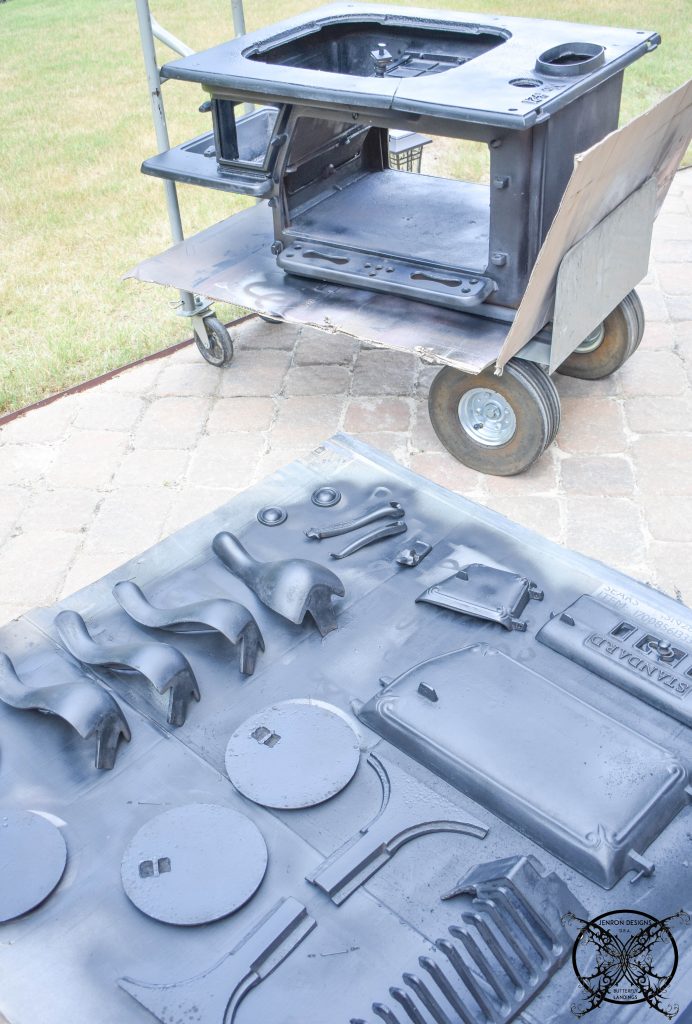 I love that the numbers are all still visible and on the back you can see where it was cast here locally in Rome, Georgia from Standard Stove and Range Company. I have been trying to do some research on her history, but no luck yet.
 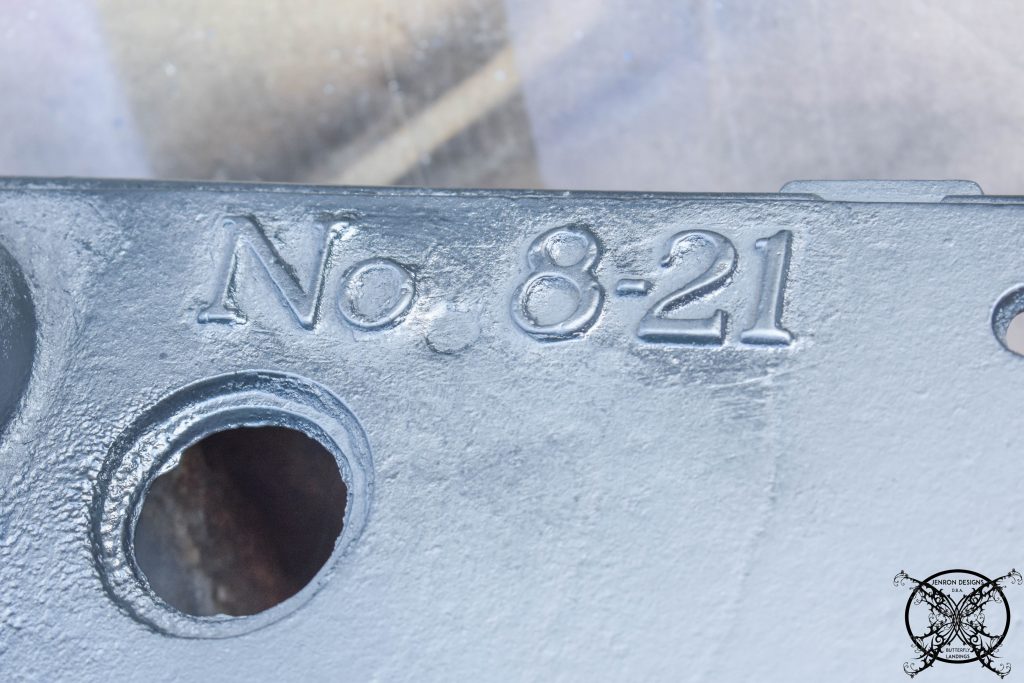 So if anyone out there knows anything about the history of this company please feel free to share it with me in the comments below. So far all I have been able to sort out from some antique sites, is that she is possibly from 1921 and was the 8th cast which could be determined by these numbers. If that is how this company operated.
 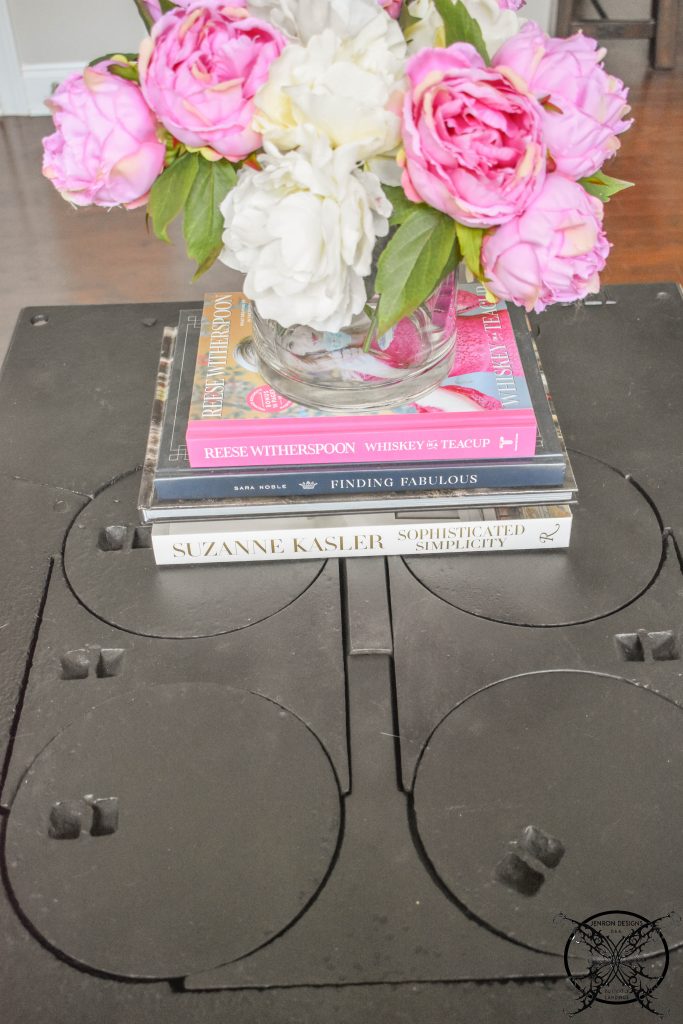 I have seen some old sales catalogues for the company online that have been priced but so far not another Cast Iron Stove with the same engraving on the back from Rome, GA but many similar style and lots of Perfection Stoves, so I am not even sure what that means.
 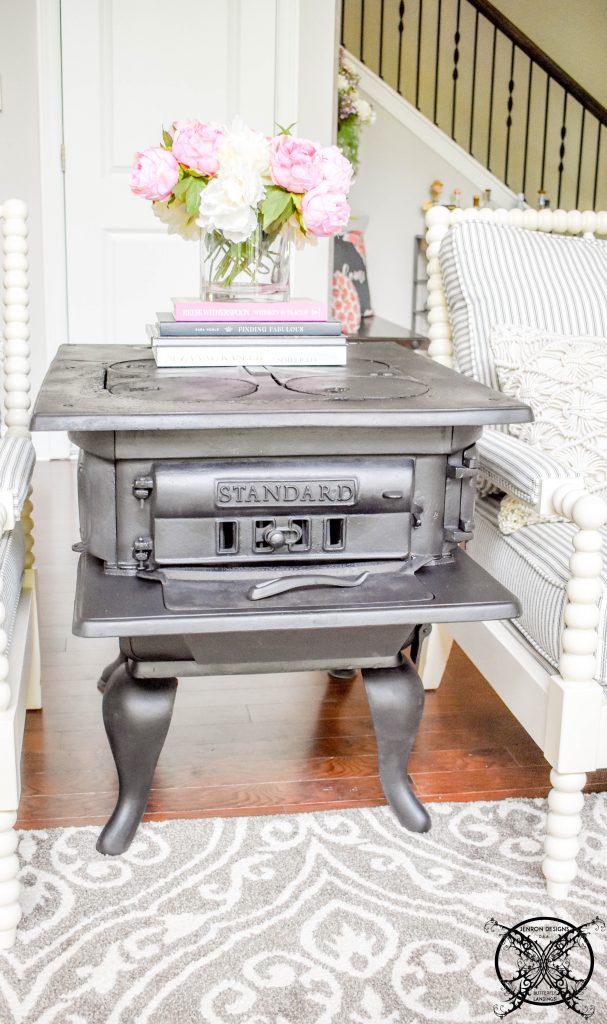 As you can see my girl is a Standard and that is fine by me. In fact even if I do not learn anything else about her history I am so happy with how she looks as an end table in my living room now, I could care less about the rest.
 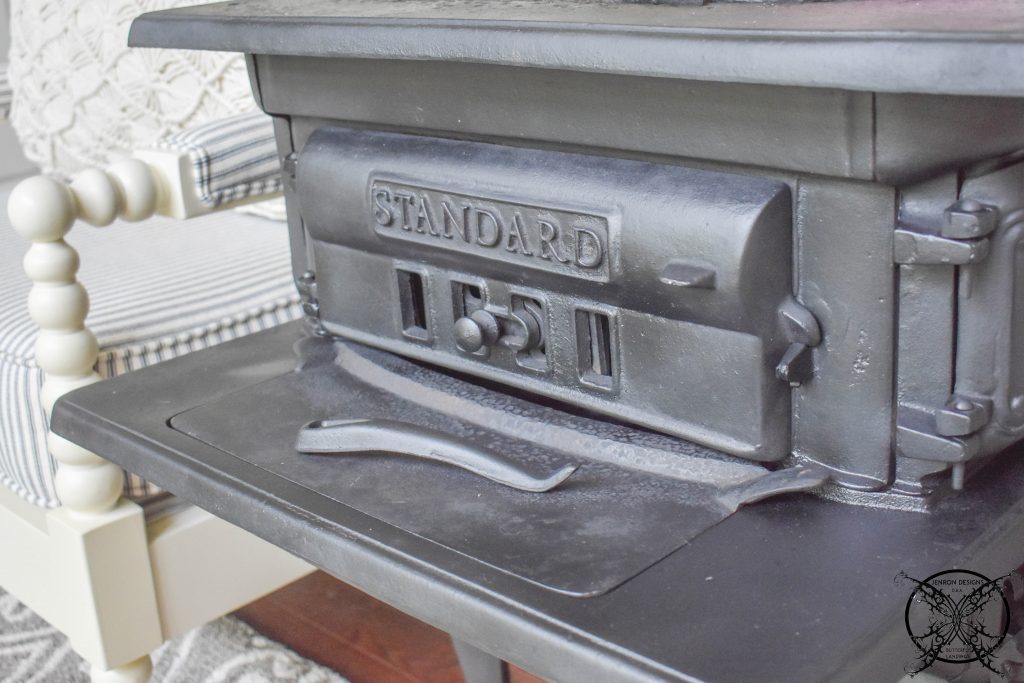 Besides she weighs so much I am pretty sure we will not be moving her anytime soon, and we may want to reinforce the floor below, LOL when we work on finishing the basement.
 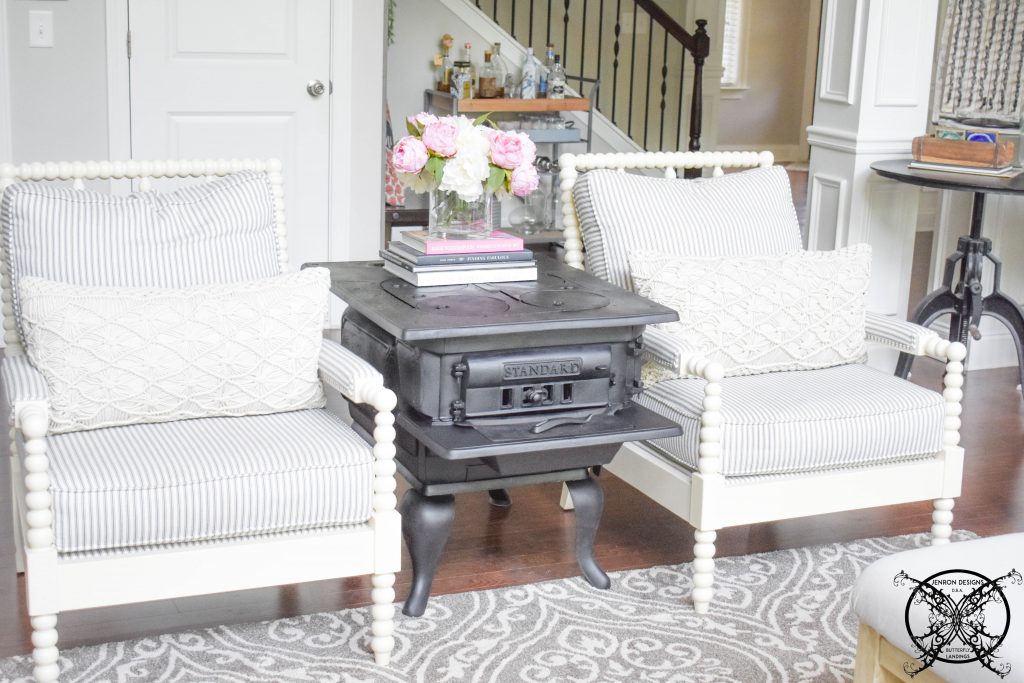 I think all in all she turned out great even though she does have a few weathered and cooking pits along on the top around the burner grates. However that creates the character, it was her life of usefulness before she was tossed away and unloved and left out in the rain to rust.
 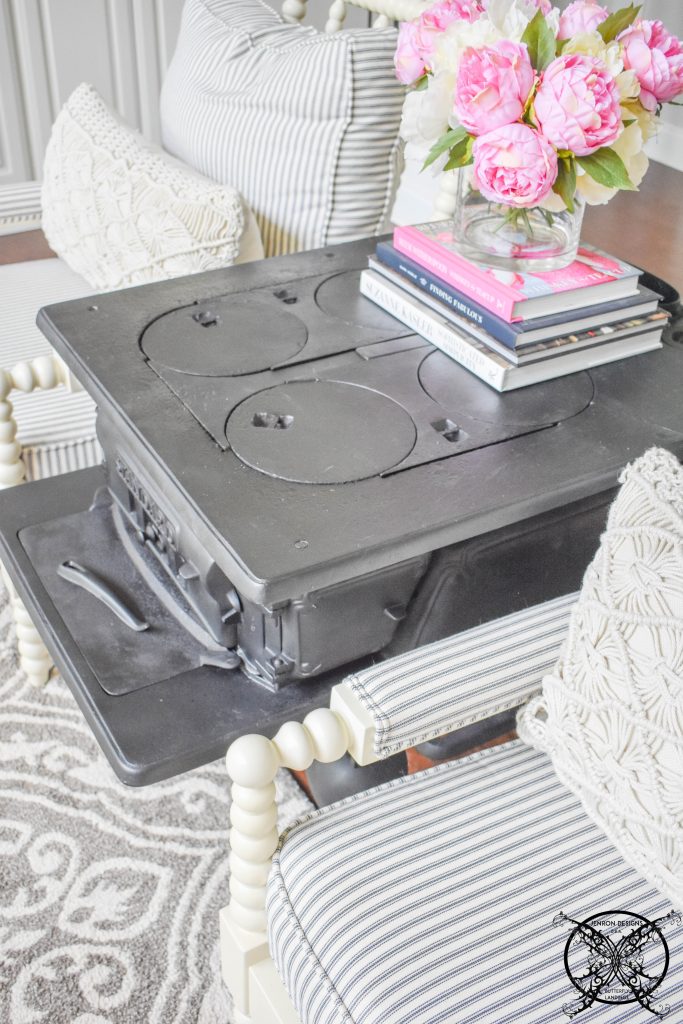 Now she has be restored, renewed and repurposed; with a new life that will hopefully preserve her a while longer. As a unique end table that might spark a conversation or memory with one of guests or bring a smile to someone’s face while visiting.
 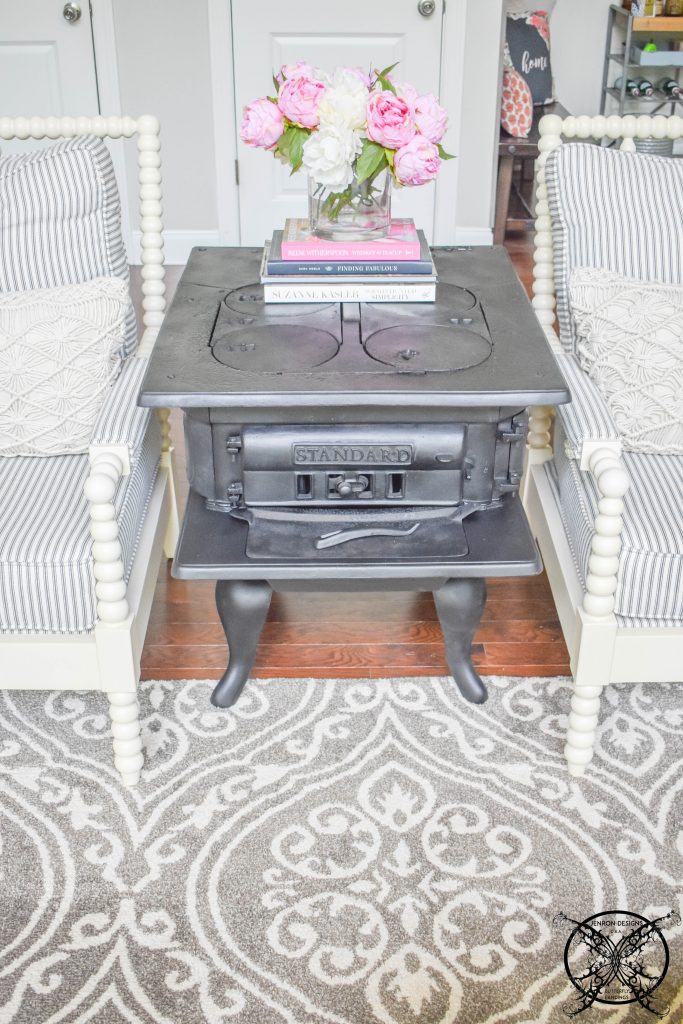 I know she brings a smile to our face everyday, the perfect height for these chairs. A nice large scale for this great room, and no more “Rosie” the Roomba getting stuck on my nesting tables, LOL.
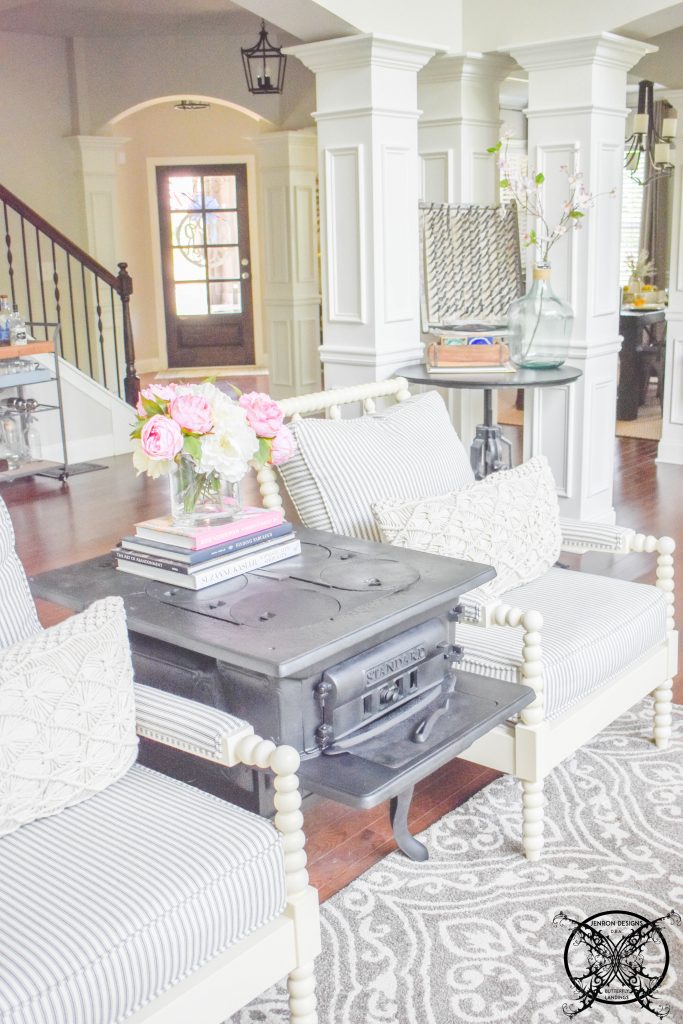
PIN ME for later and be sure to follow us on Pinterest at Jen @ JENRON DESIGNS
LOVE THIS PROJECT? Want to see more of my easy furniture refinishing projects check them out here:
Refinishing a Vintage Radio with Modern Technology
Wow! That is amazing! Looks beautiful! I have done some DIY projects, but none that have required that much work. Such a great idea.
Wow I am so impressed on how you turned an old cast iron stove into a beautiful rustic furniture! I love it!
Jen this is AWESOME! Is there anything that you can not do? If didn’t know and adore you, I would totally hate you, or at least be super jealous of all your talents. Not only are you beautiful inside and out, but you are willing to share everything you do, and put your creative talents out into the world for everyone to learn from and enjoy. You see ideas, assess them and share them with the world, which is amazing. Thanks for the daily inspiration!
Wow! That’s quite some revamping. She looks really good and classy. Great job and thanks for the step by step guide. Awesome.
Wow just gorgeous – I admire anyone who enjoys taking the time to refurbish anything!
Hey Lindsay you are just the sweetest! I actually did see this idea to use it a furniture from a friend, that I think inherited a cast iron stove from a grandparent. I recently learned that she too had to clean it up but did not know about the Cola and Brake Fluid Method. I actually learned about the Brake Fluid from a different friend while refurbishing my daddy’s antique guns which were ruined, so it has all been cumulative knowledge from so many amazing sources, that I just meshed together and shared. I like the best cook book of your grandmother’s with all the family recipes from over the years, every I know put something into it and I just mixed it all together and served it up on a pretty platter for everyone to enjoy.
I just love repurposing! I just turned an old wooden school desk into a plant stand
Oh my goodness. I would say this is unbelievable if I didn’t see the pictures. Totally amazing. Looks like a lot of work but the end result is super cool, I love it.
This has got to be one of my favorite DIY’s I love this idea now I want to go find and old cast iron stove to make an end table out of it.
Wow, Jen. What a makeover. So much elbow grease! LOL..I’m not sure I have the scrubbing power to take this on. Thank goodness this sweet antique is in your capable hands for all the love it needs for restoration. Now it’s a beautiful heirloom and conversation piece. Kudos girl.
I have enjoyed seeing you find the underlying beauty for this piece. This post spoke to me on so many levels, you perseverance to not give up, you faith to see the beauty that was beneath when others could not see it, the trust that it would all work out, it really speaks volumes about your character in addition to your undeniable talent.
Thank You it was a labor of love, thank goodness for tips from some friends about the cola and break fluid from a few other projects. They really did translate nicely on to this one, and worked like a champ on the years of rust and grease to let this old gal shine once more.
Jen I am in love with this new piece, my grannie used to have a old stove like this, and now I wonder what became of it, maybe I should go searching to give it a new home.
I have a few old antique piece I am re doing and I could use some advice, Do have any? Kindly share tips with me since I do not want to ruin these pieces that have been in my family for years.
I would say take your time and do your research. If you are new to a process, research it before you go into the project especially if the item is irreplaceable and sentimental.
I’m not that much of an online reader to be honest but your sites really nice, keep it up! I’ll go ahead and bookmark your website to come back in the future.
All the best
Thank you for posting this awesome article. I’m a long time reader but I’ve never been compelled to leave a comment. I subscribed to your blog and shared this on my Facebook.Thanks again for a great article!
You’ve got among one of the finest web-sites I have ever seen, with so many great tips, thanks!
Great website. Lots of helpful info here. I’m sending it to several buddies and also sharing in delicious of this refurb And of course, thank you for your effort!
Wow, this such a great transformation and I love that you are using it for a end table in your home now. Great job!
An impressive share this really turned out very nice, and I would have never thought to use it as a piece of furniture.
Thanks for such a inspiration post on how to upcycle pieces like this into everyday furniture. What a great idea, I bet your home is so much fun to walk through.
Very nice post.I just found your blog and wanted to say that I’ve really enjoyed browsing all your blog posts. In any case I will be subscribing to your feed and I hope you write again soon!
Thanks for posting this awesome article. I’m a long time reader but I’ve never been compelled to leave a comment. I subscribed to your blog and shared this on my Facebook.Thanks again for a great post!
Howdy! Would you mind if I share your blog with my myspace group? There’s a lot of folks that I think would really appreciate your content. Please let me know. Thank you!
Hi Felipa I always love to hear that my readers are getting a lot of information from my DIY’s I would love for you to share my link to your group, and feel free to Pin the pictures to your Pinterest boards via the easy pin buttons on my site, as well. Thank you!
What a transformation! So cool to see the entire process. I’m not crafty enough or have enough patience, but the finished piece looks amazing.
what a lovely post to read this morning! I love seeing old things being bought back to life! brilliant
No matter what you do it always looks great, I would have never thought to make a piece like this into an every day piece of furniture but I love how it looks.
Hey there I wanted to say how much I love this idea and your blog, Thank you for the great post. I’ll certainly comeback as I am a fan.
What a super idea to use this beautiful vintage piece as an end table, it really adds a lot of character to your space. I also learned a lot from the post about refinishing like using Coca Cola as a stripper, who knew?
This is such a wonderful idea for a for a farmhouse style living room, I must use this idea in my own home too! Thanks!
Thank you for the good idea I really love this concept of using a vintage piece like this as a end table. The refurbish DIY was also great!
Greetings from Idaho! I really enjoyed the information you present here and can’t wait to take a look when I get home, I have few other project like this myself that I want to try.
This was such a great DIY I too love antiquing and refinishing tresures like this one. Great job!
Such a great restoration of a vintage piece, you really did a great job!
Hi there, I have enjoyed this post and the final look of your stove. It is nice to see someone care for these vintage pieces.
What a great rehab project for this old stove, you made this old girl shine and gave her whole new life!
I like it when I learn how to do something fun like this, great site, keep it up!
Great project and DIY altogether, now you have simply received a new reader for life. Love all your ideas and style it is spot on and so refreshing.
Magnificent blog post! The account aided me a great deal in a current project I am working too. Thank for the advice on the Coca Cola trick it works wonders on rust.
This is such a great project and it really looks great as an end table in your home. I love to see old pieces find a new life again.
Thank you so much I have considered the career opportunity before since I am Faux Finish certified for restorations and such, however sometimes when your dive into those things, and open stores in a specified area if can suck all the fun out of things you already love, to do as a stress relieving hobby for yourself. So I am keeping this little treasure for myself and only very close family and friends to preserve the quality of what I do, as a true artist would.
Hello, thank you for your info – I have certainly picked up something new from right here. Well I’m adding this RSS to my email and could look out for much more of your exciting content.
What a fun little project to refurbish this old stove, and a fun reuse as furniture too, Cheers!
You really make it appear really easy together with your presentation, however it sort of feels too complex for me. I’m taking a look forward on your subsequent publishings, I will try to get the hang of it!
I Love this project for a vintage stove to become a end table what a great reuse of this old stove.
This post caught my eye and was very interesting. Thanks. I have a question for you did you really use Coca Cola as a stripper? I have heard about this method but Find it hard to believe that it really works since we drink it every day. Which makes we recalculate everything.
Hi Brianne, yes we did actually used Cola as the stripper to remove the rust, as scary as that may sound. I did use an off brand, Like Chek Cola, or a Dollar Store Cola to save money but you get the idea. To be honest I remember when I was a kid and my brother would work on cars, he used Cola to remove corrosion on the battery heads and to clean the windshields. Which is where I got the idea from plus you can Goggle it too. Sorry to bust your bubble, however it has not stopped me from drinking it, I still inhale copious amounts of it.
Great article. Keep posting this kind of info on your site. I’m really impressed by your site and ideas.