
DIY a Deconstructed Sofa
DIY a Deconstructed Sofa now you can follow me through the process of how I took a basic thrift store sofa and deconstructed.
I found a thrift store sofa for $25, created a little DIY a Deconstructed Sofa and now have a brand piece of furniture. I have always said “if I can not find what I am looking for I will build it instead.” Well this time I actually deconstructed it in my DIY A Deconstructed Sofa DIY. This sofa project was inspired by one of favorite bloggers, Liz Marie and her beautiful deconstructed sofa, which I have been internet stalking for some time now.If you have not seen hers you should absolutely check it out. 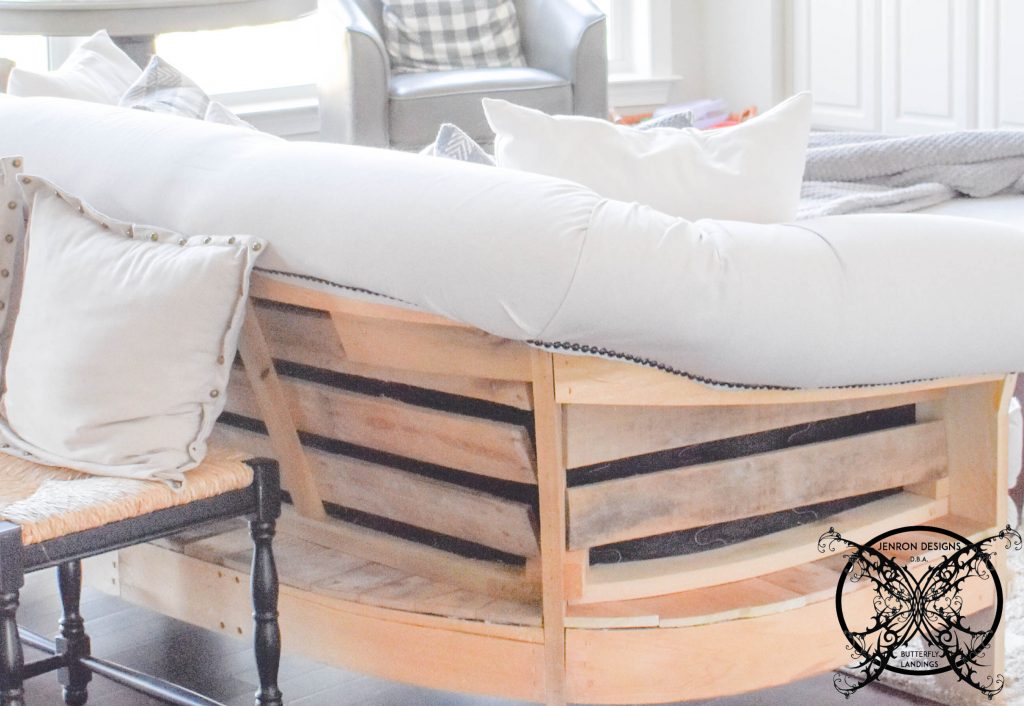
While I adore many of the deconstructed sofas out there, I wanted something unique to my home, custom, and it had to be pet friendly. Plus heaven knows, we are always up for a good DIY challenge. Also, as pet owners we are always challenged with finding upholstered furniture that can stand up to our pets and their claws, so we figured deconstructed seems to be what they create anyways, so why not just embrace it and go with this beautiful pet friendly furniture trend.
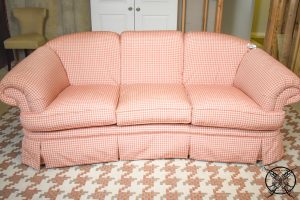
The Before:
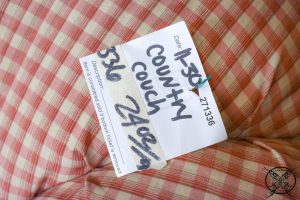
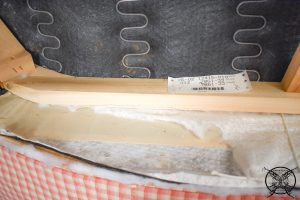
So, here are all the details on how my DIY A Deconstructed Sofa project went down. These are the before pictures of my Goodwill find that I was able to scoop up for $24.02, I know such a random amount, but I even photographed the tag because I wanted to to document the entire process.
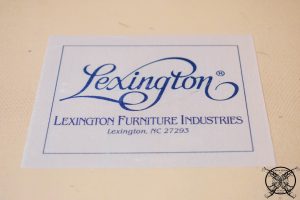
 Okay, so here is where a little bit of the magic comes into play, and let me say I knew this before we bought the sofa, while I was inspecting it at our local Goodwill. This is where all those furniture classes from my Interior Design degree came in handy. This is a Lexington sofa, that means this was originally approximately a $3,000-4,000 custom order sofa probably from High Point, NC around 1997-2002.
 If you don’t believe me google it, it was sold under a high end furniture company’ similar to Tommy Bahama. Yes, now you can find their furniture on Wayfair and other online retailers for much less, but clearly today.
 So, I knew this would be a high quality frame and construction for our project, plus it was in great shape with no stains and the cushions where still like new, not even broken down. So I feel like this piece was never really used to begin with, probably located in someone’s formal living room, you know the room where no one was ever allowed to go into or God forbid sit on the furniture, LOL!
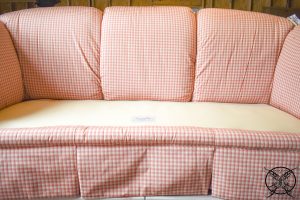
Deconstruction Day, Not Demo Day:
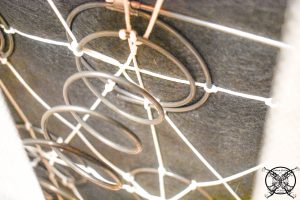
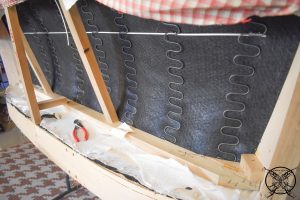
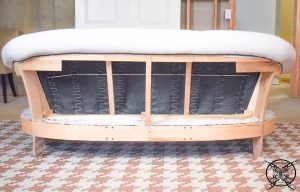
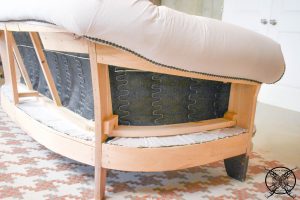
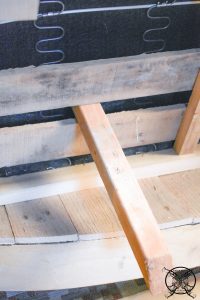
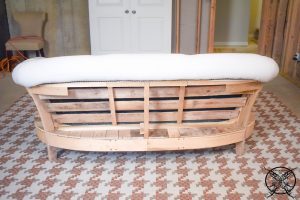
When it comes to the DIY a Deconstructed Sofa furniture, my biggest tip would be to go slow and cautiously; because you never really know what lies beneath and what you need to keep. So as much as you want to just cut into the sofa with a razor blade to see the insides, I highly recommend a more surgical approach to this project, it will serve you well. Also, I recommend working at a comfortable height so elevating the piece up onto a sturdy surface is also a back saving tip.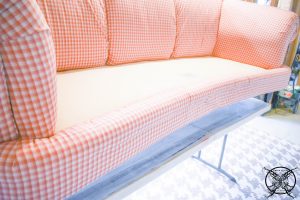 As you can see, we slowly cut into the back of the sofa to reveal the frame and spring construction. If I had just willy nilly cut the fabric I may have cut some the 8 way hand tied ropes or fabric pulls that hold the construction and integrity of the sofa springs together.
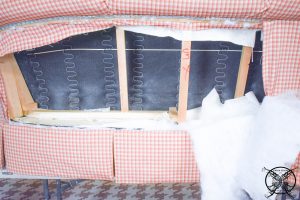
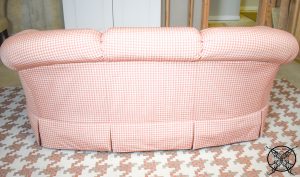
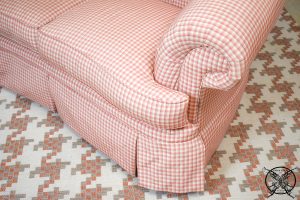
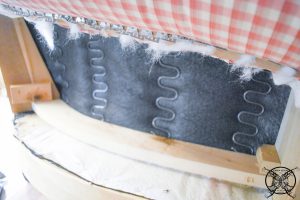
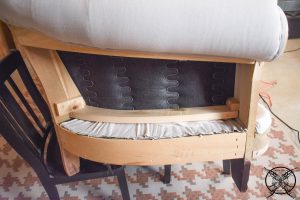
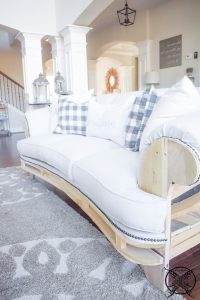
 Of course, all the filler and batten on the back side of the sofa was slated to go away for that deconstructed look. The skirt was removed as well and the legs, which were stained, were easily sanded to remove the color, to keep the natural raw wood tones. The only question was how the rolled back was going to work?
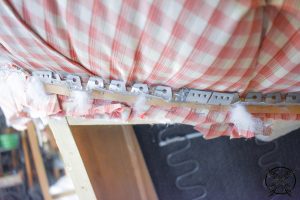
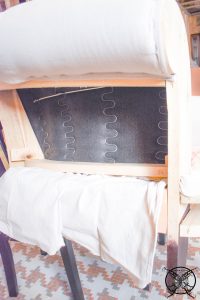
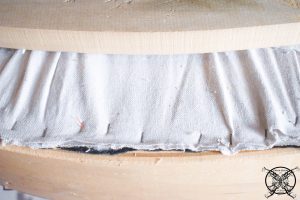
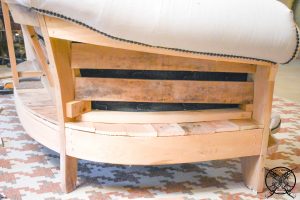
 I realized that the fabric was stretched over the back through the base of the frame, seen here and covered by this muslin, gauze like fabric. I decided that was the the way we would recover it. The existing fabric was clean, with no smells or stains. So, we would use the old fabric as a base to hold all the front foam in place.
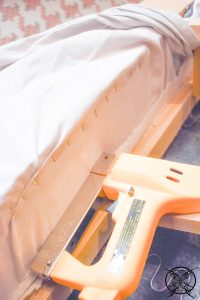
 So I cut just above this grommeted fabric pull and removed the entire piece exposing more of the frame work on the back and sides. I used a staple gun to tack the existing fabric in place, to hold it until we were able to place the new fabric on the back of the sofa.
 The front of the arms were a complete removal, since I wanted to expose as much wood as possible. This is the area where my cats like to claw, so to have fabric here is just asking for trouble. So all of this fabric was removed. I made sculpted razor cuts to the very edge of the rolled arm and removed the entire front portion. The front edge of the sofa fabric was removed as well, along with the front skirt.

Reupholstering 101:
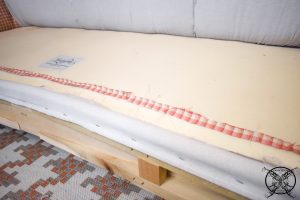
Okay, so I chose to use drop cloths available from any home improvement store, as my fabric. This is a very durable fabric and very cost effective as well. The entire sofa, including the cushions, took a total of 2 drop cloths; which were around $12 a piece, so $24 in fabric total. The cushions were completely outside of my wheel house, so I had my local upholstery guy Mike, at Riviera Upholstery recover my cushions for $55 a cushion. So, for 3 cushions I paid $165, which is a total deal for this sofa so far.
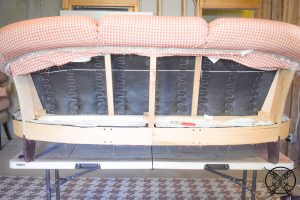
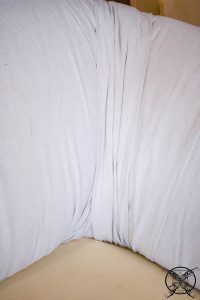
 Okay so on the next step, like I mentioned above the front fabric feed through the bottom to the back side of this sofa to attach and secure from moving. So we found the center of the drop cloth laid it across the sofa back and attached the finished edge to the frame back with staples.
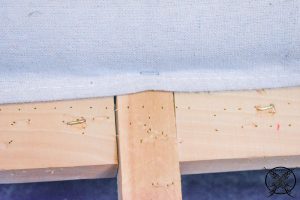
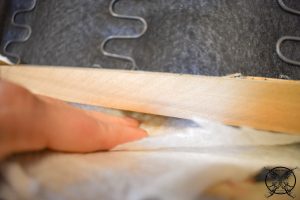
Then using this very specific tool, y’all it is a paint stir stick, we pushed the fabric though to the back side of the sofa. Once we smoothed out the wrinkles and pulled the fabric tight we stapled the fabric to frame in the back, and cut off the extra remaining drop cloth.

 I believe you can see a more detailed shot on the side pictures of each step in this process. To me a picture is always worth a thousand words.
 The arms had a little more finessing involved, since you have to pleat the fabric to create the rolled edges. We also had to pleat the areas in the back corners as well. You kind of have to think of it like wrapping a Christmas present, it needs to look nice and neat and the staples are your tape to hold all the fabric in place.
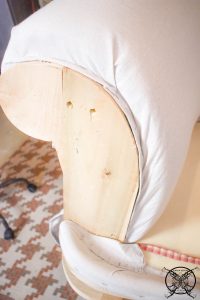
 The front edge was just a small strip of drop cloth stapled down along the front edge and then wrapped at the corners.
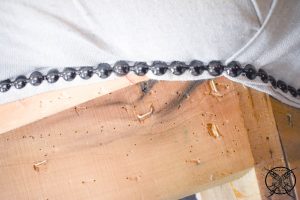
 You may also have noticed that I left just a little piece of the the original fabric behind, which was absolutely intentional. I wanted to have a little souvenir of the this sofas pervious life. Just a little keepsake or momento, tucked away, that means something to us, and the project that we worked on together.
 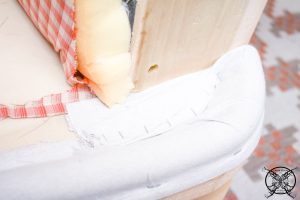 Since it is not visible, you would not ever know it was there unless you were going to flip my cushions over….which means you are hiding something like a spill, well we scotch guarded it too, so no worries.
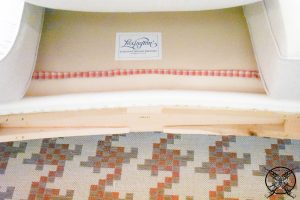
Just Use A Little Tack:
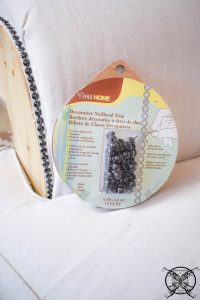
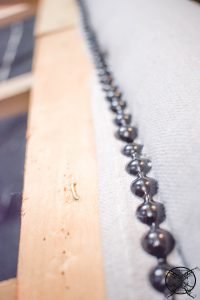
These furniture tacks are a true life saver and they cover a multitude of flaws, staples, and other things. The part I loved about these, are they come in a roll like ribbon and you only have to put a tack in every 5th space which saves a bunch of time. Plus it keeps the tack line straighter and the spacing even, so if you might be prone to a little OCD like me…. I highly recommend these.

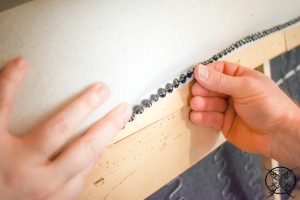 So like I said, these made the job go super quick, but our one and only tip would be to wrap your hammer with duct tape. This will prevent the tacks from getting scuffed when you hammer them in to the sofa. You can try a rubber mallet, but we found this was the best method.


Baby Got Back:
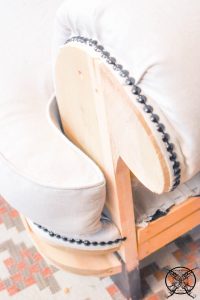
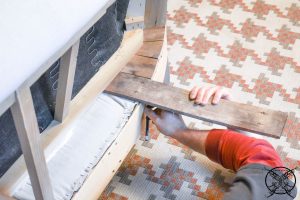
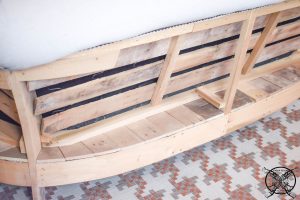
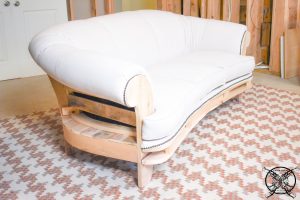
After looking at the sofa back I came to the conclusion that I wanted a wooden back,; not burlap, which is seen on most deconstructed sofas. The reason for my decision was burlap is made out of hemp, and my cats LOVE hemp, since it is in the catnip family. Let me just say, that burlap tree skirts at Christmas are no longer happening around here. 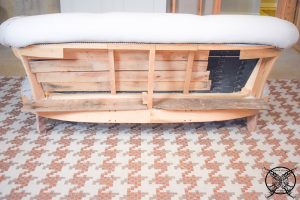 So with that knowledge, we knew burlap would just get shredded on our sofa, so pallet wood became our go to choice. We started to play with different ideas of how we wanted it to look, and decided to cut small pieces to cover the fabric decking on the the back and sides.
  This was an easy process as you insert your pallet board, draw a guide like and make your cut.
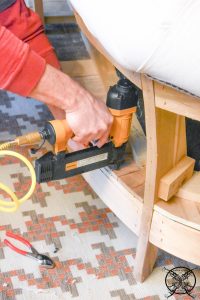
 Then you nail the pieces into place using a nail gun with thin brads. This will help the old wood from possibly splitting.
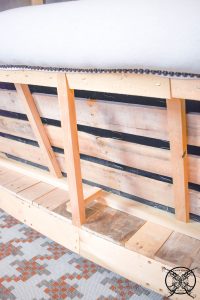
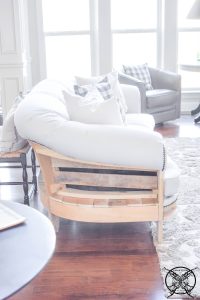
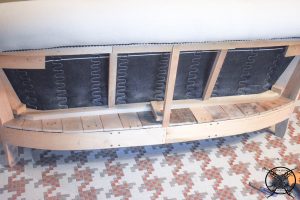 The next part was the vertical back pieces which was a little bit more involved, since the boards were not long enough to stretch the full length of the sofa. Ron ended up hiding the seems behind the support boards already in place. So really you just need to make sure of your lengths and cuts. “So measure twice, cut once”.
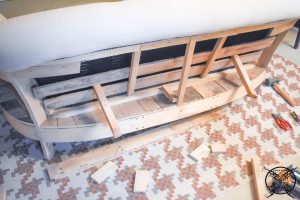 We used left over pieces of 1×2 for spacers to get the boards level and evenly spaced. Think like spacers for tiling, so those grout lines are nice and even, right. Well, we wanted the black opening to be nice and even as well.
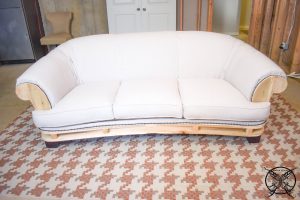
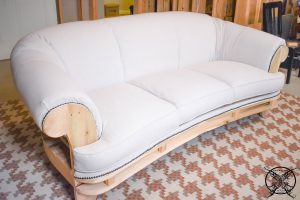
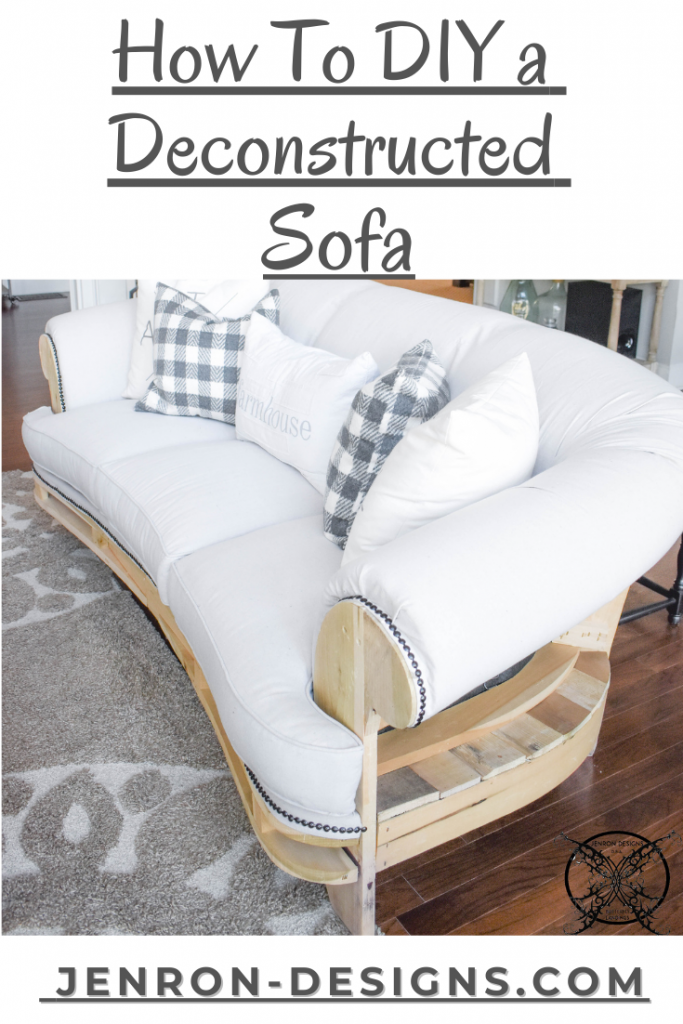
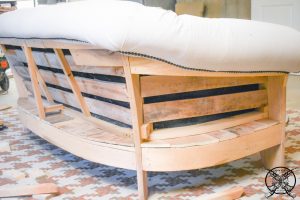 I love the final result and I think it will also protect this delicate fabric on those springs from my little beasties. It also has a very rustic look, like an old farm fence or front porch swing, which is charming unto itself. So for $213.02, I now have a brand new deconstructed sofa, lol. I feel so weird even saying that, it seems so counter intuitive.
Our Deconstructed Sofa:
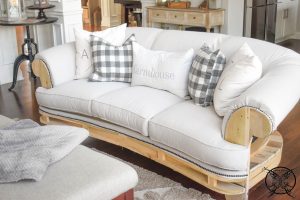
So after the DIY a Deconstructed Sofa we got the new sofa all scotch guarded, waited for a pretty day where it was not raining and we moved her, from her temporary home in the basement for the last couple of months where we have been working, to her permeant home as the focal piece of our living room.
 I have to say that this sofa is so comfy and actually sits better than our previous leather sofa that we have only had for 3 years, which proves quality construction truly will hold longer. I personally have never invested that kind of money in a sofa because anyone that has pets or children know’s they get ruined so quickly, and that it is never worth the price you pay.
 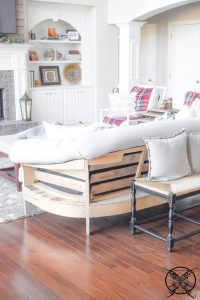 However, with the proper construction to keep my pets from destroying this piece, I may be able to keep this one for a long time. So Highpoint furniture makers, I am ready to help design pet friendly furniture anytime, you know where to find me!
I staged the sofa with some of may favorite pillows which I have gotten a lot of question about, so here is the scoop in them. The ATL pillows were a limited addition pillow created for the re-launch of the Atlanta based Frontgate store at Phipps, so they are currently not available. However, Ballards their sister company does have a great Atlanta line of pillows right now, so check those out. The Farmhouse grain sack pillow is handmade from my friend Lara at Decor JS Designs and I just love her stuff. We met at the Pinterest conference last year, and I will be a guest speaker at her Old World Market April 5th. the next dates will Oct 12th & 13th. Finally the buffalo check pillows are from DecoNovo set of 2 for $13.99 via Amazon Prime.
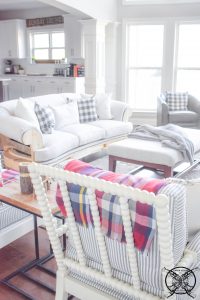 I also just had to post this picture, since I worked so hard to stage the room and put a pretty blanket on the back of the sofa, draped all pretty. I go to my office to grab my camera off the charger and come back to find Dexter has nestled into my blanket and knocked it off into the floor, yep this is the true life of a blogger. I guess I could yell and scream at him and run him off, but why? Just to get that perfect magazine shot and ruin his day, yeah it’s not worth it. This was a project all about making pet friendly furniture perfect for our little family, so I figure just embrace what it is, and go with it, right?
 Be sure to check out our next projects in this room our DIY Stenciled Tabletop it really looks great with this sofa.
PIN ME for later and be sure to follow us on Pinterest at Jen @ JENRON DESIGNS
LOVE THIS PROJECT? Want to see more of my easy furniture refinishing projects check them out here:
Refinishing a Vintage Radio with Modern Technology
I am totally in love with your new sofa creation, this is marvelous. You have such an amazing eye and so much creative talent. I really want one now.
Wow is all I can say, this really has showcased all you talent and skills rolled into one post.
So good, this is by far one of my favorite projects you have done. It really makes me want a deconstructed sofa for my home.
I have gotta say I am not normally a fan of the farmhouse style but I do really like this deconstructed look for furniture. I am not sure why but it really resonates with me, and this piece, with all the exposed wood it really very pretty.
Jen you are clearly the designer extraordinaire, this sofa has gone from rags to riches in my opinion and is truly a beautiful addition to your home.
Great job girl, this really looks awesome and you saved a ton of money too.
You have totally enchanted my heart, I love this sofa and must have one or create one similar for my living room. Also it is one of the best DIY’s I have seen on Deconstructed Furniture, a lot of them leave steps out and tadah it is finished, but yours is very concise and through. Thank you.
I absolutely love it my friend. Highpoint needs to hire you for a consultation.
You know how I love to thift, so this is a topic that really got my juices flowing. Your sofa upcycle turned out great and I really like the deconstructed look.
What if I wanted one… how much would you charge?
Love the final result! It super interesting to see the process of this, I’ve never seen a blog post like this, definitely keeping my eye out for more
Your sofa looks great I really like the back being mostly wood too, instead of burlap. It certainly seems more durable.
JEN!!!!!! THIS IS GORGEOUS!!!!! OH-MY-GOSH I AM IN LOVE!!!! You truly are my inspiration!
I have not heard of a deconstructed sofa before but I like it a lot. While it has a rustic feel from the pallet wood you really used it a classy way to dress it up and make it looks nice.
Incredible great job, its like a complete new sofa with a totally different style well done.
This is an interesting idea especially for pet owners, when their furniture has been destroyed.
Hey Robin so glad you stopped by! Oh my goodness you are completely flatter me. I am not sure that I am good enough to create one for someone else, LOL. This was my very first endeavor at this type of project so I would really need to do a few more before I even considered doing this for to try and sell. It was really more of a teaching post to share with others that might have the same desire I did to give it a whirl as a weekend hobby project, but I appreciate the vote of confidence. Maybe I really should really pursue this in conjunction with a few other big picture projects we are mulling around right now.
Oh how I love this, you know how I love your DIY’s! Great job and this deconstructed trend is really catching on right now.
Wow this is amazing, and such a great deal for a a beautiful sofa with a little work.
Such a fantastic transformation! And what a steal, I’m familiar with Lexington, they make such beautiful furniture. My childhood bedroom furniture was from there. It really does look perfect in your living room as well! The tacks were the perfect touch…they really bring it all together!
-Madi xo |
I am so amazed at this sofa project now I just want to come see it in person, it looks so comfy.
Wow! That is the most creative couch refinish I’ve ever seen! Awesome job!
Wow – fabulous result with the work that you did. Love the fabric – a cool neutral – goes so well with anything.
OMG… drop cloths what an amazing use of them,I can believe I never thought of it. I have made drapes and dust skirts but never upholstered with them but you better bet I will now.
Wow! You are crafty! I would’ve never thought to do this. I’m amazed at the difference. Great job.
I am so glad you posted before pictures because it looks so good I would never believed it was a reupholster. It really looks like something you would buy direct from a farmhouse furniture store.
I am super impressed! This looks AWESOME!
Girl I am in love with this, do you think everyone will be running out to Goodwill and buying sofas to rip up? I do, LOL.
This really looks great you never cease to amaze me with your out of the box projects!
Jen this is awesome!! Now my wheels are turning and wondering about doing this with my sofa!! 🤔
I am loving every aspect of this sofa, not that the original was bad but you really took it to a whole different level of rustic chic design.
Such a fun idea and love that you always are willing to try new things. Nothing ever seems to scare you, in that regard I wish I was more like you.
What a beautiful creation, and inspirational post on how to make your ideal furniture pieces for your own lifestyle.
I am so in love with your sofa, I need one like this in my life.
Beautiful and inspiration and true creation from the heart, just like you.
I must say I have not been a fan of the deconstructed look on some of the sofas I have been seeing. Mainly because they look so unfinished, or like the crafter did know what to do with the fabric so they just left it hanging or stuffed it to the back, but you really took the time to create something finished and beautiful. While it is rustic and deconstructed, it still looks like a beautiful crafted piece of furniture not just something that was pulled out of an old shed that you are afraid to sit on for fear of bugs living inside. Great job.
We just love this idea and the execution and tutorial are great, thank you for sharing.
WOW can I have one too? I really love how this looks, I hope this trend becomes more mainstream and we see them everywhere, I really do not think this is in my wheelhouse, but you did a great job.
This really turned out nice, and I really enjoyed seeing how you worked through the process and learned a lot.
Jen I really do love what you have created here it really is exceptional.
Bravo my dear this is a really game changer here you are really changing up the world of home decor blogging. It is not all just the home shopping network anymore, LOL.
It reminds me a little bit of those bed swings but in a sofa form. I love how you transformed the outdated sofa to something a little bit more modern.
So creative and the finished product is really nice, and very unique. I do really like how the back is wood instead of the burlap seen everywhere.
Love this look so much and the wood back you created is absolutely beautiful.
Fantastic! It has been a while since I have commented I know but this post was so worthy of praise! Love it so much!
So pretty my girlie I just love those tacks your added they really elevate the design too and give it a mod feel.
This is really a good looking sofa from what you started with, I am really impressed.
Such a great idea, very innovative and unique.
Deconstructed? What will they think of next, lol I do like how it looks but it seems like today everything if deconstructed, food and now furniture it is just funny.
The wooden back is so lovely you took the basic bones of the sofa and really made them beautiful.
So much talent that you possess, every time I read a new post I think what next, this girl has got to run out ideas soon, lol but you never do. Sending good vibes and much love.
Love it! The drop cloths were a great tip for inexpensive and durable fabric.
Girl you really out did yourself here, this is amazing and the price can not be beat!
Ooohhh yes this is soo good, and love the wooden back verse a standard burlap or fabric back. It seems more durable and gives it and vintage feel.
OMG I LOVE THIS SOFA, I REALLY WANT ONE NOW! CAN YOU MAKE ME ONE TOO? I AM PRETTY SURE I HAVE NO TALENT TO DO THIS AT ALL.
You did an exceptional job on this reupholstery project and really appreciate the end results.
Not that the original sofa was that bad, it was in good shape for a goodwill thrift find, but you really elevated the look to something very current and modern.
Wow that is quite a transformation, you have some amazing skills.
I have never heard of deconstructed furniture but I can say I like the rustic look of it. You must be on the pioneering stage of this home decor trend.
Love this idea and it looks great.
Yes I can see this trend taking off especially for people with pets, I know my cats have destroyed my sofa wooden arms and back would be very beneficial in our home.
So pretty and perfect for a kid and pet friendly home, great before and after pics, this is a stunning transformation.
Jen this sofa is beautiful, and really suite your lifestyle. You guys did a great job.
This is such a beautiful piece that you have created for such a low budget which is awe-inspiring.
Girl I am loving each inch of your new sofa creation, this is absolutely gorgeous.
I am really not sure how you came about this project but I really love the results. You have a one of kind, work of art in your home now
Thank you for crafting such a useful DIY on this topic I am pinning this one for later with our home purchase.
Such a great job you are very talented.
Shoot I am in love with this idea, I want a whole house full it.
We love your blog and are following you. This DIY is one of our favorites to date along with your pantry.
It was so nice to meet you at the conference and I am so glad that I checked out this post. Very nice article and project.
You did such a nice job reupholstering this sofa I really like all of the wood elements you added too.
Oh my goodness I really love what you did with this sofa and that you used drop cloths, brilliant.
Yep this is all I want for my living room now. Thanks for the detailed DIY I can see one in my future soon.
Such a inspirational transformation for those of us that stuff from pet damaged furniture and a light at the the end of tunnel for sure.
Whoa this is really a great DIY they way you added the pallet wood on the back is awesome.
Jen this is gorgeous! I love it and it really looks great in your home.
Okay so I am completely in love with your sofa, which is one of kind and I must have one, but I am not crafty, at all. Do you think I can get a local reupholster to replicated this? I guess anything is worth a shot since I love it and live all the way up in Michigan.
What a great look sofa. Thanks for all this information.
This looks phenomenal I am shocked that you picked it up from a thrift store and that is was in such good shape. Your DIY projects are always so neat to read and inspirational, thanks.
I have to say you did stellar job on this sofa, I would totally buy one just like it and pay top dollar for it. It is gorgeous and farmhouse fabulous.
Such a great looking piece of furniture you truly have such a gift for design.
Girl you knocked this one out of the park such a great article and step by step DIY.
Wow this is really cool and very impressive woodworking skills too.
This is a very interesting idea for furniture, and this design is incredible! You most certainly know how to keep a reader amused.
Bravo this is such a wonderful upgrade to that pukey sofa from before, you did it a favor and put it out of it misery.
Such a neat sofa and it really does look good, you guys have so much talent and it shows in all the project you do.
Such a lovely upgrade to a classic furniture frame to make it more farmhouse friendly. I do love that it now a pet friendly variety too, that is a huge selling feature furniture company’s should look at.
Oh wow! What a cool process! That was fascinating and the finished product is really stunning!
Wow this is really pretty it reminds a bit of those porch bed swings which I adore. Very nice job sweet lady.
Saw this in your newsletter and just had to comment on how great your new sofa looks. I have to say the original was a pink nightmare, and I seem to remember that fabric from the mid 90’s too, ha ha.
This post was worthy of me leaving you a comment, I read your stuff all the time, but this was one of my favorite articles to date. I really like to see the before and after and how you are creating these master pieces.
Seriously an amazing transformation of the original sofa, loved the detailed DIY too! Super impressive and really nice work.
Girl…what? You are just making your own furniture now….come on, that is amazeballs. Great job.
I am truly loving on your sofa right now, this is such a great idea and gorgeous DIY.
LOVE IT! This sofa is truly a beautiful creation and I am so jelly, now I really want too.
Great stuff, and really neat idea.
What a good looking piece of furniture you created.
Incredible DIY and plenty of awesome pictures and information.
Abnormal post is totally unrelated to what I was searching google for, nevertheless it was indexed on the first page. I suppose your doing one thing proper if Google likes you sufficient to position you at the first page of a non similar search, lol.
Oh my goodness this is amazing! First of all what a find, and second wow how creative to see the end result of where you were going in that project.
Love you blog the girls and I can’t wait to see you new posts!
Love, love, love this so much it is one the best things I have seen in long time. You go girl!
I really like how this sofa looks it is a neat mix of rustic and outdoorsy. Nice job.
Gurl you are so talented this looks amazing, the before picture is soooo 90’s but you really gave it a new life.
This is one of my favorite DIY that you have done to date, I am pinning this one!
What a fun way to create a deconstructed sofa for a fraction of the cost. I have priced a few and the range 3,000- 7,000 for a sofa which I think is crazy, you basic made this for under $500 if my math is correct.
Jen this sofa is beautiful and you did a great job giving it a new life with a modern look.
We love your stuff lady! Keep up the good work your fans at Pelican Bay ~ Bahamas
This is such an impressive DIY you and your husband certainly have the creative genes. I love your site and enjoy seeing all your home improvement adventures.
Wow this is really cool I love the wood back and that you used drop cloths! That is genius and you saved a ton money.
I wanted to leave you a comment because I have been stalking this page to recreate this very sofa. I love all the details and pictures your have included I am still working on mine but I wanted to thank you for all the help along the way.
This content is really amazing and ground breaking in the way of DIY and home improvement. You should be very proud of your work.
I have not heard of a deconstructed sofa but I do like the way your new creation looks and it is so perfect for pets and children since they are both very destructive. Great post and I looks forward to many more like this.
What an amazing transformation I love this new sofa design you created it is unique with the wooden back unlike many of the deconstucted sofas I have seen before. Fantastic job, pinning for later to recreate.
Wow this ingenuity you have exhibited is inspirational, this would also make great outdoor furniture too which our congregation is looking to add in garden space. The pallet idea is an exceptional way to create a cost effective seating space, thank you for you ideas.