ORC The German Schmear
This week we doing the ORC The German Schmear for our Faux Brick Walls, are you ready?
Okay so, this is the week you have all been anxiously waiting for, ORC The German Schmear. This is the week we will transform the traditional looking red faux brick walls into an old world, industrial, vintage brick creation. All with a little joint compound and whole lot of patience.
WEEKS AT A GLANCE:
WEEK 1 WEEK 2 WEEK 3 WEEK 4 WEEK 5/6 WEEK 7 REVEAL
Just in case you maybe wondering exactly what The One Room Challenge is, here is the link, and the scoop. This event was originally started by Linda Weinstein @ Calling It Home. It is currently hosted twice a year, in April and October for the past 15 seasons. The ORC has hosted over 500 interior designers & home decor bloggers, that have joined together in this challenge to makeover one room in their own homes. The participants normally have a total of six weeks, from start to finish, this season will be eight weeks to complete a full room transformation. Over 3,800 rooms have been transformed through the One Room Challenge to date, and many spaces have been recognized and featured by several prestigious sites, such as Better Homes and Gardens.

THE BASEMENT FAUX BEFORE PICTURE:
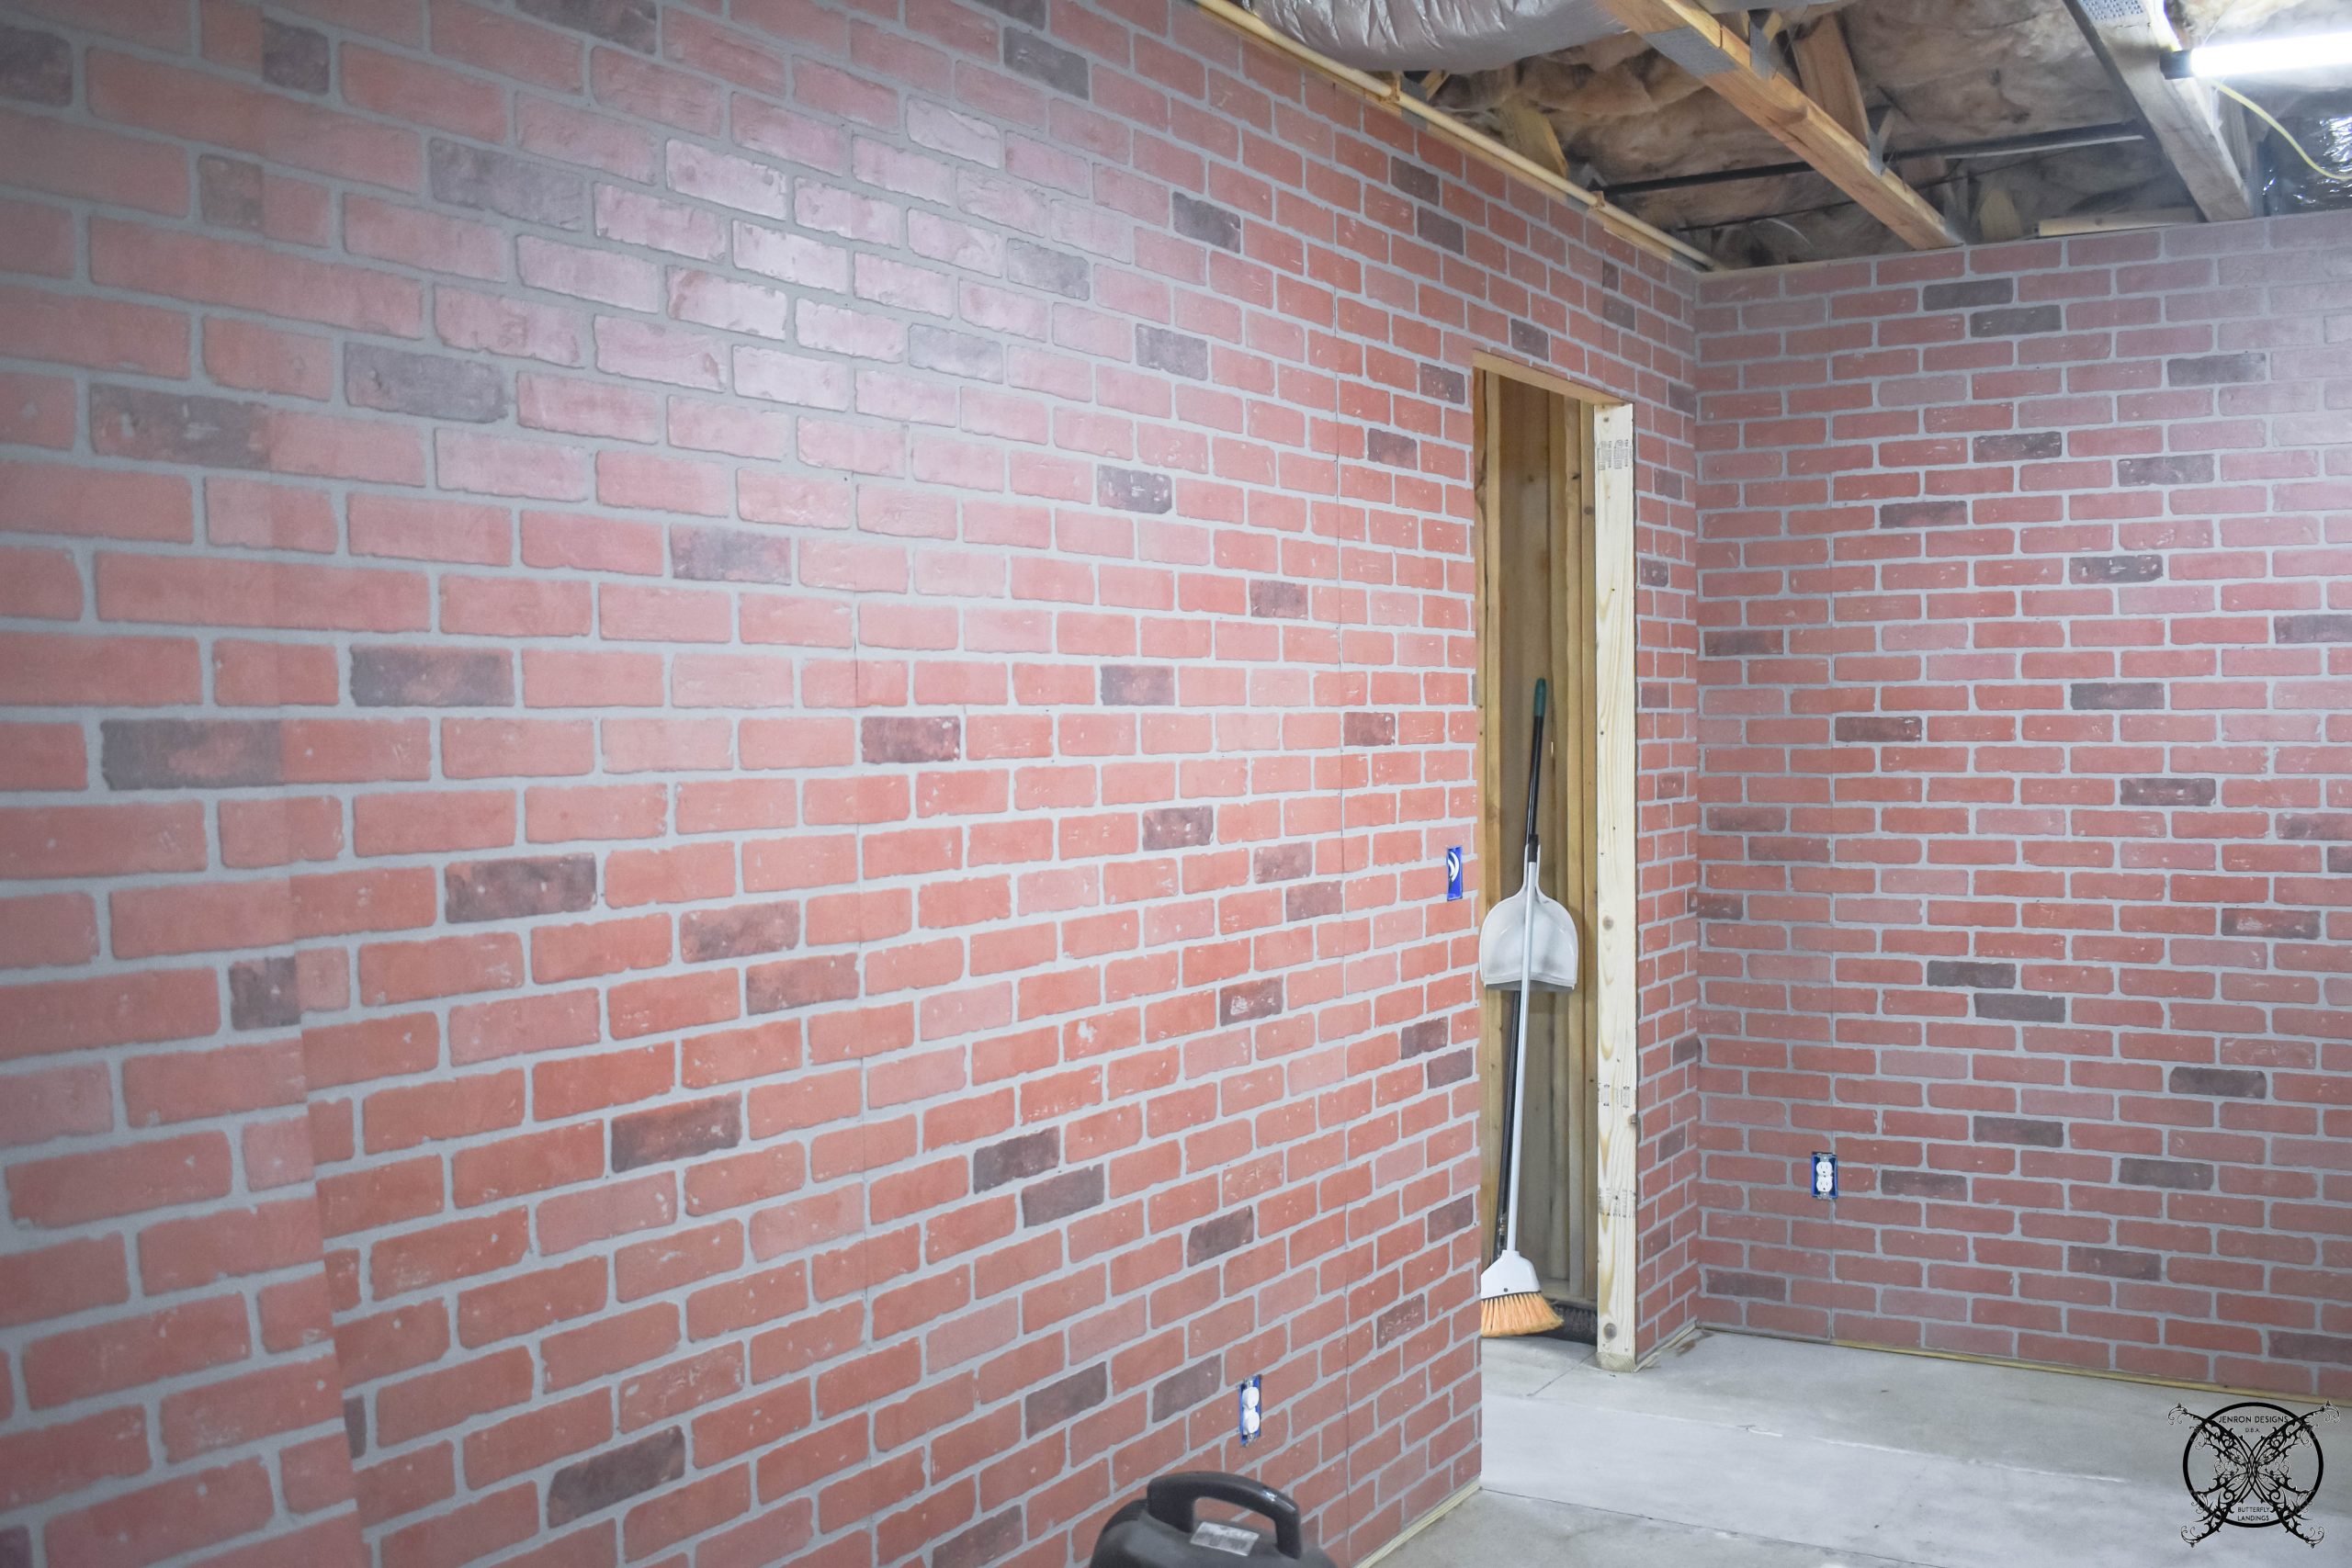
Here is where we left off last week after getting all the faux brick panels installed in my new craft room. This week I am planning on adding a German Schmear technique over these faux panels to add a more realistic look and feel to faux panels. I mentioned last week that I had been looking at these panels for about 5 years now and working with several techniques to create a look that also feels more realistic for this application.
 I also mentioned that I was a certified faux finish artist, so a brief background about that is that I took several seminars and classes back when I was in college for Interior Designs and got my certification at the same time. At the time all the rage was Sponge Painting (aka Ragging or Rag Rolling) ironically now this technique is making a huge come back. I learned how to do many other techniques like\ Marbleizing, Trompe-l’oeil, Frescos (like skies or cloud), Graining, Color Washing, Strie’, Venetian Plaster, Gold Leafing, Stenciling and Murals. While I have never really followed into this field professionally, I have done several faux finishes for myself, friends, and family members over the years, so the knowledge never went to waste.
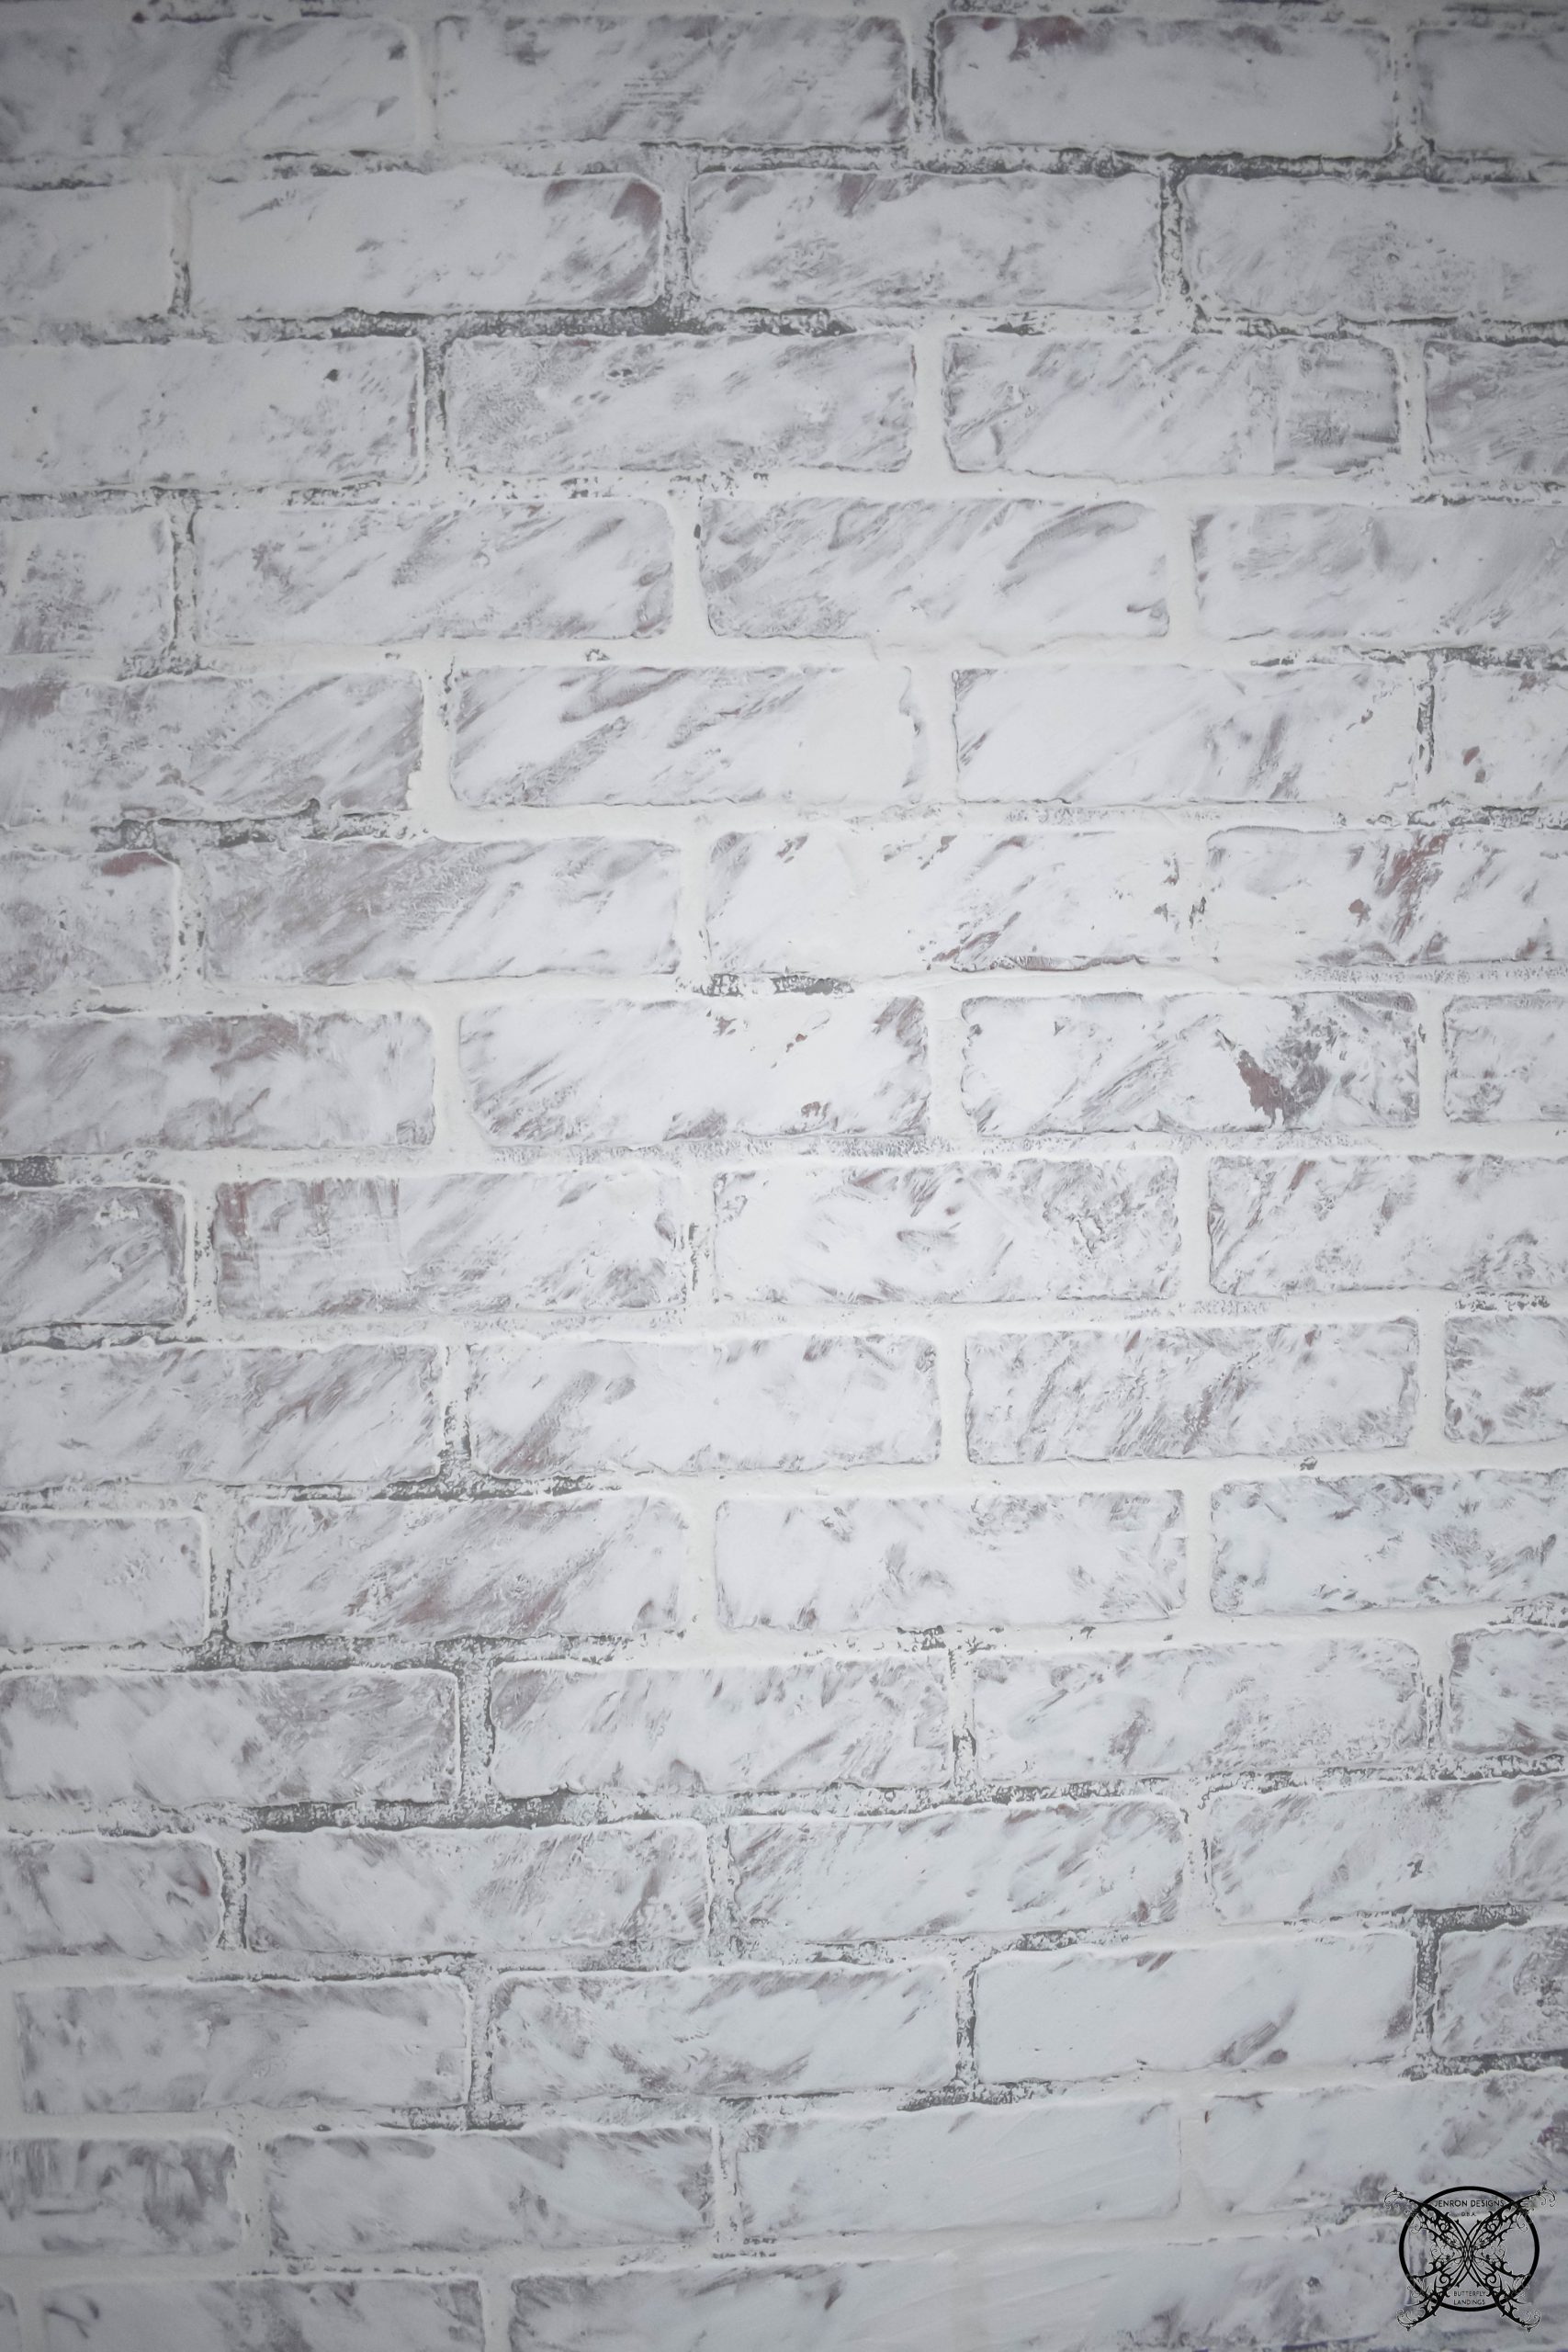
 Okay so here is the scoop on how to make it seem more realistic on those seams and give it a different texture. I did two passes over the faux brick. The first was with a basic dry wall mud to fill the seams and create a visual interest in random patterns and areas seen above and below. I found the more random the patterns the better. My tool of choice was a dry wall mud knife and sometime my hand. If you can imagine giving a 2 year old wet clay and a wall, this was what the technique looked like, no real rhyme of reason to the application.
 The seams are always going to be in a straight line, which can be problematic unless you hide the lines. There are a couple of ways to hide them: one is by making it not seem like a line anymore, draw the line out and away from the seam.
  You can also do a tight fill where you only fill just the crack and sand it down to make a smooth surface. Just like if you patched dry wall to hide the line as well.
  Once I had all my additional patterns and fillings in place and allowed it properly dry I moved on to the second pass. For this I used the dry wall mud that goes on pink and turns white when dry, that way you know. It also gave a slightly different shade of white in the final finish of the wall ,which adds to authentic look of roughed up brick.
  Now it was time to do the German Schmear, for this step I used a basic all purpose joint compound which runs about $15 for this 5 gallon bucket. A total steal for a wall resurface material, heck it is less than paint. I wish I could tell you there is a specific tool to use, but for me I just like to get my hands dirty. So my tool of choice is seen below. I will give you a little warning; it is a little rough on delicate hands, so be prepared, I drew a bit of blood in the process as I passed over the seams but that is all a part of the authenticity of the faux finish right? While I am sure you could probably wear some gloves, I don’t even wear them to garden because I am such a tom boy…so good luck on having me where them here. Besides true artist use their hands….LOL!
  As you do the German Schmear you will want to work your way around the room and always make sure to finish in a corner when you need to stop. This will insure that if you come back on a different day that your entire wall will look consistent, with your hand pressure and mud strokes. Again it is the same mind set of a two year smearing paint around, no particular way, or you think about Karate Kid and do “Wax On, Wax Off” but I found this gave a bit of circular motion to the over all look. You will want to step back a look at your finish, again it is subjective to what you like, you perspective of what aging decaying brick would look like. My advice just don’t over think it, or try to contrive it, because it will show.
  As the mud dries you can add more mud in areas that you may want to have additional coverage. Also you can scrape off areas with a putty knife for a more rustic look as well. This can allow you to create a more industrial roughed in look, which is what we were going for. So what do you think? Are you going to German Schmear everything in your house now? I can tell you we love it and the results are so much better than we ever expected.
  Plus I love how it looks on the faux brick, however I am not sure that I would want to commit to doing this on real brick since you would be completely stuck with this finish forever. Trends and taste change way too quickly for that, which is also the part of the beauty of using these faux brick panels, easy future removal, even easier than wallpaper removal, and besides you would have to re sheet rock anyways. Check out next week where we stencil and paint the concrete floor, which can also be covered later with hardwoods as well. Designing a workshop on dime, with the ability to easily upgrade at any point.
THE PROPOSED REMAINING SCHEDULE:
WEEK 1: Introduction & Inspirations
WEEK 2: BLUEPRINTS: Figuring up the amount of supplies needed for all DIY builds
WEEK 3: Building Walls Pulling Wire & Running Electrical
WEEK 4: Insulating & Adding Brick Panels
WEEK 5: Cancelled by ORC
WEEK 6: The German Schmear
WEEK 7:Painting the Floor
WEEK 8: Casing Trim Out, Barn Door & REVEAL
Ah the long awaited German Schmear! it came out really well I love it! And can’t wait to see the room in a couple weeks. Thanks for sharing your interior design knowledge too, it’s truly fascinating!
This looks great! White always does spruce up any room 🙂
Oh, finally, this is awesome and you truly did an awesome job, the German Schmear turned out to be so awesome. This I find very encouraging to always apply DIY principles in home decor and maintenance. Thank you for sharing.
It’s impressive how such a simple design actually hides so much work behind it! Wow! ^_^
Wow what a cool treatment! It looks amazing Jen!
You are blowing my mind!!! I love it!
I am constantly amazed at your talent! You are constantly reviving like everything and you do such an awesome job. The finish product is going to be so awesome! Thank you for sharing all of your artistry…you are truly amazing!
Thank you for sharing the week by week details with pics. It looks like a lot of work but the end result is great and worth the time, money and efforts
I really love this look. I’ve been thinking of giving the bricks in my kitchen a light whitewash to brighten them up but now I have something else to consider!
so much work but it looks amazing!!! two more weeks and we are all done!!
This looks fantastic! It makes such a strong and beautiful impact in the space. I can’t believe you did this with your hands!! It makes me want to try it for myself:)
I’ll be moving in to my new house soon, I’ll sure will take note of some of your ideas, thank you for this post! Keep it up!
This looks really great! Loving following along!