$100 Room Challenge: Week 4 The Birds Stencil
It is time for the $100 Room Challenge: Week 4 The Birds Stencil. I am stenciling in the main focal point of the bathroom, the birds!
Welcome to the $100 Room Challenge: Week 4 The Birds Stencil. This is challenge takes place twice a year, January and September and is hosted by Erin from Lemons, Lavender, & Laundry. She invites us to redo a room in our home using only $100, and we must complete the task in one month. We have one month to complete the makeover and we post a weekly update every Wednesday. You may have seen Erin talk about this challenge on the Rachael Ray Show. If you want to learn more about the $100 Room Challenge, you can check out Erin’s post to see how the concept was inspired, and it’s colossal growth since she started it.
Weeks at a Glance:
WEEK 1 WEEK 2 WEEK 3 WEEK 4 WEEK 5


*Please note that I was compensated for this post. This post contains affiliate links for your convenience. These involve no extra cost to you, but may result in me receiving a small commission should you decide to purchase after clicking on my links – for which I am very grateful! You can view my full advertising disclosure here.
Stenciling In The Birds
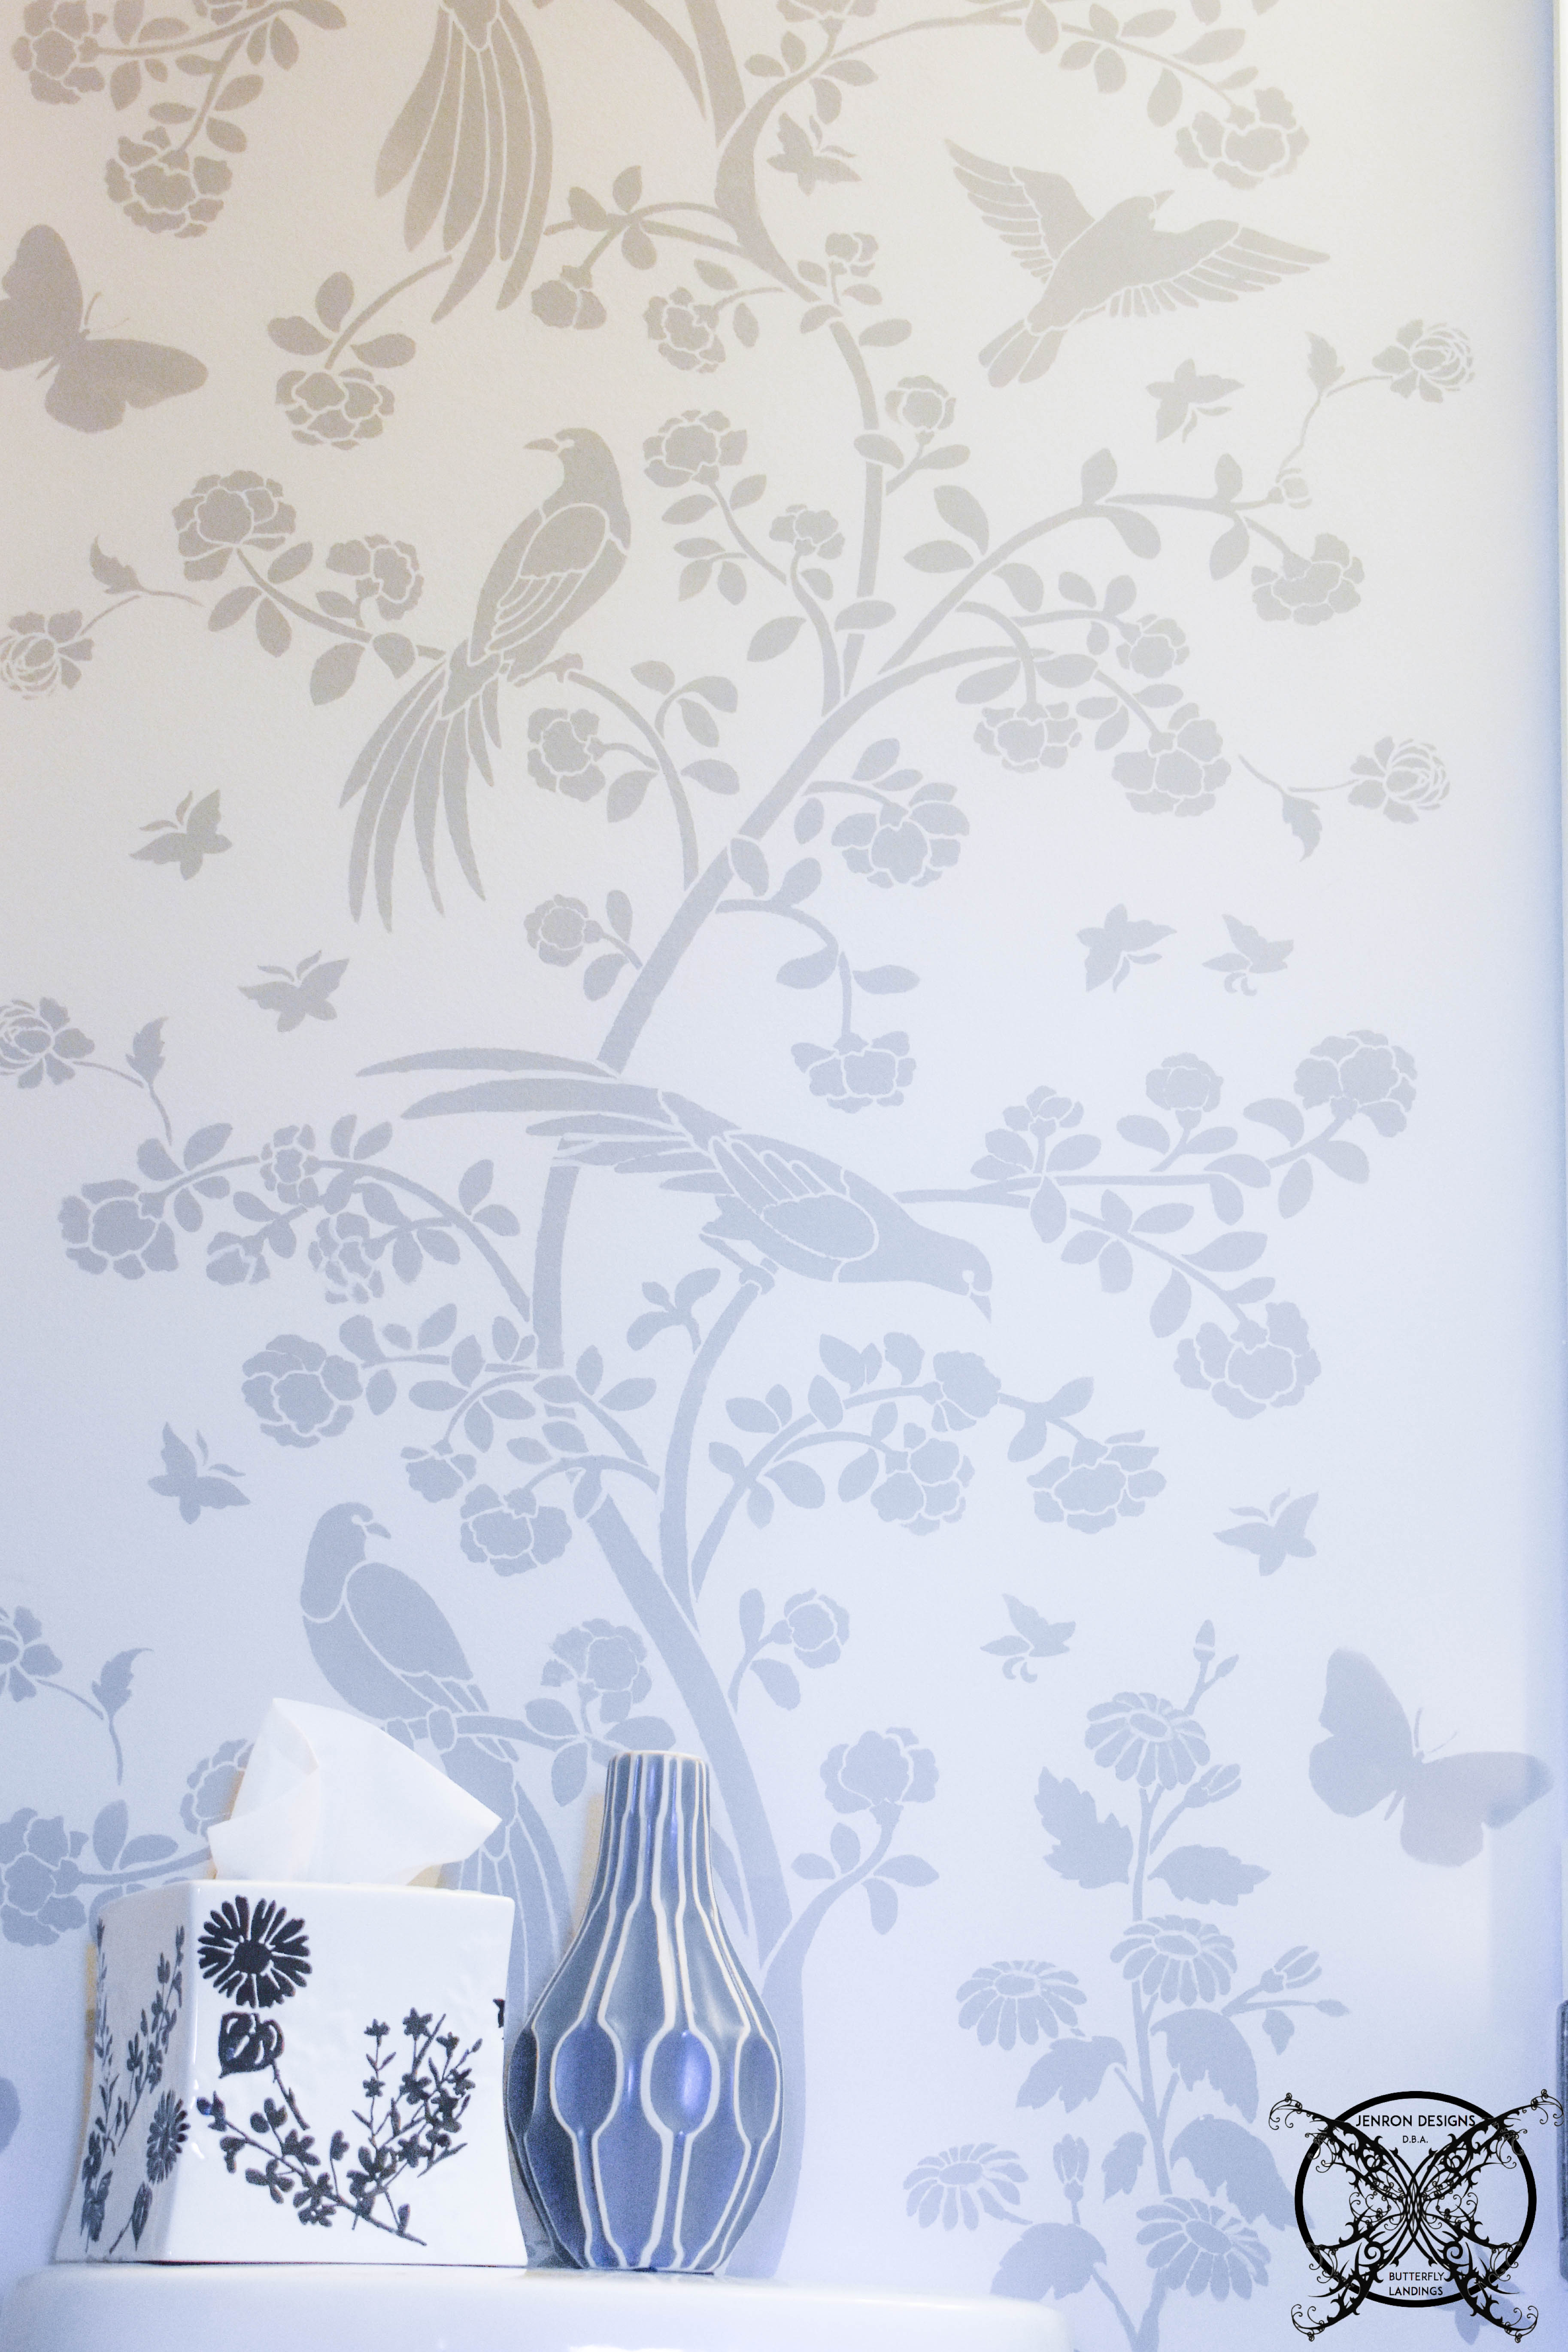
I swear you guys are going to think I have an obsession with birds all of the sudden. First my Halloween table and porch and now my bathroom? Well I can tell you I was actually hatching (the pun was totally intended) this design concept and idea around the same time. LOL. For those of you that really know me and my design process, I am designing ideas and concept anywhere from 6-12 months in advance. Like I am already planning out Christmas for next year y’all…no joke, that is just the life of a designer, no matter what field of design you are in, fashion, interior, weddings, merchandising, graphic it is always the same story, you are always seasons ahead creating the trends and putting them out there to inspire others. It is just the nature of the business, I would be a really awful designer if I was running out today to get the items I needed do post for something tomorrow, unless they were perishable of-course, like food or flowers, but all the hard supplies like furniture and accessories, most designer have those well in advance with a game plan for the overall design. 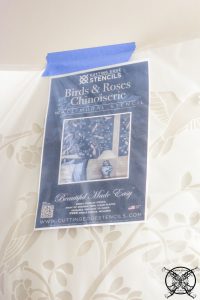 That being said I have to be completely honest with you all, as you may have read in my disclosure above I did receive this particular stencil as part of my sponsorship with Cutting Edge Stencil back in November, when I was hosting my “Sharing is Caring Giveaway”. Which our winner was Alys Davis a lovely local lady right here in Georgia! In the spirit of the $ 100 Room Competition, I am including it in the cost of my supplies, since I would have normally purchased such a specific stencil for this project
.
 This stencil runs $79.95 at regular price, since I had made the decision to use this pattern back in November, I would have purchased it during the Black Friday Savings Event, which I was promoting at the time and I would have saved 30% off making the stencil on sale for $55.96. I believe this is a fair assessment of how much I would have paid for this stencil if I had purchased it for this challenge, which is actually over half my budget.
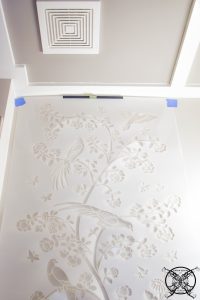
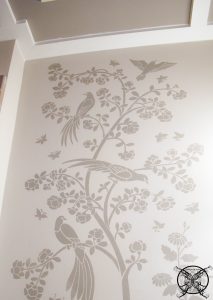
  As you can see this is a very large repeat stencil, which will make this project go very quickly in a small space, but that also explains the more expensive pricing. This is the Small version that I am using: Sheet: 28″ x 50”; Design: 25” x 46”. However, in hindsight, I probably should have ordered the Large: 2-Sheet Design; Total Design Size: 36” x 75” but I am going to show you how I worked around that in just a few.
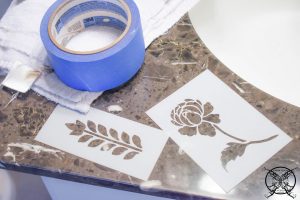 The other thing that I just love about Cutting Edge Stencil is they always offer a few great free stencils with your purchase; which were these, along with the included Single Bird stencil which matches the pattern perfectly.
Make Sure It Is Level
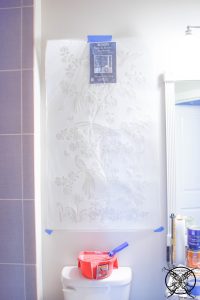
 As you can see above, my stencil kit came with a level to make sure that you got the stencil completely level on the wall prior to painting. This would be very important in a geometric pattern. However, since my pattern is more of an organic botanical, I have a little bit of wiggle room. Which is something to keep in mind, if you have never done a stencil before. The botanical patterns are a little bit more forgiving, however they do require a little bit more of an artistic eye to line up, and even free hand in some of the additional patterns. I tacked the stencil up with blue painters tape in several places making sure to pull it tight against the wall.

Rolling Verses Pouncing
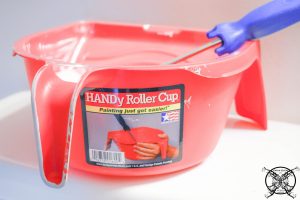
I have to say thank you again to my friends at HANDy Paint products, because this roller was exactly the right size for this type of project. We just added a new liner that we had on hand and started the next phase of our project.  The HANDy roll pan held just the right amount of paint and even worked great when I decided to switch over to the bounce brush for the smaller and tighter areas. While the roller worked great on the large spans; I ended up using a pounce brush after I cut my stencil down for the smaller tighter areas.
  When rolling, you want to make sure that you are not overloading the the sponge roller with paint. It is more of a dry roll, to prevent bleeding under the stencil edges. You also want to make sure that you are not over pressing as well, which can cause the paint to bleed under the stencil as well.
 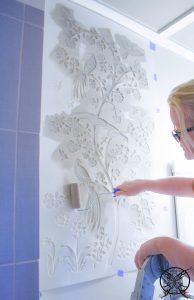 You will also want to make sure that the pattern is completely filled in and covered with a nice thick layer of color; which may require two or three thin coats with a slight dry time in between. The key is to make sure that your stencil does not move or slip between coats.
 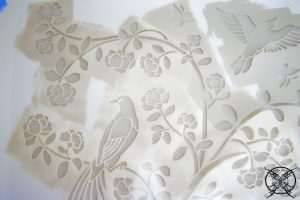 Once you have achieved the desired opaqueness, you can remove the stencil and move on to the next section. You may need to go back with an artist brush and do a little fine tuning on some of the lines just to get a nice crisp edge. This is a great time to do so; which allows a little extra dry time before you layer the stencil back on to your pattern.
Breaking The Pattern
As I mentioned above this is the Small: Sheet: 28″ x 50”; Design: 25” x 46” that I am using; which has a definite bottom edge, which becomes your ground line. In hindsight I probably should have ordered the Large: 2-Sheet Design; Total Design Size: 36” x 75”; which would have provided me a longer run, but in all honesty I still would have had to piece it together with 9 foot ceilings, so it is a moot point for me.
 As you can see in this picture, what I did was pick a section to stop painting at before I reached the ground line. Then, I just layered in the the stencil pattern from a higher point on the stencil and repeated until I reached the floor with the ground pattern . This is that part where you might need a bit of an artist eye to see where the pattern should join, and then you have to thicken the vine slightly by hand painting.
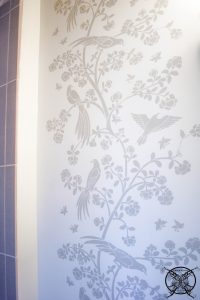
Cutting The Stencil
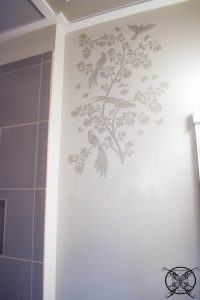
I personally decided that once I had gotten all my long runs done that I would cut some the larger pattern into segments so I could better utilize them throughout my bathroom. Doing this allowed me to create a very one of a kind custom look by still using the the small stencil patterns. The example of the foxglove below shows how I created a large bushy grove to go behind the commode on ground level, where the stencil only had a single stem. The overall look was very effective. 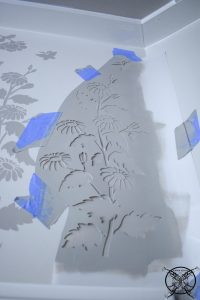 This trick also allowed me to create a custom edging in tight space around the shower tile and above the door frames. I was also able to add in some additional birds and butterflies to some of the sparse areas that needed just a little extra pattern. Over all, I am very excited with how the stencil turned out, and I think since this is Week 4 I am going to hold the final over all pictures for the Final Reveal next week with the rest of the room staging.
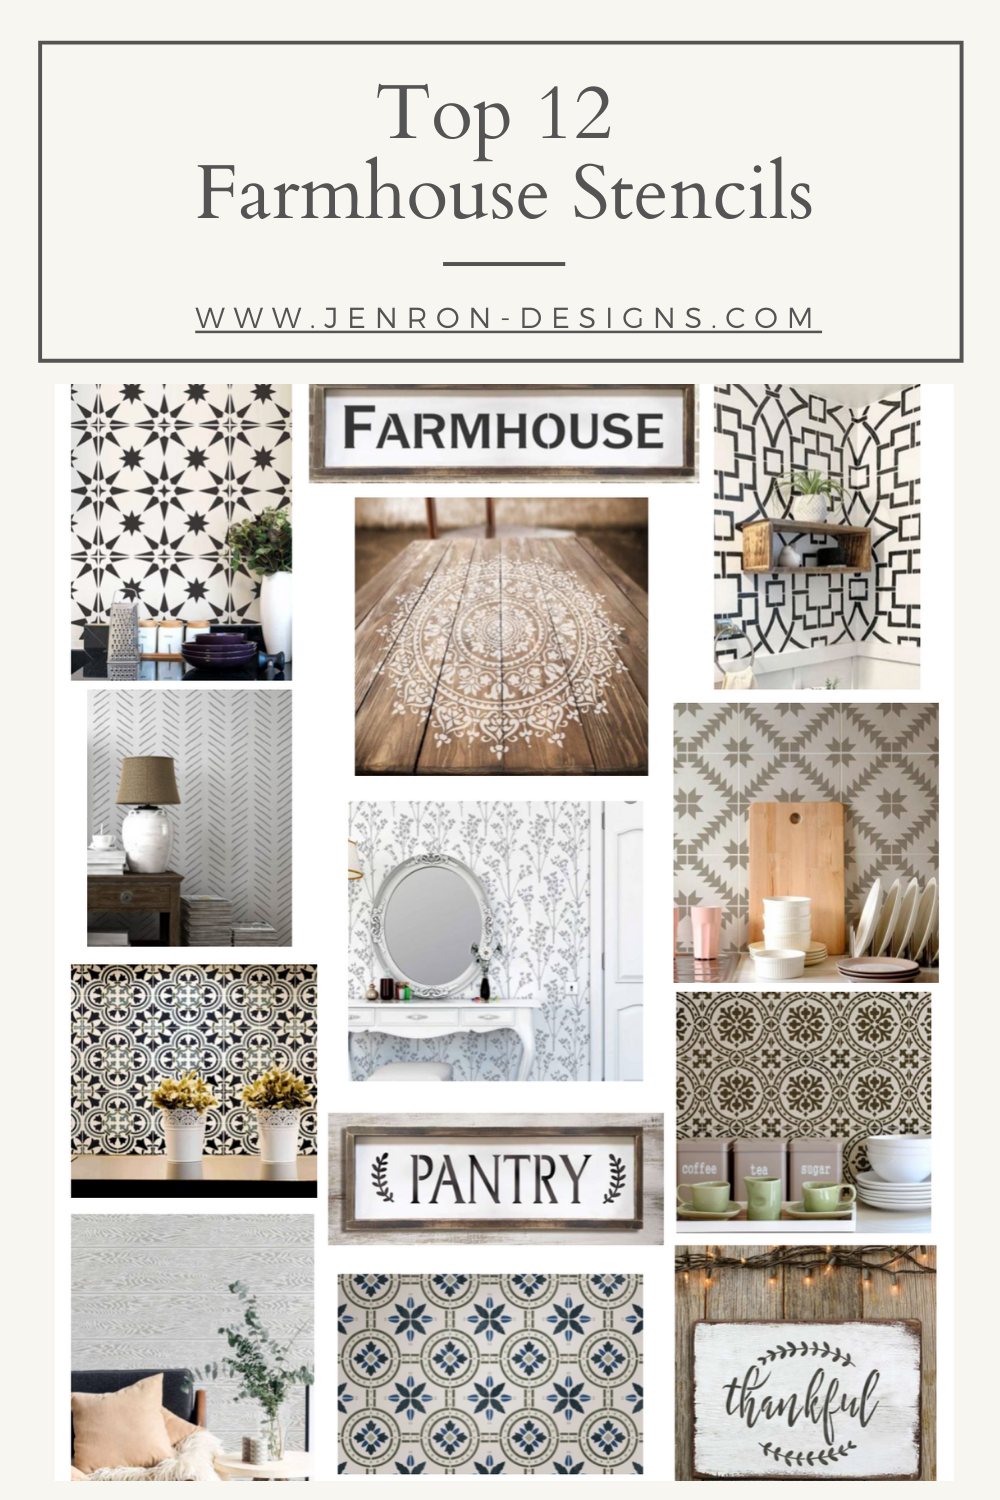
Check out my other favorite Farmhouse Stencils below perfect for tile floors or walls like I have created in this post. Also be sure check for the latest saving events always listed on my Shop My Style page, linked here. 1. Star Tile Stencil 2.Vintage Farmhouse Sign Stencil 3. Tea House Trellis Wall Stencil 4. Prosperity Mandala Stencil 5. Hand Drawn Chevron Wall Stencil 6. Maestro Tile Stencil 7. Sprigs Allover Stencil 8. Augusta Tile Stencil 9. Pantry Sign Stencil 10. Calista Tile Stencil 11. Shiplap Wall Stencil 12. Polanka Tile Stencil 13. Thankful Sign Stencil
PIN ME for later and be sure to follow us on Pinterest at Jen @ JENRON DESIGNS
BUDGET:
Week 1- $0
Week 2- $17.82
- 8 ft fluted primed trim boards $6.95 ea. x 2= $13.90
- Decorative Rosettes primed .98 ea. x 4 = $3.92
- Trim Paint, Adhesive, & Tape- On Hand Leftovers
Week 3- $20.28
- 52 ft primed trim boards .39/ft x 52=$20.28
- Dorian Gray Paint- Exterior Paint Color, left by builder from building house
- Paint Supplies- On Hand Leftovers from all our painting projects
- Caulk-Leftover Tubes- Loads of half used leftover tubes
Week 4- $55.96
- Stencil Kit $79.95 On Sale 30% off- $55.96
- Dorian Gray Paint- Exterior Paint Color, left by builder from building house
- Paint Supplies- On Hand Leftovers from all our painting projects
REMAINING BALANCE $5.94
Project Schedule:
WEEK 1- Inspiration Board, Room Prep, and Product Procurement
WEEK 2- Install Mirror Frame DIY
WEEK 3- Faux Coffered Ceiling DIY
WEEK 4- Chinoiserie Bird Stencil DIY, Revisit Mirror Paint Color-Possible Grey? TBD
WEEK 5 – Room Reveal
PIN ME for later and be sure to follow us on Pinterest at Jen @ JENRON DESIGNS
Be sure to see all the latest updates on all my friends projects too, they have some really great ones this round!
Yes, Yes, Yes! I LOVE IT! I have to say when you said birds, I was a bit skeptical, but I really do love this pattern and the color.
This is amazing. You definitely have an eye for design. I’ve always been afraid of stencils but this just may be the nudge I need.
You did an amazing job with the stencil! I seriously messed up using a stencil once, and have been afraid of them ever since!
That is really beautiful. I love florals and birds and the way you used that stencil in that one area looks fabulous!
I still have my daughters room to be redecorate with a huge white wall in front of the window. I was thinking to paint it myself, but now after watching how pretty it can be done with a stencil, I think I will go for it! Less time of work too 🙂
I love this stencil and all of it’s details. I think this is going to be gorgeous!
This is so pretty it is hard to believe that it is a stencil, the lines are so crisp. Great tip on the foam roller I think that makes a difference.
I love the grey and white combination it has a classic feel but still seems elegant, if that makes sense. This room has come a long way for $100.
So elegant…so beautiful! I haven’t had much success with stencils but after reading this I’m pretty sure it’s because I have been doing it all wrong. LOL. Really want to try a stencil back splash in the kitchen so thank you for the inspiration.
Wow! A hundred dollars, that’s quite a challenge! I love this idea, and the stencil!
What a genius idea! I’ve actually never seen anything like this & it turned out just lovely! Perfect for that space!
-Madi xo |
This is amazing!!! What a great idea!!
Oh my goodness! I absolutely love this idea. You did an amazing job and have given me some really good ideas for even other areas of my home.
I would never have thought to use a paint roller with a stencil. Great idea!
This is looking so good I am very excited to see the reveal next week.
I’m always so inspired by these cute looks on a budget! Way to go!
This is so cute, and looks so expensive!! Great job.
You know how I love a good stencil project and this one is top notch. I am so loving the birds! Great look.
I have never tried stenciling but I thought this was wall paper at first glance. I have some friends that bought an older home that have had trouble removing wallpaper paper so it scares me a little but I like the patterns.
This is so fresh and hip I love the colors and pattern you have picked out to make the space interesting.I t really bring life to that area.
Superb design and execution it looks great.
I have been so excited to see these birds in the bathroom, this projects looks great girl!
The stenciling in this room is beautiful! So glad to see you are still enjoying it.
Wow what a great transformation for such a little amount of money I am shocked.
You should be a part of a contest first of the most effective blogs online. Let me suggest this blog on my site to other too!
I just love how this room looks it made such a big impact but your did not spend a bunch of money which is great in my book.
As being a Newbie blogger, We’re permanently exploring online for articles which can be of help to me. Many thanks for all your insite.
Thank you for another wonderful article. Wherever else could anyone get that kind of info in this type of an ideal way of writing? I’ve got a presentation next week, and Im round the search for these info.
As I site possessor I believe the content and material here is rattling and really great, I appreciate it and you for your efforts. You should keep it up forever! Best of luck.
I truly love how this paint looks with the use of a stencil I may never go back to wallpaper again, since it always lifts or even worse tears up the walls when you want to change it.
I just want to say I am very new to blogs and truly savored you’re web site.
Amazing blog layout here. Was it hard creating a nice looking website like this?
Amazing this is such a great idea! Thanks for sharing!
You amazingly come with superb articles that are so interesting. Thanks for sharing your webpage.
Just wanted to say great post and thank you to the web site admin.
I just want to mention I’m bookmarking your site for reference on how to do this. You surely have good writings which I appreciate. Thank you for it for sharing all the great tips on your web page.
You made some great points here. I appears that on the internet most people will associate well with you, your website, and ideas. Keep up your inspiring work.
I just want to mention how much appreciate you for sharing all your ideas and knowledge on your web page.
Thank you so much for showing this transformation I love how the stencil paint looks.
Are you ready to spend hours laughing? I tried to to stencil paint a bathroom too but used an artist brush, I think a roller would have been very helpful.
You are wonderful and so creative I love everything that you do! Thanks for all the inspiration!
The $100 Room Challenge is such a fun idea for decorating contest. I love to see what designers can do on tight budget.
Thanks for all the great ideas and information for decorating on a budget. Lord knows we all need this!
Attractive content, and in fact I really enjoyed all of your blog posts and tips.
I love how the stenciled wall look, you would never be able to tell the difference between paint and wallpaper by the pictures, it looks so good.
Love this idea so much I am know a wallpaper fan either.
Hi my friend! I had to tell you that this post is amazing, great writing and so many alluring tips and informational tidbits for me~
Your way of explaining all the design facts is great, I am sure they will be very effective, Thanks a lot.
This turned out so lovely, a great option to no using wallpaper. I am also not a fan after many horrific removals so I understand the allure of this technique.
Hey there! I’m at work surfing around your blog and I just wanted to say I love reading your blog and look forward to all your posts! Keep up the outstanding work!
How do you say it? Relevant! Finally I have found an website that has ideas that are current and on topic for me. Thanks a whole lot!
I do consider everyone of your ideas that you’ve presented in your post to be the best! Still, the posts are too brief for newbies. You might just want to extend them a little bit from next time please? Thanks
Hey Alice I completely understand, however to keep my posts from turning into books or journals I have to constantly edit them into reasonable sized blog content. Please know that I am always available for any question via comments like yours, or emails to help in the newbies out in those situations.