
$100 Room Challenge: Week 2 Mirror, Mirror on The Wall
It’s week 2 of the $100 Room Challenge: Week 2 Mirror, Mirror on The Wall. We are making a frame to go around our builder grade mirror. Please keep in mind that this mirror is firmly attached to the wall.
Welcome to $100 Room Challenge: Week 2 Mirror, Mirror on The Wall. This challenge takes place twice a year, January and September and is hosted by Erin from Lemons, Lavender, & Laundry. She invites us to redo a room in our home using only $100, and we must complete the task in one month. We have one month to complete the makeover and we post a weekly update every Wednesday. You may have seen Erin talk about this challenge on the Rachael Ray Show. If you want to learn more about the $100 Room Challenge, you can check out Erin’s post to see how the concept was inspired, and it’s colossal growth since she started it.
Weeks at a Glance:
WEEK 1 WEEK 2 WEEK 3 WEEK 4 WEEK 5

Adding a Frame to a Mirror
This is not the first time that we have added a frame to a mirror in our home. We have done this several times, on several projects. Here are two of our other frame out projects, just to give you and idea of other possibilities with this type of project. 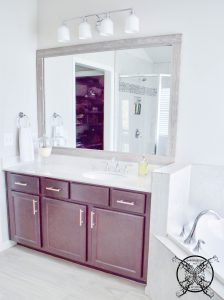 This is from our Master bathroom How to Frame a Barnwood Mirror Frame post , which was one of my very first post two years ago. This one actually got me published with many mainstream DIY networks and on the map as a blogger.
 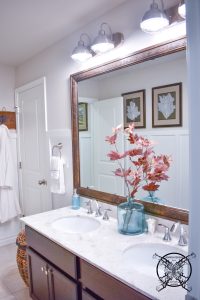 You may remember this second picture from the One Room Challenge in Fall 2017 , where we did our Jack & Jill bathroom. We just recently upgraded the adjoining Guest Bedroom so I have shown this mirror more recently in those posts.

That brings us to our most recent project here on week 2 of the $100 Room Challenge the supplies were super inexpensive:
- 2- 8 foot fluted trim boards primed $6.95 each – $13.90
- 4- Decorative Rosettes primed .98 each – $3.92
- Total Project Cost- $17.82
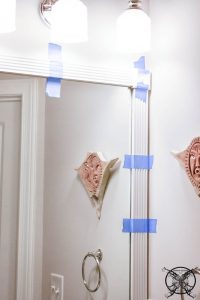 The mirror boards needed to be cut at 3′ x 4′, which allowed enough space for the rosettes to sit at all four corners. So we had two 3 foot boards and two 4 foot boards. Since they were already primed, we just did a quick gloss coat of white trim paint that we have on hand for all our household trim touch ups, prior to installing.
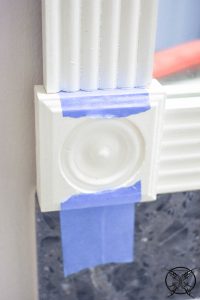 We used a tube of leftover liquid nails we had from our previous mirror projects seen above, to adhere the boards and rosettes to the mirror. Then used some blue paint tape from our paint supplies to hold them in place until dry, which takes approximately 3-4 hours. However, we left it for a couple of days just to be sure, due to all the rain we have been having.
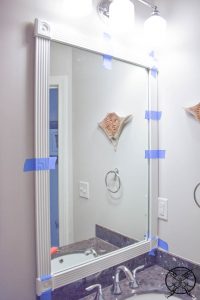
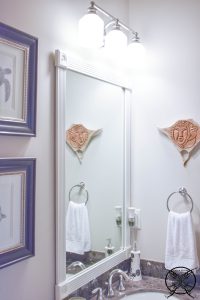
 This was the finished project after we removed the tape a couple of days later. I am thinking now that I might want to paint the frame grey to match the stencil or ceiling, but I am going to give it a few weeks to see how the white grows on me.
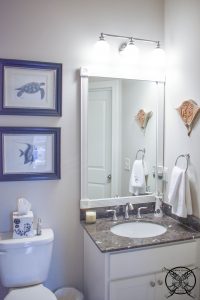
I originally picked white for the frame to match the base cabinet of the sink, but as with any good design project, things always change, LOL. I can always do an antiqued effect over the white towards the end of this challenge if I still desire the frame to go grey. So, this particular project may still have one more step, we will just have to see.
BUDGET:
Week 1- $0
Week 1- $0
Week 2- $17.82
- 8 ft fluted primed trim boards $6.95 ea. x 2= $13.90
- Decorative Rosettes primed .98 ea. x 4 = $3.92
- Paint, Adhesive, & Tape – On Hand Leftovers
REMAINING BALANCE $82.18
Project Schedule:
WEEK 1- Inspiration Board, Room Prep, and Product Procurement
WEEK 2- Install Mirror Frame DIY
WEEK 3- Faux Coffered Ceiling DIY
WEEK 4- Chinoiserie Bird Stencil DIY, Revisit Mirror Paint Color-Possible Grey?
WEEK 5 – Room Reveal
See what my blog friends have been up to this week below during their $100 Room Challenge this time too!
I have been toying with the idea of sprucing up our master bath for a while now. This just gave me the inspiration to add it to my spring project list!
You did a wonderful job!
I have always loved your frame upgrades that you do, they really have taken off since your first one two years ago with the barnwood. This one is unique as well by adding the rosettes in the corners, amazing how you always find a way to create something new. Bravo!
Love this, Jen! I think the fluted boards with the rosettes are a perfect combo. 🙂
I have always wanted to try this, but it seems too complicated becaues my mirrors have little clips that stick out, and I can’t figure out how to work around those. I love all of yours!
Nicki usually you can remove those, because the mirror “should” be glues to the drywall with liquid nails. In my experience those were used as a precautionary measure for natural disasters like earthquakes… or children, lol. In my parents 1975 split level home, every bathroom had those mirror clips and my mother was petrified to remove them, for fear of the mirrors falling off the wall. When we got ready to sell the house and replace the old etched mirrors, my husband and I removed the clips thinking.. 25 years later the mirrors would probably just fall off the walls, but much to our surprise they were still stuck to the dry wall with a tar like substance and we ended up breaking the mirrors trying to remove them…. go figure right? My advice would be to check it out first, but do not think you are locked in by those clips.
I couldn’t thing about a best solution for framing a mirror and the best of all it’s the price and no need to take off the mirror at all. Great post!
It looks gorgeous! You always do such a great job with your designs. I have been wanting to update a few things in my house, and it is really encouraging to know that it can be done on a budget!
That looks great! Completes the room!
Sure does make a difference. I actually looked into removing a builder’s grade mirror and was so intimidated by that tutorial decided to add a rustic frame to it. Worked like a charm. Looking forward to seeing whether or not you decide to change the color.
this is a great idea. I hope for a day when I’m a homeowner and can do a little more reno and decor!
-shay
Wow I didn’t think it would be that simple it is such a cute little thing that really changes the appearance of the room. Looking forward to future projects!
I am amazed at how cheap and good this was!
Such a pretty frame with those added rosettes, it really elevates the look of your mirror and keeps the large size too, which is key in a smaller space.
It looks great, lady! And I am so glad I read this because I have to frame a mirror for this challenge too…..totally using your tips. 😊
Kate I am so glad I could help you out and I can not wait to see you mirror too!!! This challenge is so much fun and love to see what everyone is doing!
What a difference $17.82 makes! I love the corner details on the frame!
Jen this mirror is so different from the other two, which shows how versatile this project can be, love those rosettes. All I can say is wow all for $17 bucks you can’t beat it.
You know this is one of my favorite DIY that you do, I love the the barnwood one and the simplicity of it, but I am fascinated by how different they all are and inexpensive they can be.
Just wanted to say this is such a great DIY and who would have guessed it was so affordable too.
It looks awesome!! Great progress!
That mirror is so cute I would’ve never guessed it cost less than $20! You’re so creative!
Love the frame and love the price! Looking forward to seeing your completed space and if you decide to go grey. 😊
I love this! Can’t wait to see the ceiling and the Chinoiserie Birds!
Okay I really like this idea a lot since it looks pretty simple and easy to do, and the cost is so minimal for a home project.
Xx, Nailil
I reckon that I am new to this challenge since I was unaware that is was a thing, but I really like this concept a lot.
This is a great idea for a bathroom mirror a quick and inexpensive way to to upgrade what you are ready have, great tips and well written article too.
This blog is so… relevant, finally something that helped me. Thanks
My sister and I used to play bloody Mary in the mirror and love the tv series Ghost Whisperer that was the first thing I thought of with your title. Great post and nice DIY.
I’m not that much of an online reader to be honest but your blogs really nice, keep it up! I’ll go ahead and bookmark your website to come back later. Cheers
Hi I am so delighted I found your blog page, I really found you by accident, while I was browsing on Yahoo for something else, Anyways I am here now and would just like to say cheers for a incredible post and a all round interesting blog (I also love the theme/design), I don’t have time to look over it all at the minute but I have saved it and also added in your RSS feeds, so when I have time I will be back to read more, Please do keep up the excellent job.
A good blog with interesting content, that’s what I need. Thanks for making this site, and I will be visiting again. Do you do newsletters? I Can’t find the sign up.