DIY a Sleeping Porch Fireplace
How to DIY a Sleeping Porch Fireplace. See how I converted a basic sleeping porch wall into a brand new outdoor fireplace.
Today I am going over how we created a brand new DIY a Sleeping Porch Fireplace on a blank exterior wall. First of all we are super lucky to have been able to watch our home being built to know we have a empty cavity in this wall to do this, so it has always been on the “to-do list for a while now. We have just been able to free ourselves sup to finally get it done. You may recall this was our original antique fireplace set up we had on the porch for quite sometime. Last year with tornado this lovely vintage piece did not make it. It sustained quite a bit of water damage, and a few tree branches were launch through our screens some of the wood veneer was unable to be replaced. Sadly the old girl was scraped.
 This provided us with the perfect opportunity to complete a DIY that had been on the “to do” list for a while. I was super excited to get started on my Sleeping Porch Fireplace. We started by removing the siding which was actually needed for other damaged areas on our home, so it was a win win.
 Next we built the frame work for the new fireplace and ran the outdoor GFI electrical box. You will probably want to have electrical contractor do this for you just to make sure it passes all inspections and meets the proper code requirements.
 Once this part was complete we hung tile grade Durock backer board, prior to installing the fireplace. We used this so we could install exterior grade tile rock for our fireplace fascia. This board goes up just like sheet rock or any other tile board, but no seam mudding required since it will be covered with thin set and a rough rock tile.
 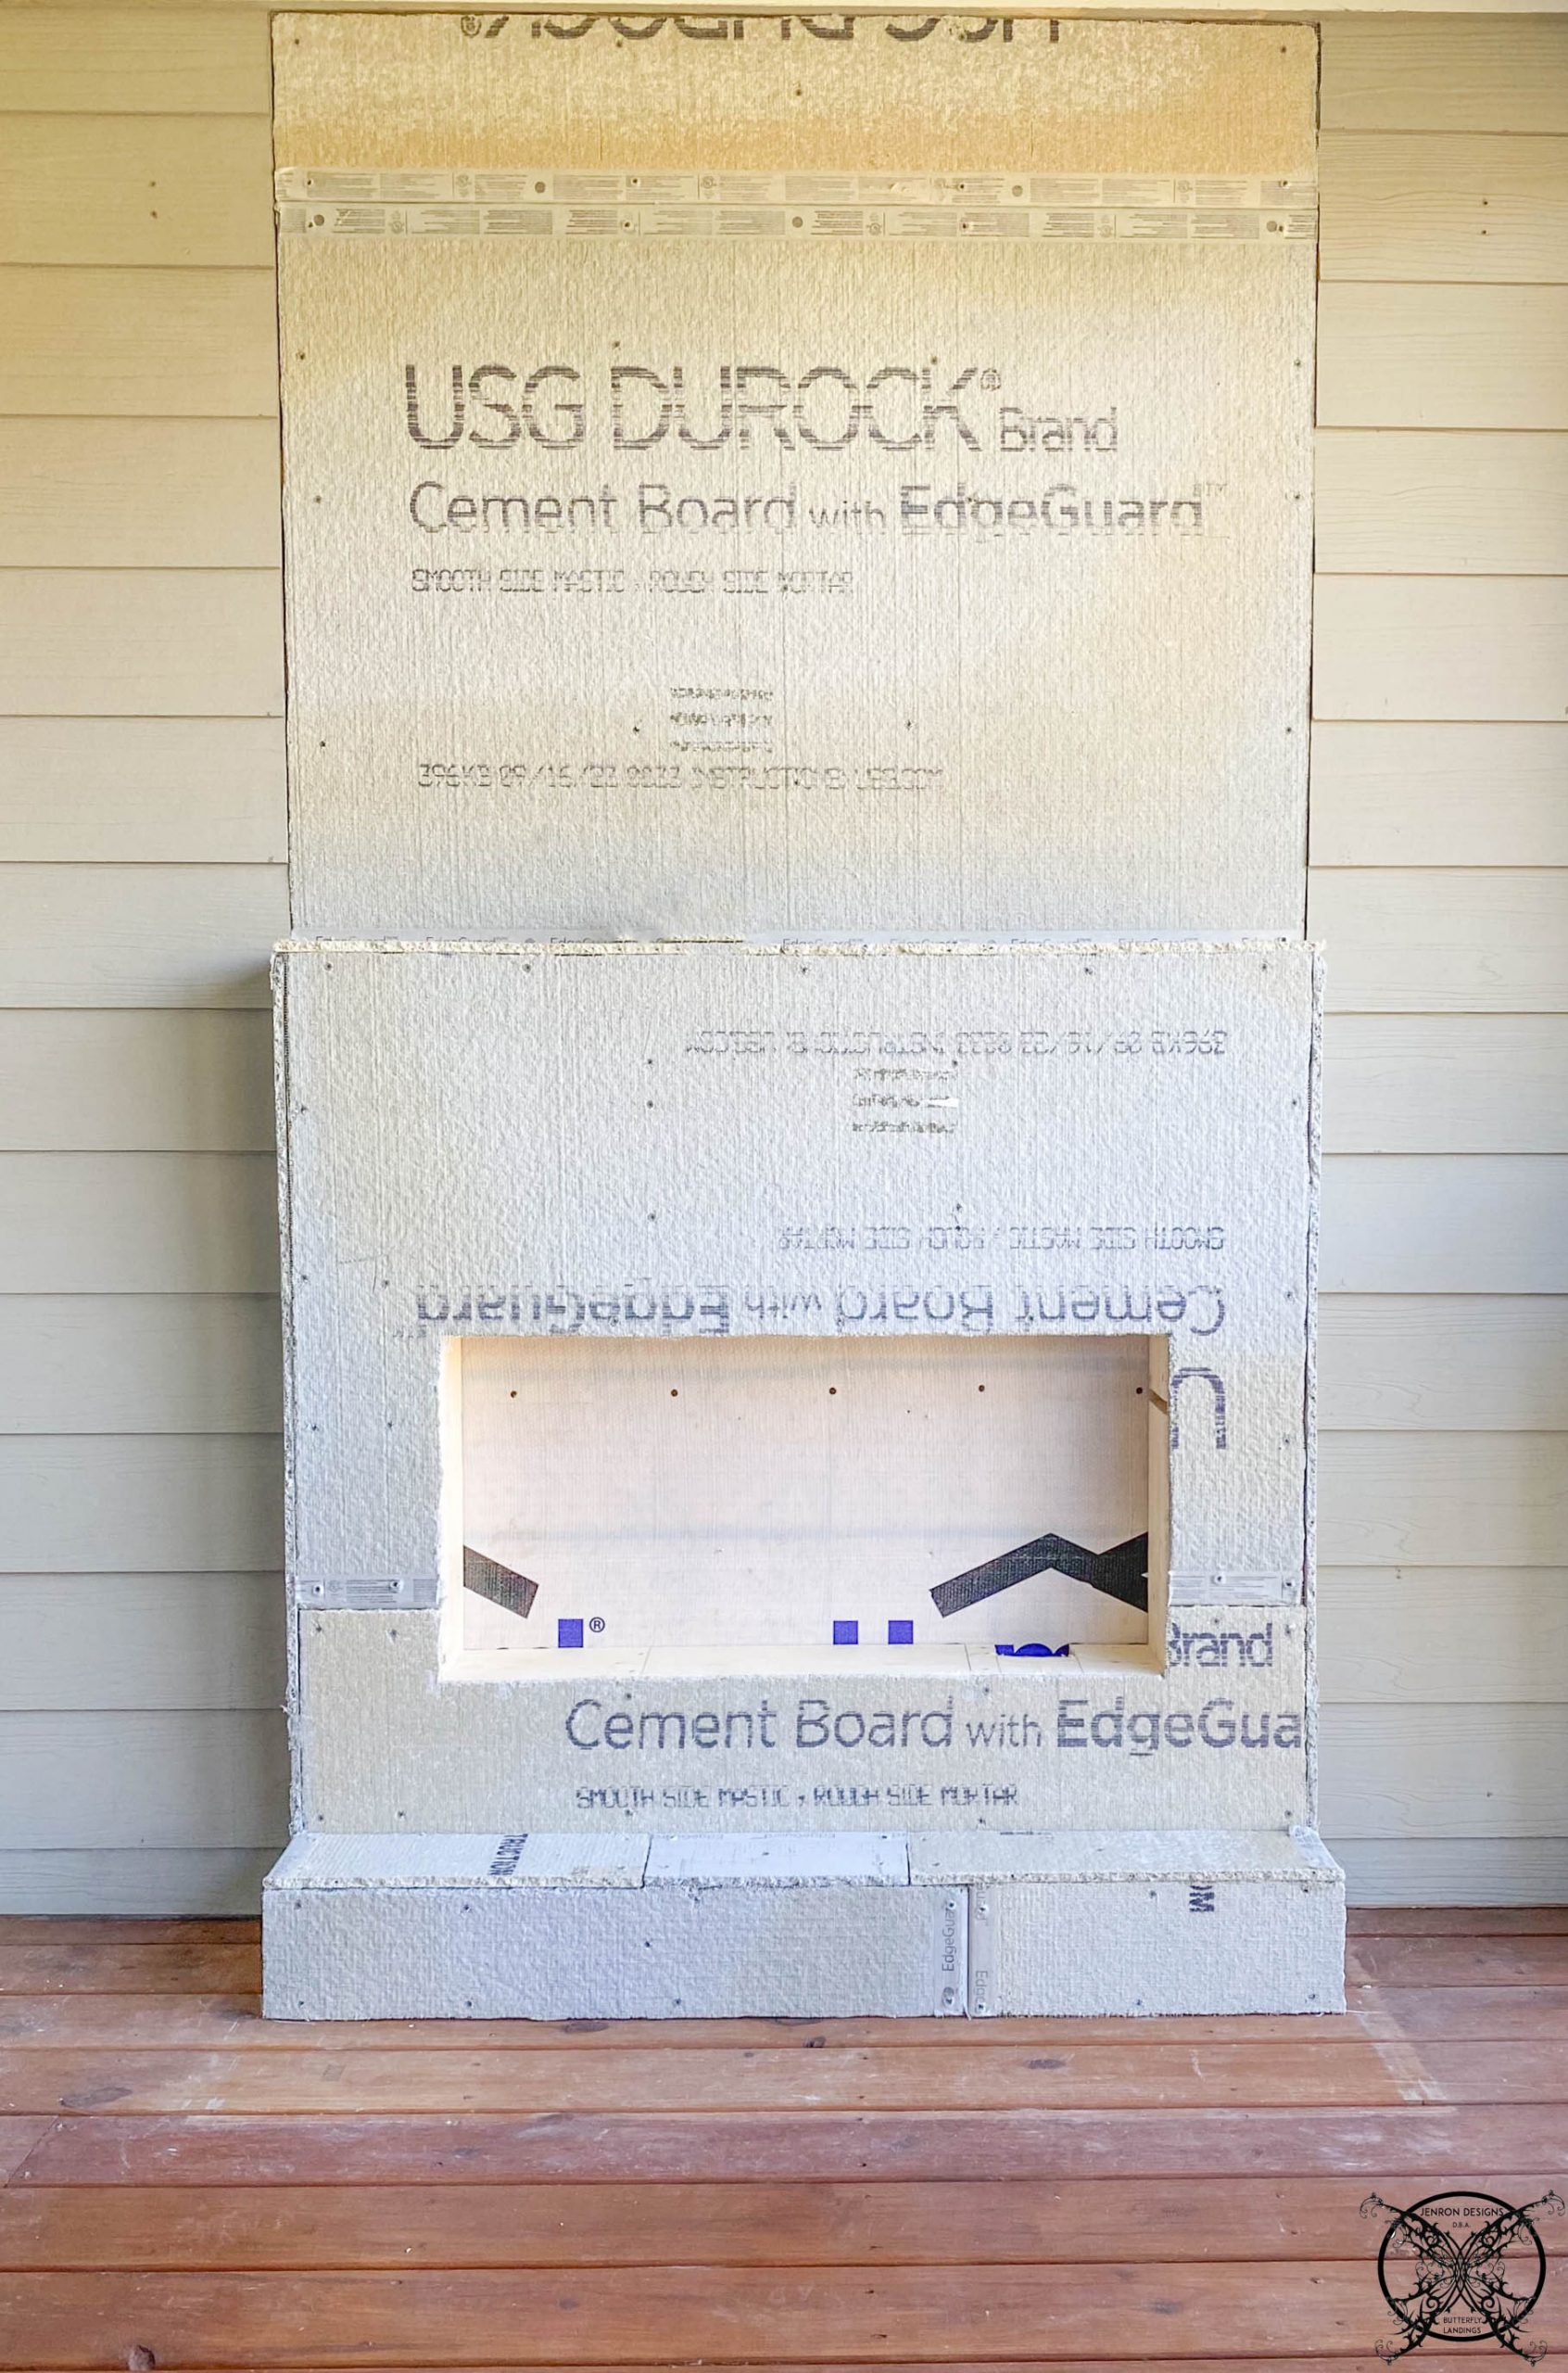 Next we installed the fireplace, and tested it to make sure it worked with all the proper settings. We opted to install it with same sheet rock screws as the Durarock board which kept things clean and simple.
 Next we started the tile process at the bottom and worked our way up. Using a basic thin set to butter the back of each tile and put it into place. It does help to lay your tile out ahead of time, to see if any cuts would be needed, however we designed the structure to take full pieces, to eliminate the total number of cuts that would need to be made.
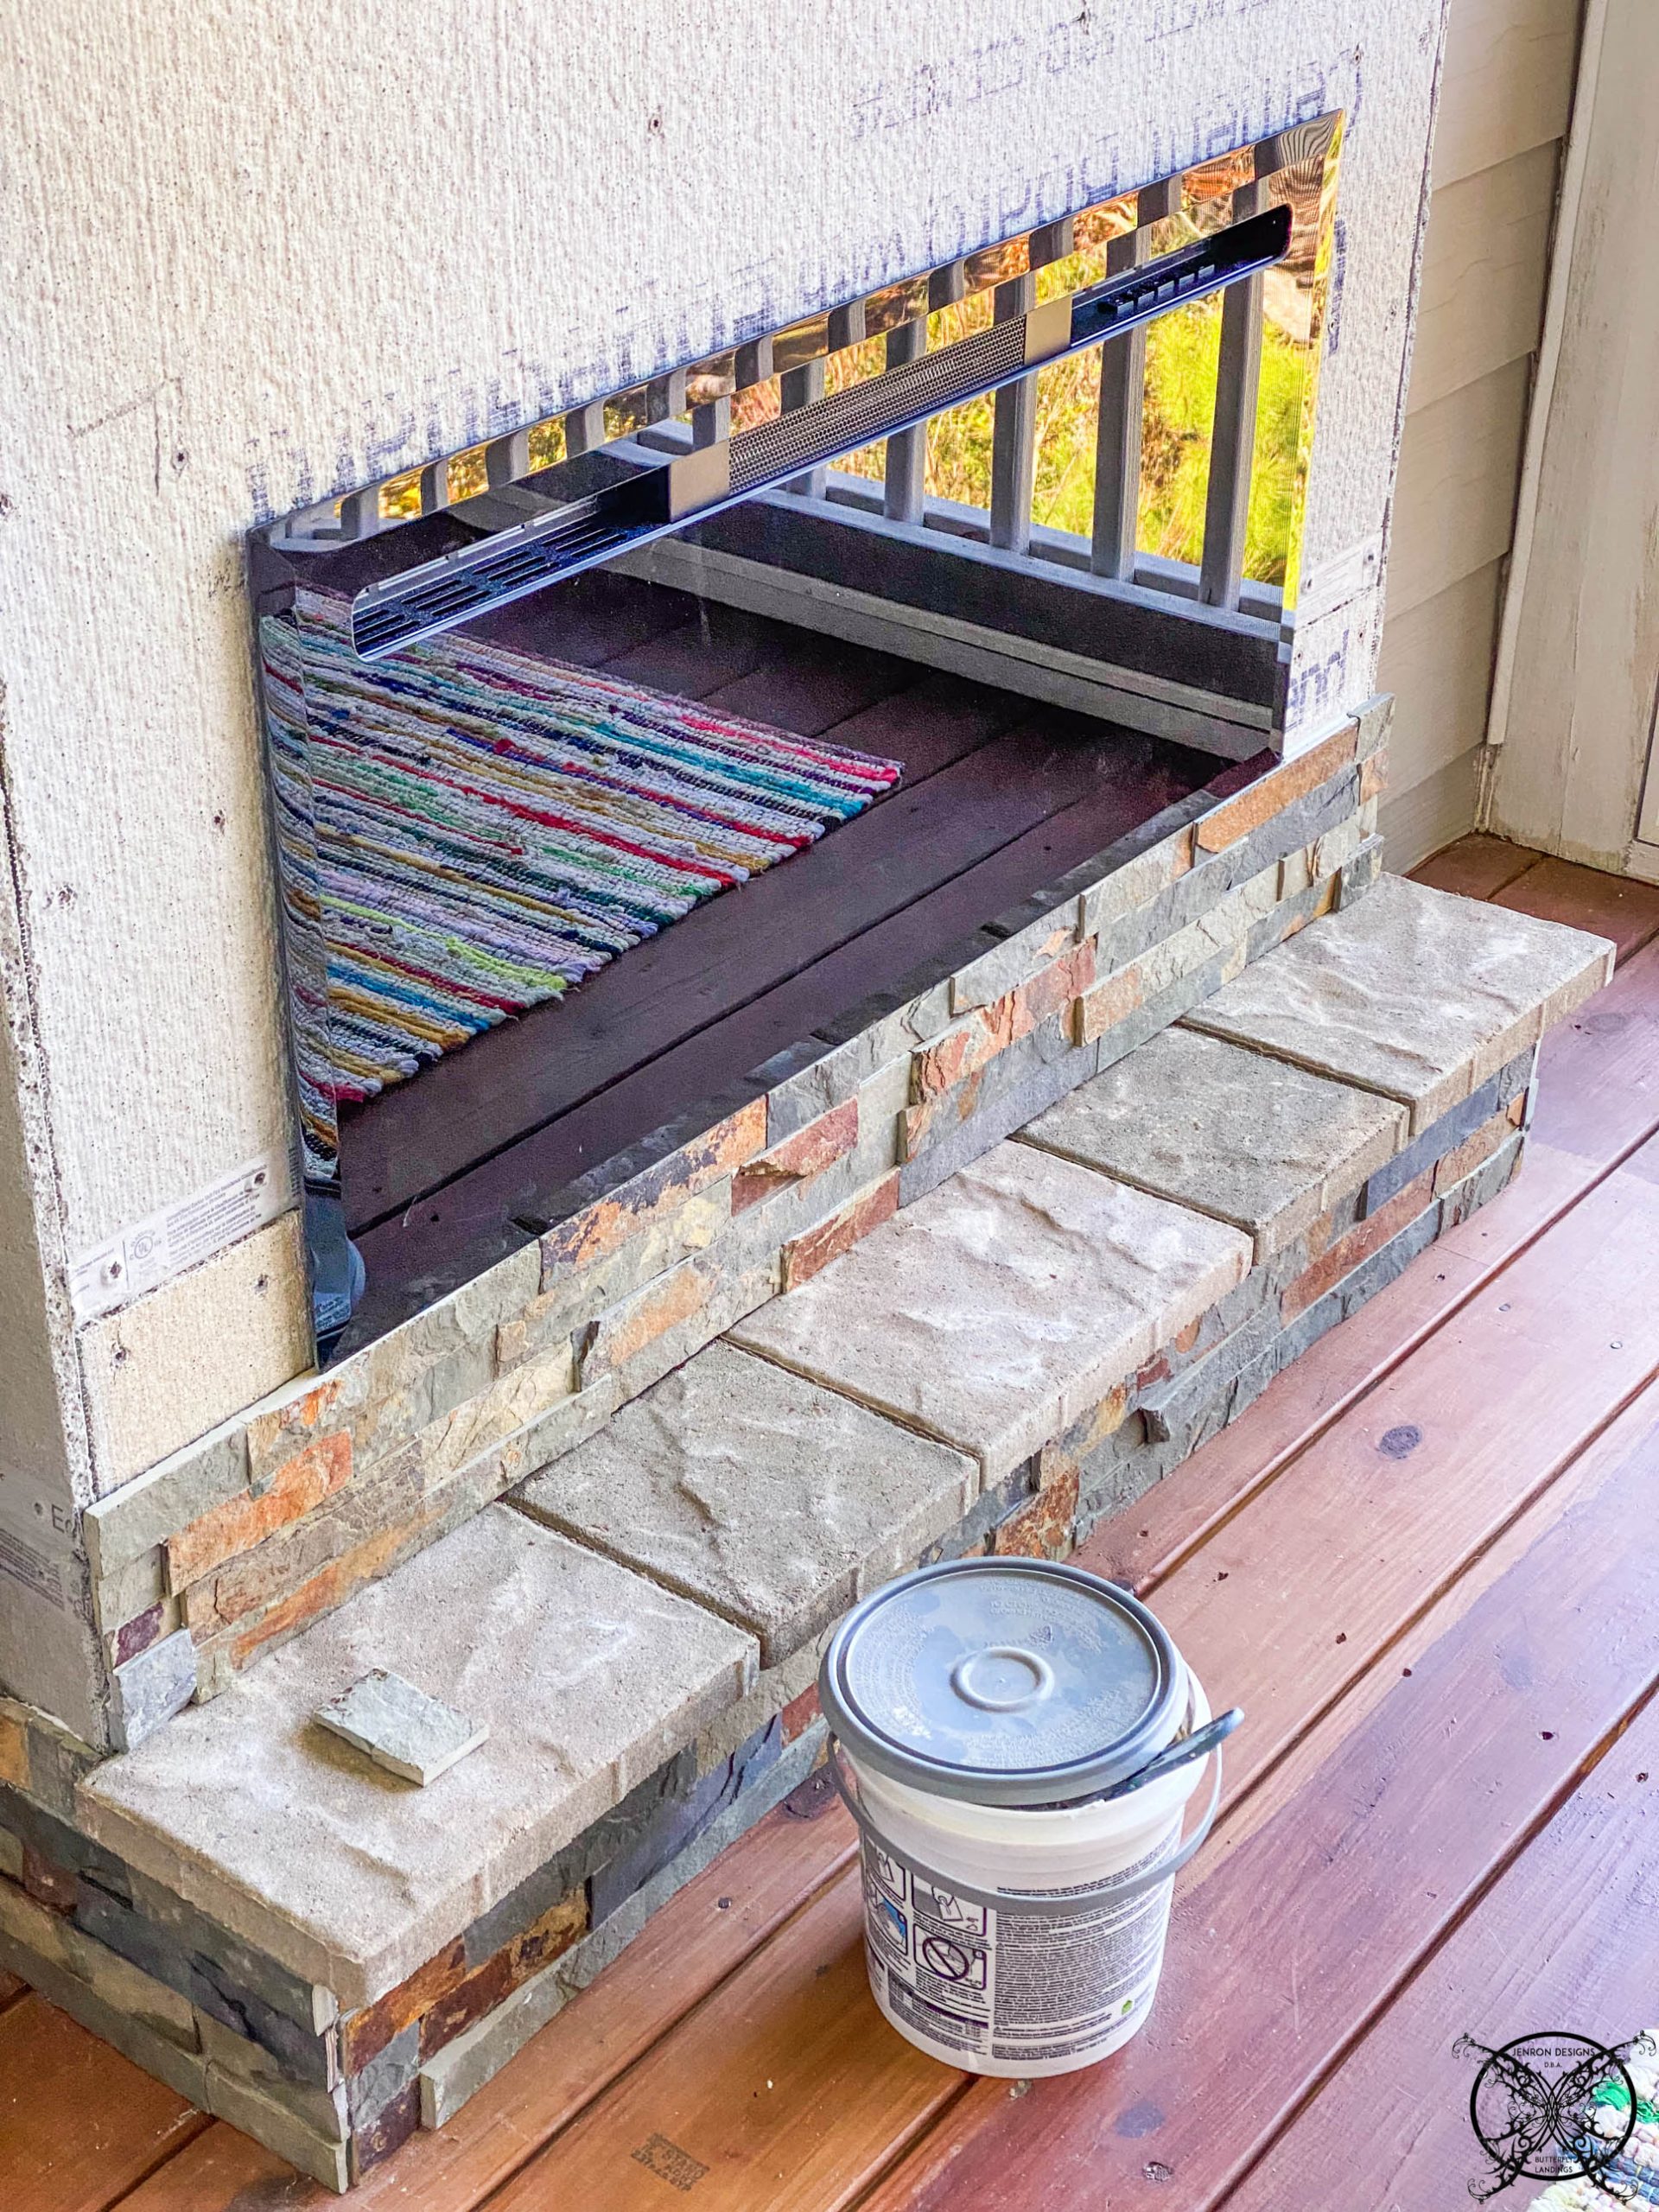 Once the base was done we used garden paver tiles to create a hearth top and again for the mantle. We laid the paver tiles out to get the sizes needed to eliminate cuts and jagged edges. Work smarter not harder. We were able to score this beautiful tile at local Floor & Decor store Jura Splitface Slate for $4.69/sqft. It took roughly 75 tile which was $351.50 and a large bucket of mortar and 10 garden tiles, available from Lowe’s or Home Depot your choice.
 We continued to work our way up the fireplace until we reached the top. Ron would make any necessary cuts with our tile saw. I would butter and set all the tiles directly into place. Hand selecting the color patterns with a custom layout, so no two tiles ever matched or repeated. For me it is always the details, this design touch is the different between a basic tile job and a custom one. Once the tile project was complete and cured, we went back and caulked the seams with gray caulk; voila the project was done.
 I have to say we have been very happy with our new outdoor fireplace this season and it really put off a lot more heat, make the sleeping porch more cozy than ever. So while we were not thrilled about the storm, at least something good came from it and we now have yet another fireplace in our home. I always said my goal was to have one in every room, even those outdoor spaces. Check back in soon to see our next big DIY we have been up too!
IN CASE YOU MISSED THEM- SEE MORE FUN DIY’s HERE:
DIY Paver Patio & Outdoor Fireplace Project
DIY Barn Door Shiplap Shutters for Windows
DIY Architectural Cedar Ceiling Beams
What a great idea and what we really need at our home. We need more outdoor space year round ideas and solutions after 2 small children go to bed.
Jen, clever and beautiful idea for getting away from the things that drive us nuts! I know just the place to use this …. my she shed! I love you comment it all about the details. Beautiful!!!
I think this is such a genius & adorable idea! It’s perfect for all porches! Everything has a place & I love that!
-madi xo |
I will definately reccommend this post to my mum. She’s into DIY stuff. So im sure she’ll love this.
I love DIY projects! Might need to tackle this one when we get home from our road trip! 🙂
This is so great and fresh and on point, I love it
This is so cool! Those mantles too they probably really come in handy too. What a good idea to keep it warm!
I have been looking for a new DIY too and this is a great hack! I would have never know it was not original to be honest, it looks like it came with the house.
Such a wonderful way to really update the space and it makes it feel so very expensive now. I agree that the a real fireplace is a much better solution.
Such a pretty piece Jen, and it does really look like a real built in fireplace. I do really like the ability to warm up outdoor spaces. Great post.
Jen I love this porch. Honestly it is very eye opening to see how a current space can be altered to look like an brand new but it really is not. I need to be more vigilant at my design, I have a feeling this happens a lot and I am missing the boat.
I am really enamored with this project and this concept. I have been search for a great porch fireplace idea but unable to find one in the shape and color I like. This is such a brilliant way to create that look, for a really great price. Just a little bit of work but that is half the fun.
Useful information on how to better updated a porch, I gotta say the I love everything about this.
I absolutely love this DIY and need to do this for my patio. You did a wonderful job on it, you can’t even tell it is a DIY project!
Good idea
This is so beauitful, I’m so jealous of your sleeping porch it is not even funny
You did such an amazing job with this. I might have to make one!
Such a useful tip! I love the style and it is so practical and luxurious which makes my heart flutter! Love it and thanks for sharing!
You had me at the word sleeping porch! Hehe such a nice DIY!
How cute! I have always wanted one of these for screened porch. Love it!
What a wonderful DIY upgrade. A great mix of beautiful decor with functionality for more space.
I love this, it’s so creative! Keep these ideas coming.
OMG I love it! This is the perfect porch. Thinking of getting a wood fireplace for my patio too.
Wow want a cool idea! You make DIY look easy
This is such a great idea to warm all winter! I love the look of the tile too!
What a beautiful outdoor space, I love the idea of curling up with a good book by this fireplace. Your DIY’s always turn out great, and this one is functional and outdoor beautiful for a sleeping porch.
First of all I just want a sleeping porch, what a grand idea that is! Second, this fireplace has elevated such an already inviting space even more; it makes the area feel even more posh and regal. A true southern stunner, just like you see in the movies from Hallmark. Now I know they do exist in real life, they are not just a film set.
I am soooooo in love with your outdoor porch space and how you easily added a fireplace to the area. It is a great permanent fixture to your home which adds to the overall value, not just a cheap old propane unit or those ugly radiant fire hazards I have seen on so porches that people add, which just feel like they cheaped out. I mean it is home not a take out restaurant am I right? Proves you can not buy class.
Jen this is a beautiful add to your already beautiful home. I was so excited to get my email with a new DIY from you this month then when I saw the project it certainly did not disappoint, exceptional as always. I can not wait to see more projects soon.
Hello! I hope you’re having a great day. Must say I really like this project a lot and it upgrades your home and porch bunches. Good luck with all your endeavors 🙂
This DIY sleeping porch fireplace sounds like such a cozy idea! Perfect for creating a warm, inviting space to relax. Thanks for sharing dear.
I wish I had a porch like this one, it is beautiful and so serene. The fireplace only adds to quaintness you already have making it even more enchanting.
This is a great DIY tutorial for a larger style of project. I will admit this is not for a weekend warrior that has never done a lot of DIY’s you need to have some skills. If it is your first rodeo this may not be for you, but as a regular DIYer myself this is really alluring to see it done well. Thank for all the inspiration.
This fireplace is everything, I just had a neighbor add in one to her home and it ran upwards to 10-15K to add something very similar to this to her home using a contractor. I would be very interested to know the budget of this project for your DIY in comparison. Would you be willing to share?
Hi Erin to be very honest the contractors quote was probably mostly labor. For us the stone tile & supplies was around $500, the fireplace via Amazon was $150, and the wood/Durlock/building supplies was approx. $250. So our total was under $1,000 for this project. We own our tile saw, and other tools needed to complete this project, which would indeed add to daily project total if you had to rent those items.
Cozy and genius! This transforms an outdoor space into the ultimate relaxation retreat.
Such a pretty fireplace and I love the stone tiles it really makes it look upscale. You guys always do such fabulous work for all your DIY projects.
Thanks, I’ve recently been searching for info about this topic for ages and yours is the best I’ve came upon so far. However, what in regards to the bottom line price? I need a number for my husband to move forward
Hi Ariel I think a concrete number would depend a lot on how big of area you have, the existing wall, and finish choices. These could all factor into the final number at the end of the day. While I did try to keep our budget on the lower side, I know several designers that will pick seriously stupid expensive finishes in the name of “quality” which is not always the case. Do your research, name brands are not always the best purchase sometimes you can find a similar product for better pricing. Let’s face it they are all made in the same factory just one gets the designer label, when it comes to tile, cabinets or even some pieces of furniture you will never know the difference.