DIY Concrete Garden Steps
We recently added a set of DIY concrete garden steps to our backyard. Which ended up being 4,200 lbs of hand poured Quikrete concrete, and 6 months of battling rain to complete.
We recently completed our spring DIY project, of adding some concrete garden steps to our yard. These will allow us to walk from our back yard down to a wooded walking trail that runs next to the creek behind our home. We started this project back in March, and due to all kind of crazy weather and pop up storms the project has been slightly delayed. Let’s just say the process of digging and hand pouring the 4,200 lbs of Quikrete concrete was quite a challenge, in the rain.
* This post contains affiliate links for your convenience. These involve no extra cost to you, but may result in me receiving a small commission should you decide to purchase after clicking on my links – for which I am very grateful! You can view my full advertising disclosure here.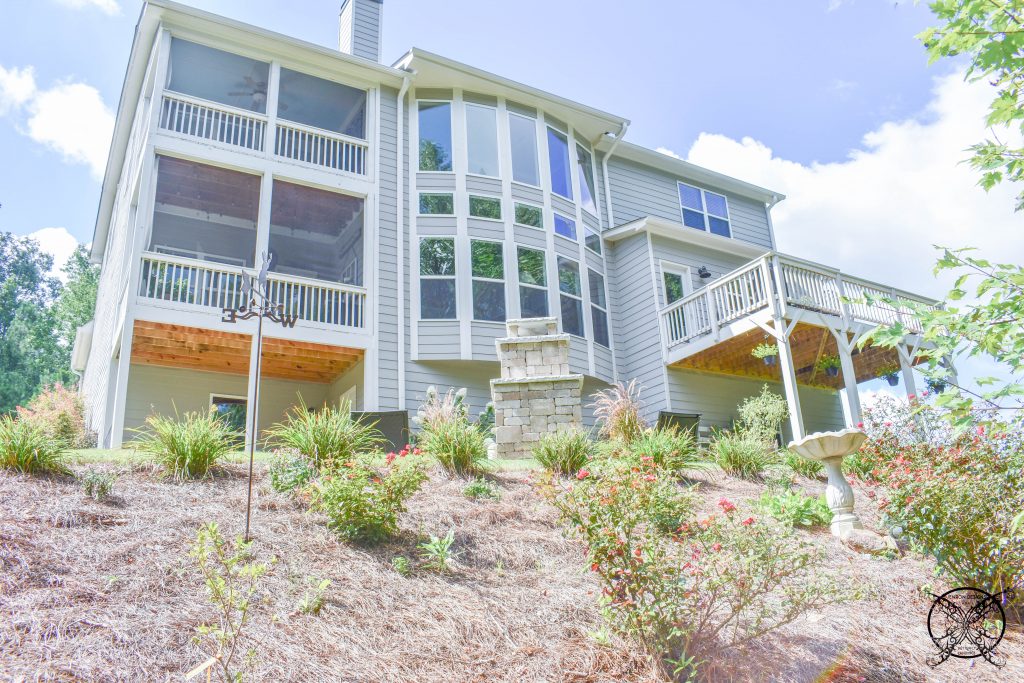 As you can see, our back yard has a steep slope. Ironically our previous home also had a slope, in the opposite direction. Which presented an entirely separate set of issues, which is why we selected a home with a slope going away from our home this time. Let me just say as a side note, that proper lot selection really is very important during the building process. Believe it or not I actually spent more time stewing over my lot than I did on my interior finishes,since those can will all eventually be changed, lots you get stuck with a lot things you can never change, like changing the flow of water due to county codes and ordinances so make sure you are properly informed.
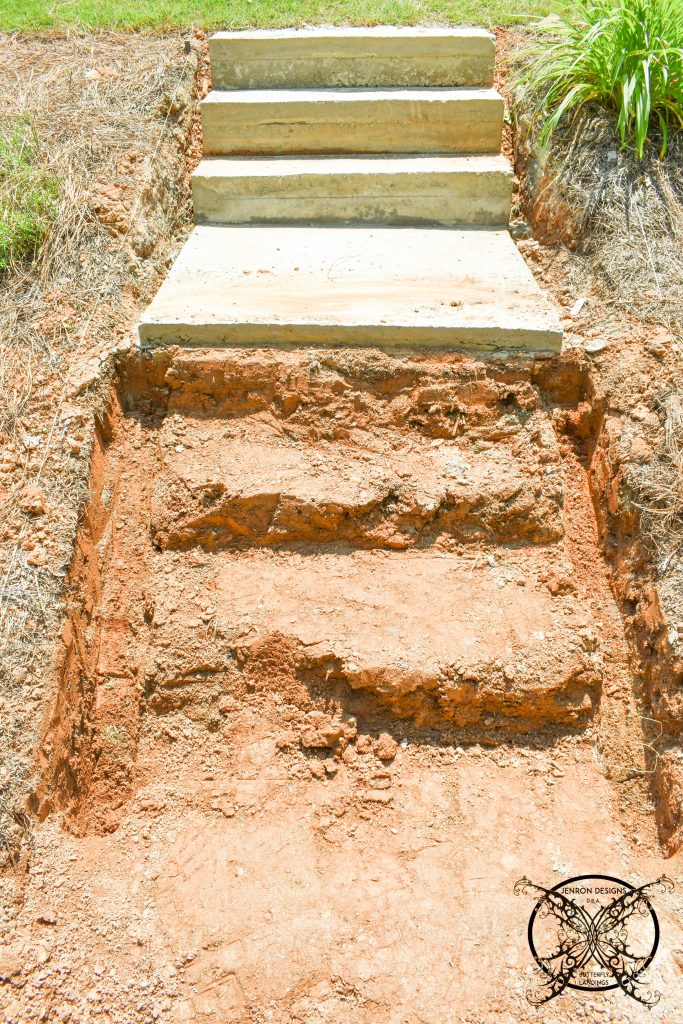
  So here is the DIY process that my husband Ron came up with, all on his own. I gave him the perimeters of: I wanted steps going down the hill, that will not ever rot, like our previous home’s railroad cross-ties. This made stone and concrete our top choices. He started by getting a basic layout of where I wanted the steps to go and staked off the area with string as a guide. He also gave the area a rough rake to remove pine straw and loose rocks.
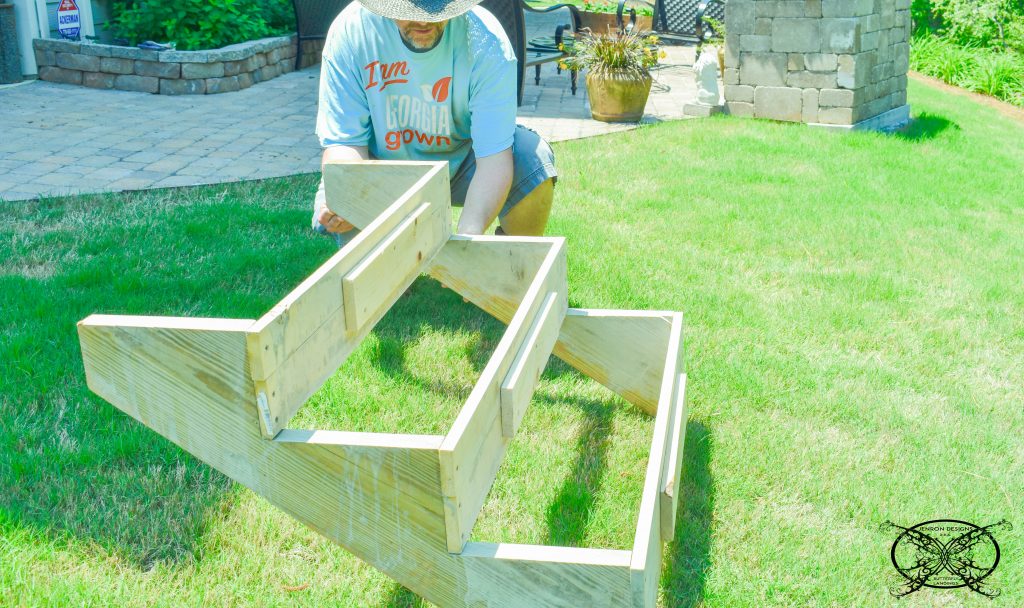 Next, he constructed a form which is based off a pressure treated stair stringer. This is the exact same stair stringer that is used for exterior deck steps. Ron cut the stingers in half and made a 3 step form that could easily be dug into the side of the hill. He went with 3 steps based upon the actual grade of our hill so he could turn and alter the steps as he went to make a natural descent to the bottom of the hill.
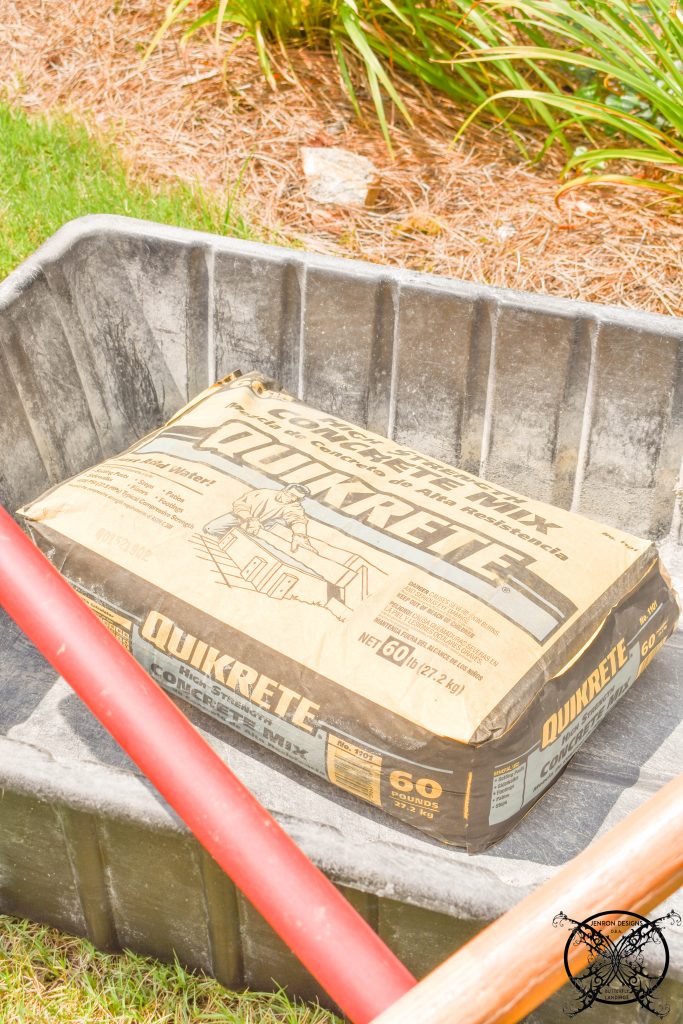 The next step was to mix the concrete and add it in to each of the step forms. It ultimately took 70 bags of Quikrete to create the entire staircase. However, it was easier to handle one bag at a time, in the ridiculous hot Georgia heat. This kept the product from setting up too quickly and allowed us to pour as we went in the project. I also loved that the bag showed a picture of the exact project we were doing, LOL.
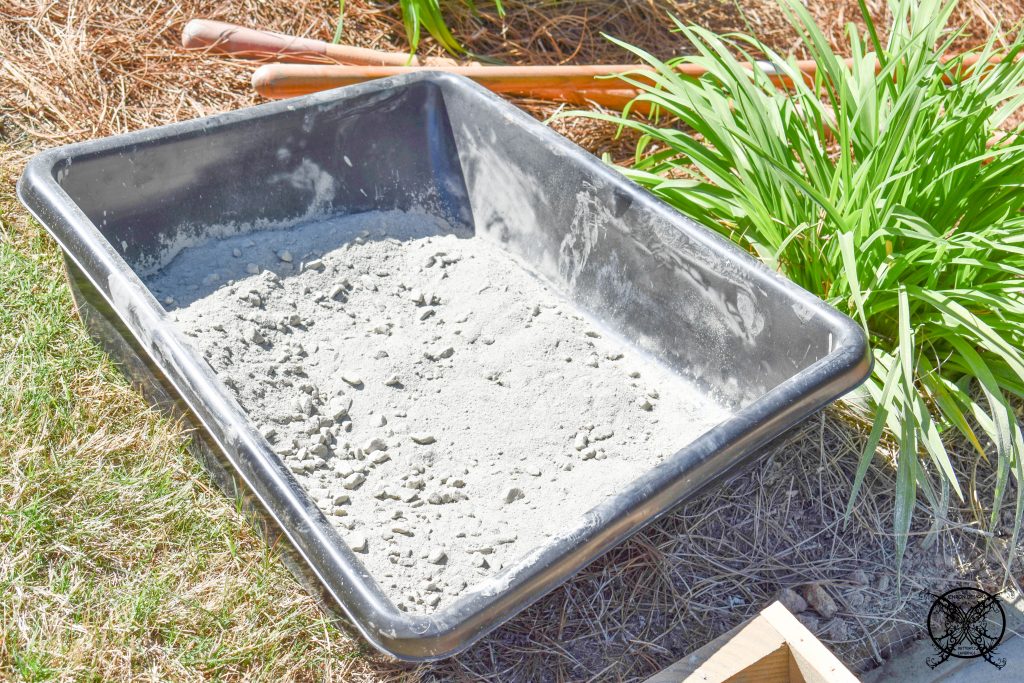 We also added metal rebar stakes, that where primed and painted to resist rust and corrosion, into each of the steps for stability prior to pouring the concrete. He filled in each section and then smoothed off the tops. Since this is an outdoor staircase, I was not really worried about perfection as long as it is an even stair tread. Plus, I am thinking that we will probably stain the staircase at some point.
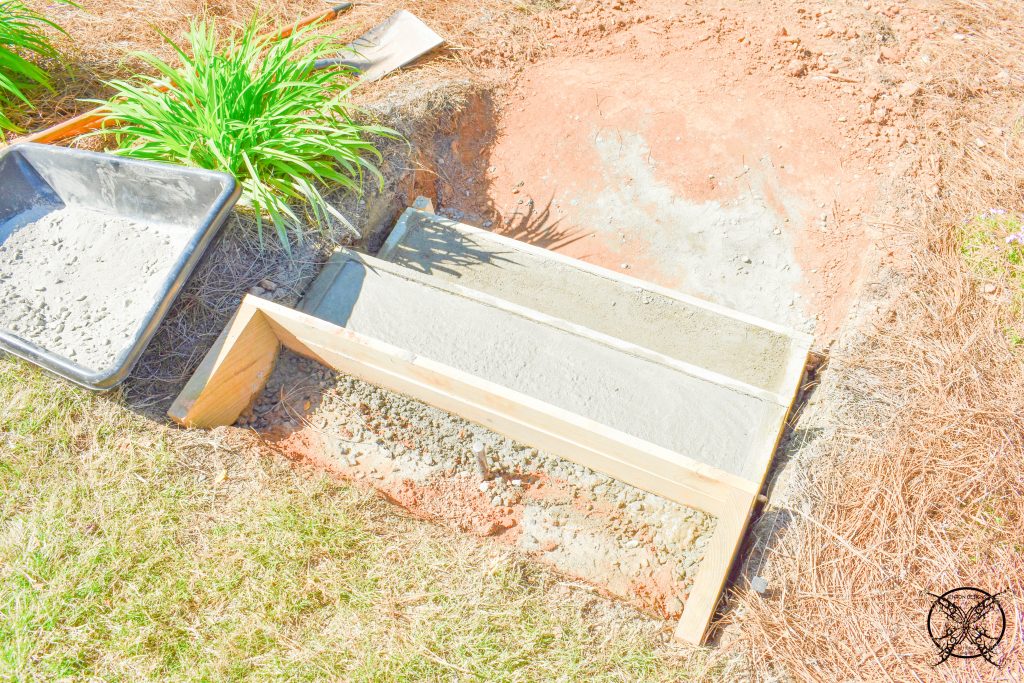 We also found it was easier to start from the bottom step and work up. The would keep any possible run off from occurring, when adding the water and troweling the excess off. You can see one of them in the top form that has not been filled yet.
 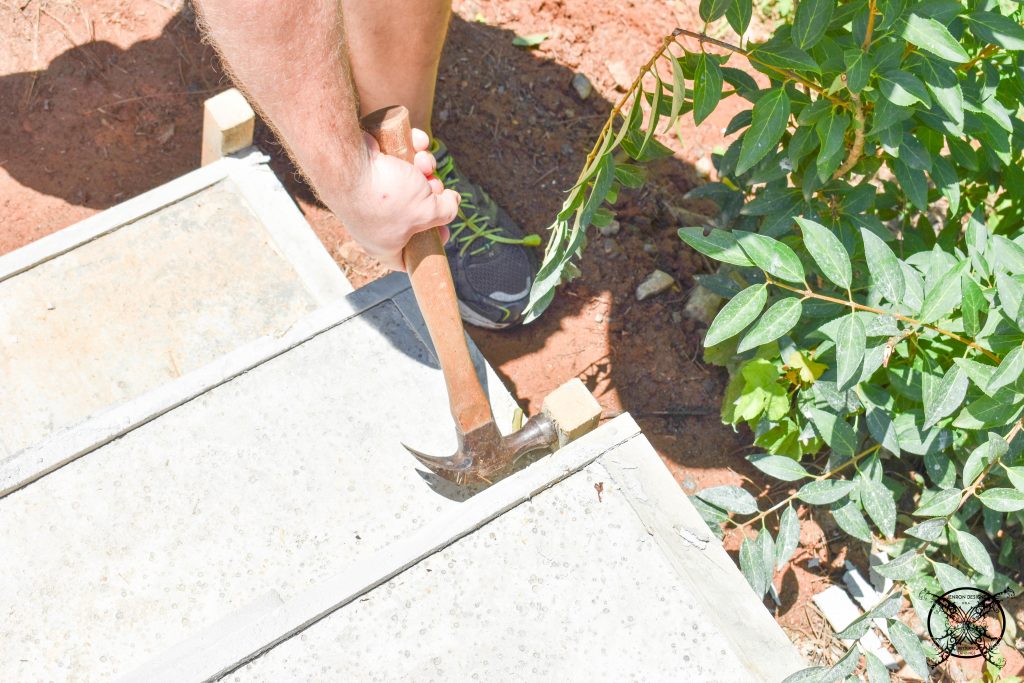 Once the steps are poured it was all a waiting game for the concrete to set up. Which depending on the weather was about a day or two due to thickness. At this point he could remove the form which would allow him to begin working on the next set or level.
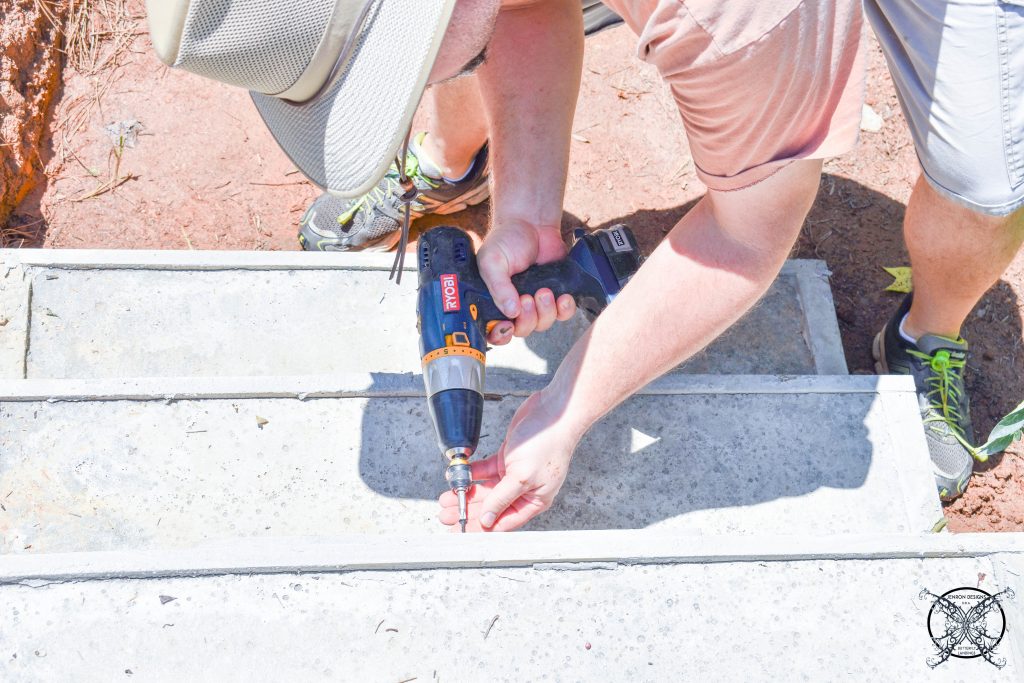 Since he was planning on reusing the forms as he worked his way down the hill, he decided to use screws instead of nails, which made the disassembly process much easier. Plus it saved his boards from splitting and splintering.
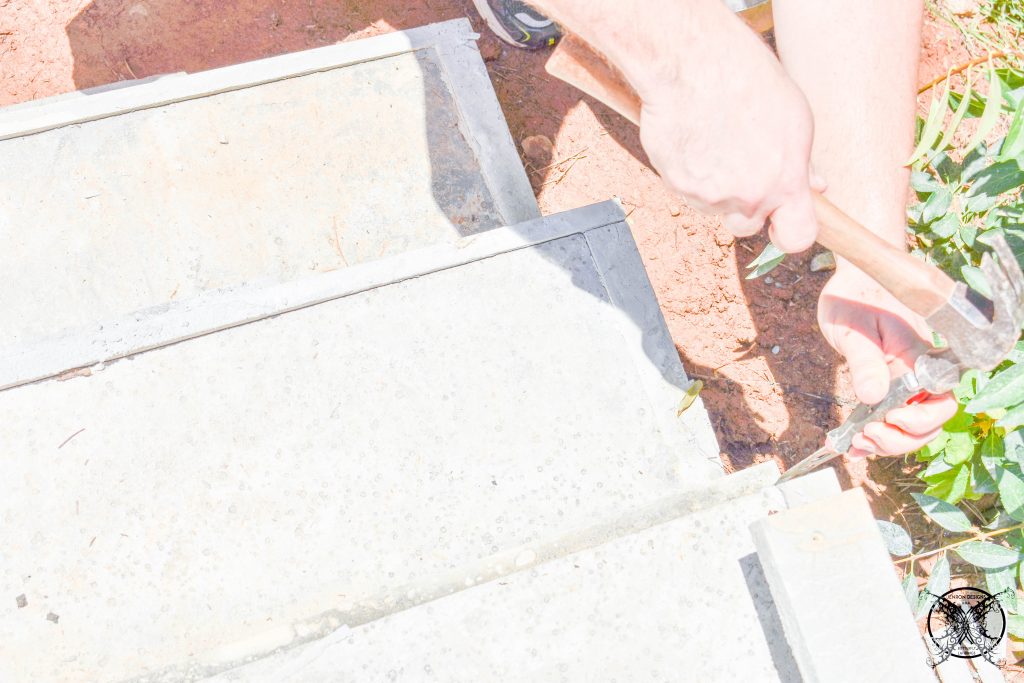
 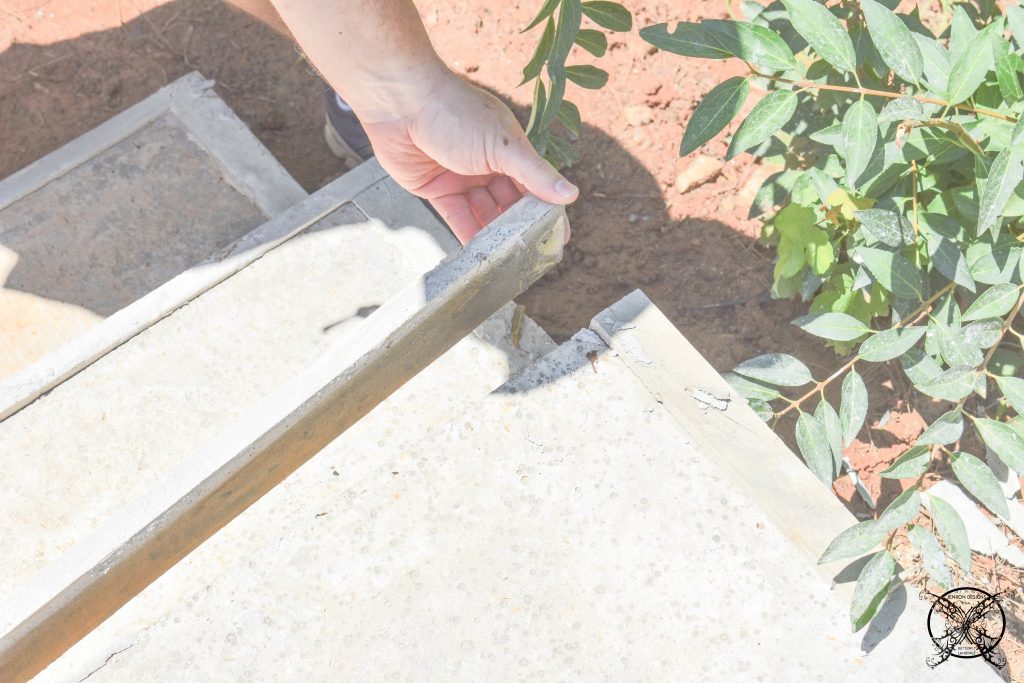 There were a few sections that required using a wonder bar to pry the boards away from the concrete. Which was mainly on the long runs for the actual stair stringers.
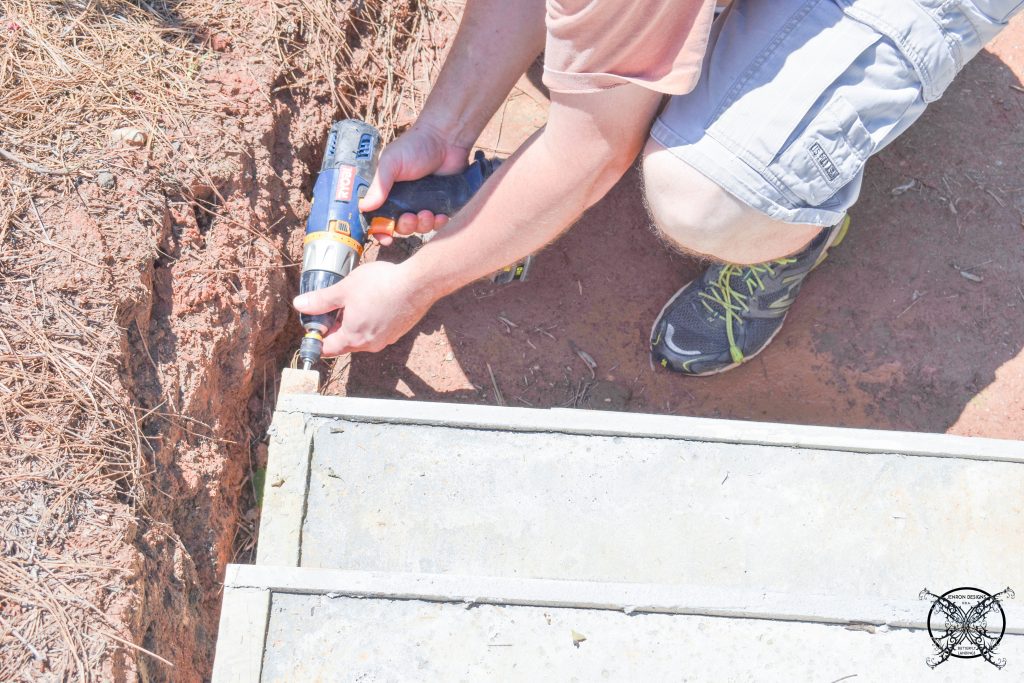
 As you can see the entire stringer lifted out seamlessly and was ready to be reassembled for the next set of step.
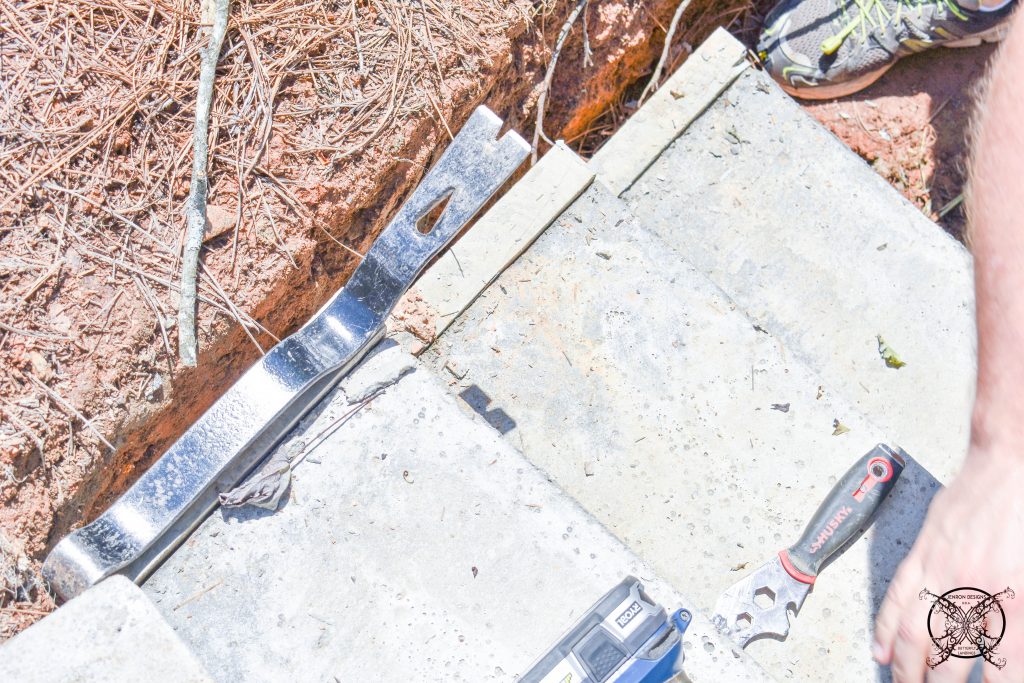 Ron actually made sure to number the pieces prior upon building the initial form, so he would know the exact order of the boards and where each of them went the next time.
 I mean he is an engineer after all, I would expect nothing less. I will not even get into the schematic drawings and actual structural measures that went into this process just to get this project started. Like I said, I just said told him, I want steps, that won’t rot, and let him go with this one.
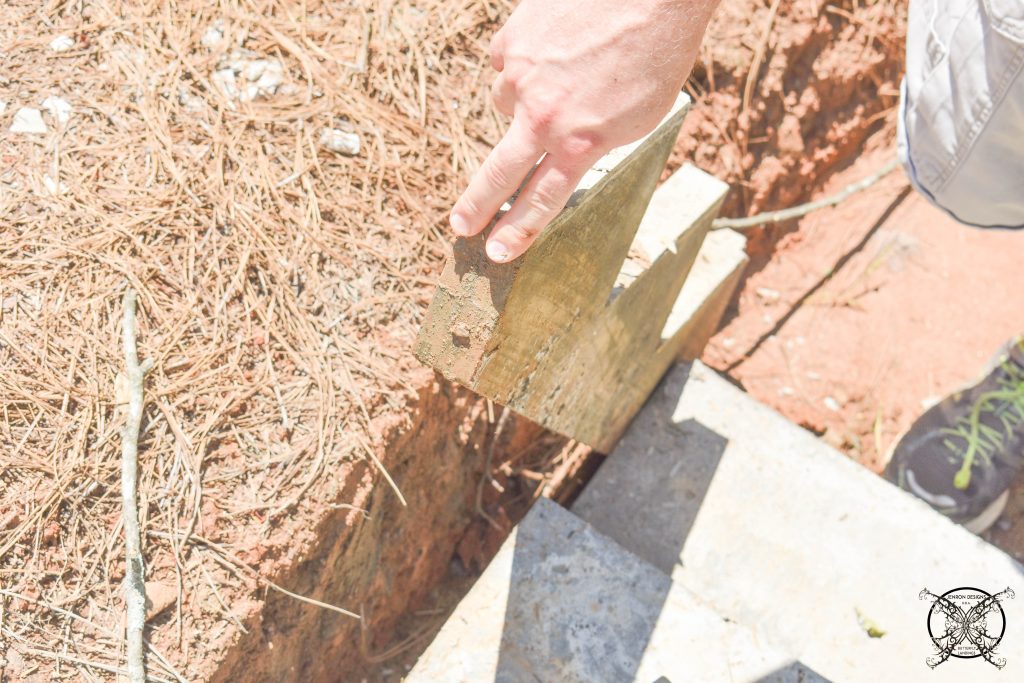 So this is what the first set of step looked like after the forms were removed. Pretty nice, right? Yeah only 50 more to go, just kidding, lol.
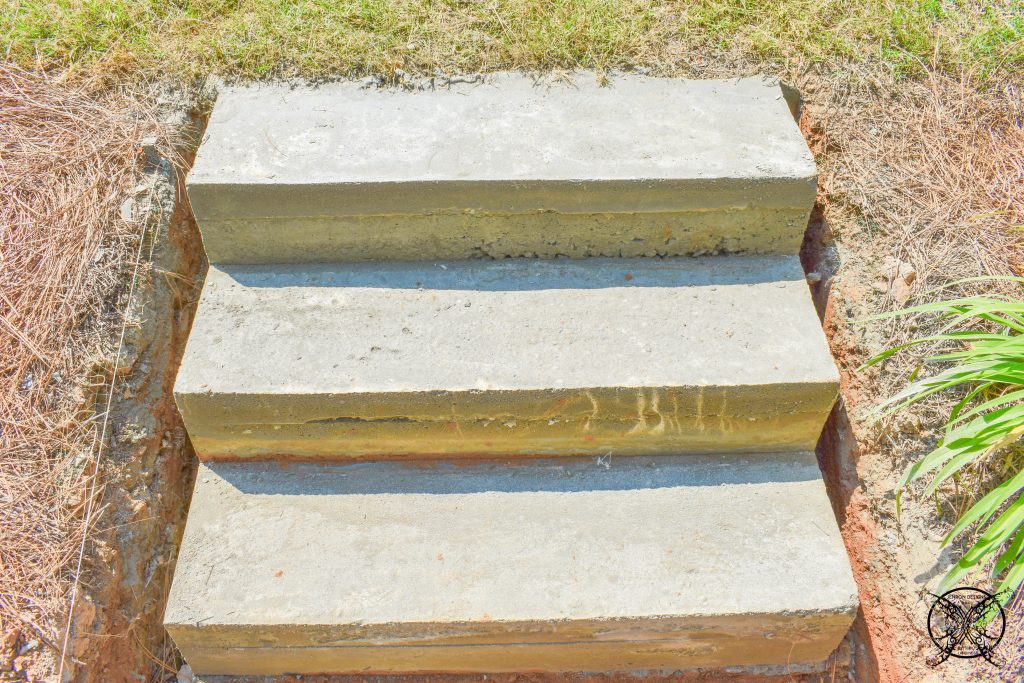 Well not really, the next level needed to be more of a concrete landing or pad since the grade was more level. I also really liked the idea of it not being just a straight staircase.
 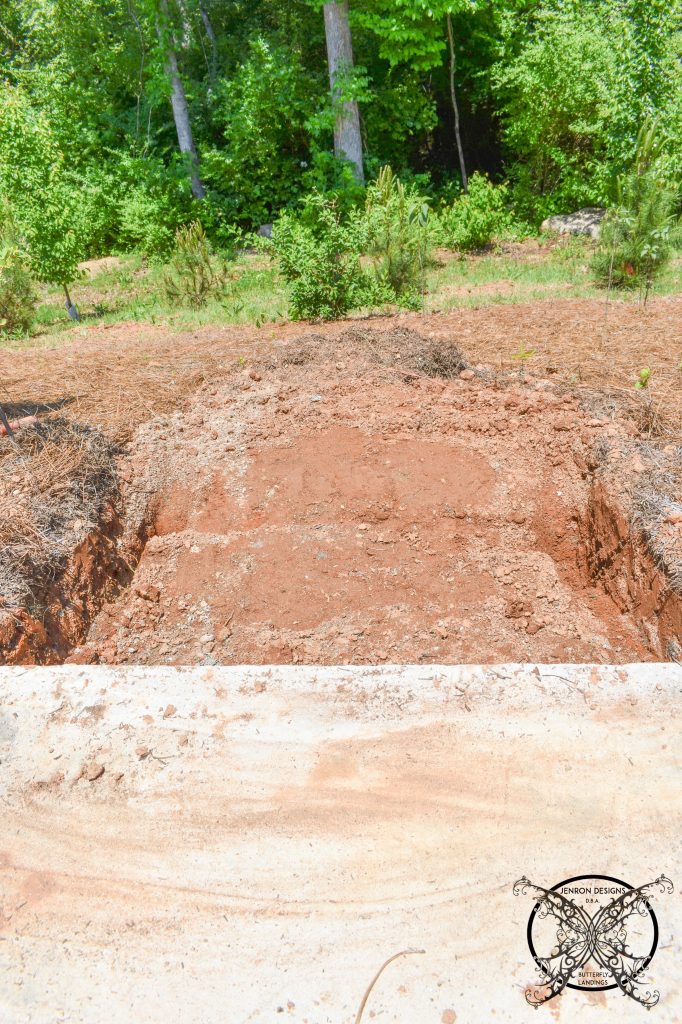 I wanted to meander and have areas you could stop and pick flowers or blueberries since they are planted along this pathway. This level ended up being a 3 foot landing before the next set of steps began. Which really works well with the topography of the land as well.
Design Tip- For exterior handrail codes, in our state the maximum amount of stairs you can legally have without a handrail is 3 so this worked out perfectly.
 Then the process started all over again with the next set of 3 steps. We did the same process as above; adding the rebar, pouring the concrete, etc. It really just became a rinse and repeat scenario, as we worked our way down the hillside between thunderstorms and other life happenings.
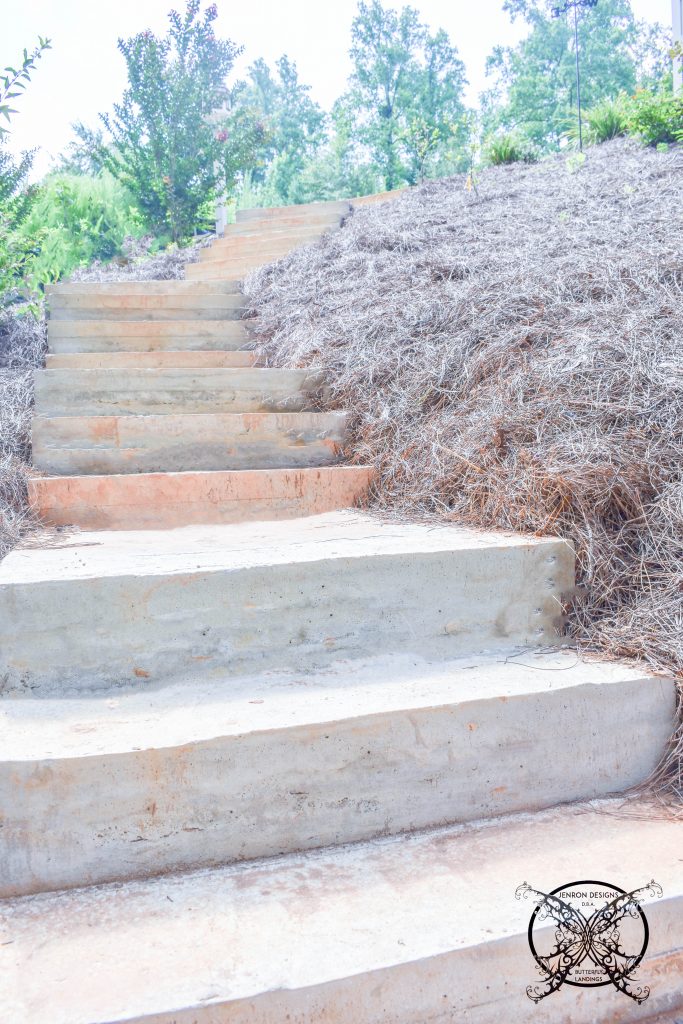
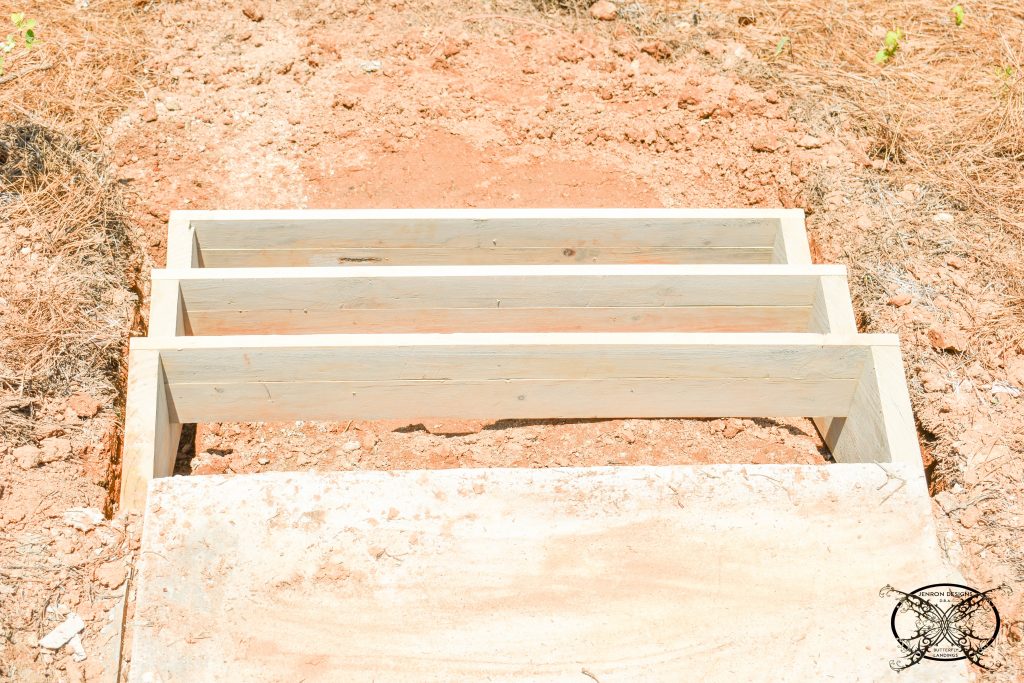 This was a few of the pictures taken at the halfway point we were about 15 steps in and 2 landings. We were really making great progress and we were very happy about the way the staircase was looking so far. However, we needed to start creating a turn. You see I wanted it to have a meandering garden path feeling so I wanted it to have a natural turn, which was also going to help with some of the back breaking digging.
 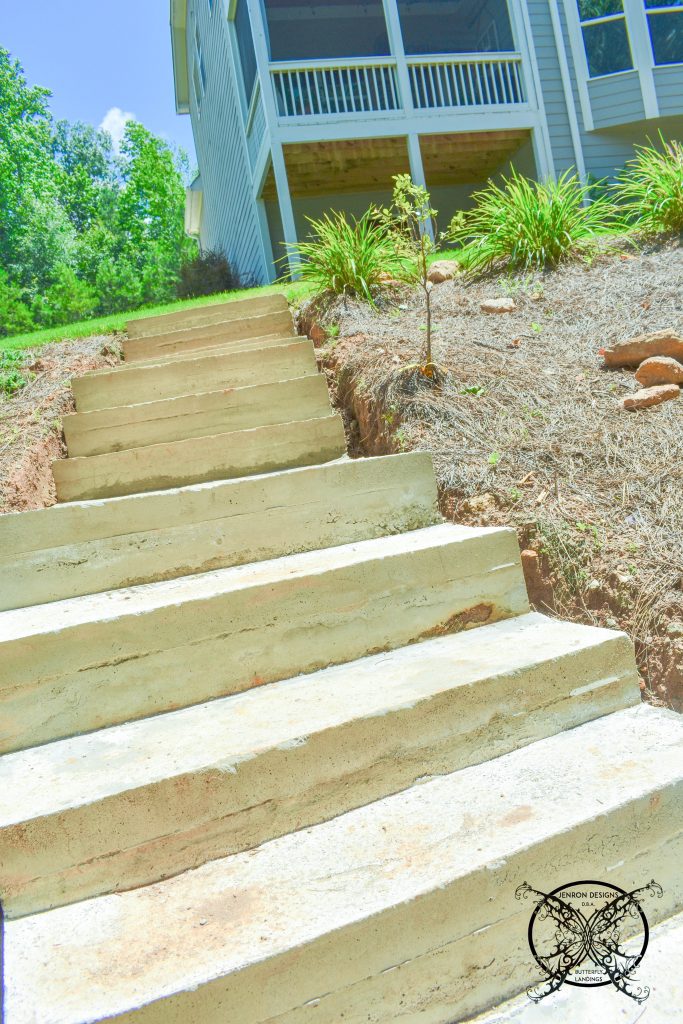 So, Ron again engineered a form to create a subtle turn on the landing. So instead of a 3×3 square of concrete he altered the form to make the landing turn on a 35 degree angle. Then we proceeded with the next set of steps.
 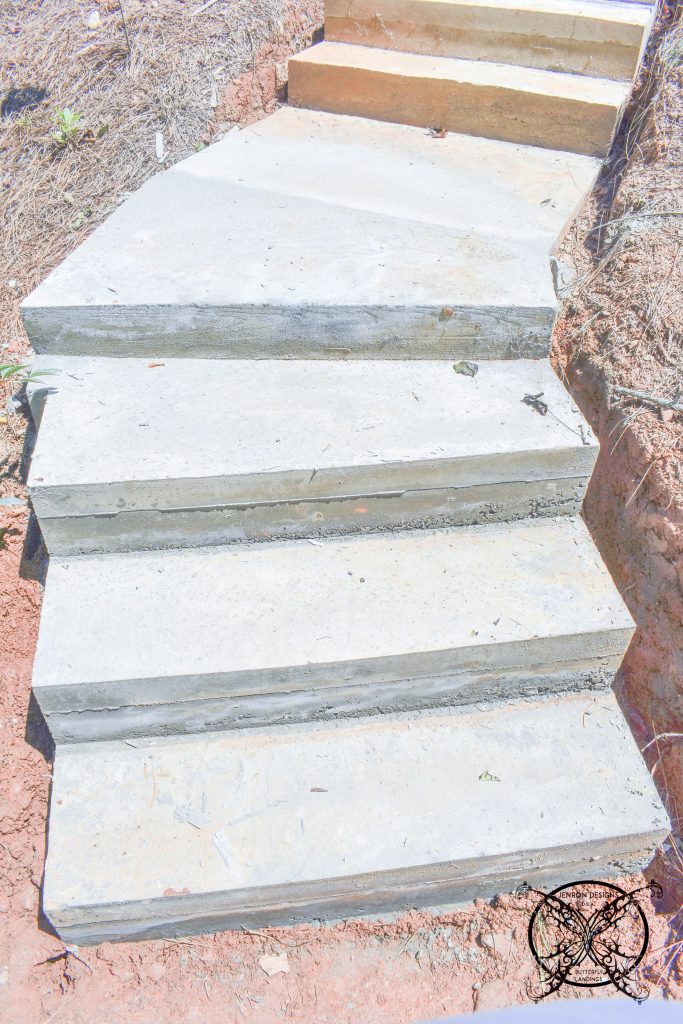 This is an aerial shot from the back porch so you can see how the turn really nestles nicely into the hillside. It also shows you how we are still only a little over half way done. Again the weather this year was less than cooperative because it seems like it rained even other day, which this is fantastic for our plants but not so great for pouring concrete.
 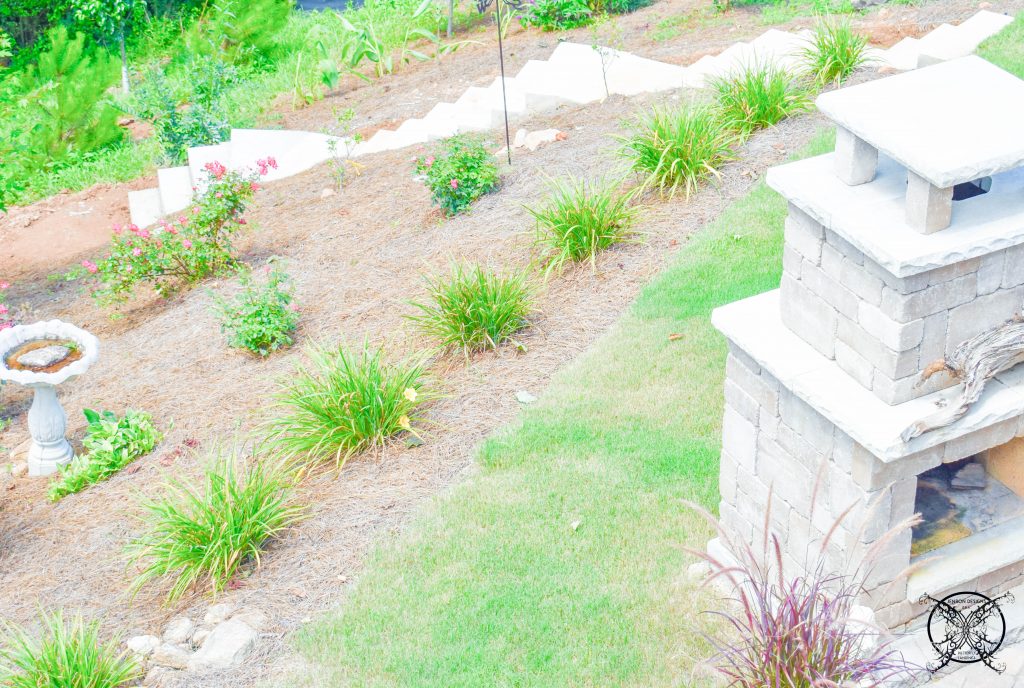 We managed to finally just keep getting a few more sections done here and there over the last few months. Finally a little over 4,200 lbs of Quickrete, which was 70, 60 lb. bags, we finally reached the bottom of the hill. Yay!
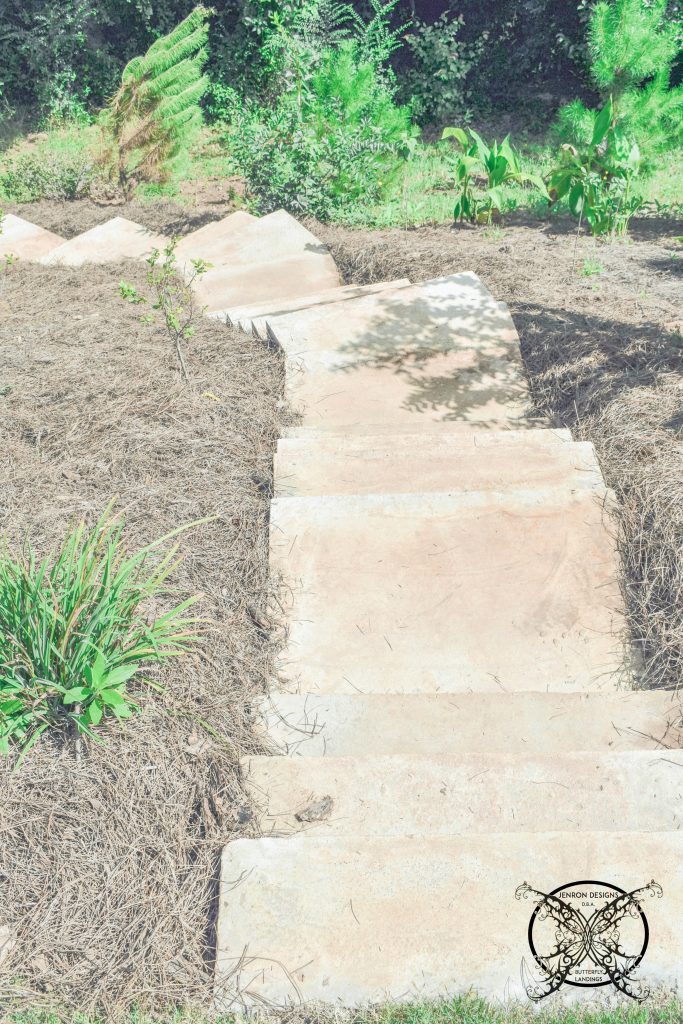 While this may seem like a lot of work, it saved a lot of money since this project ended up costing us just under $1,000 in total. We had been quoted well over $15,000- $20,000 for our backyard patio and steps which we have now completed both for way under that amount. See the DIY Patio Paver Project for those details.
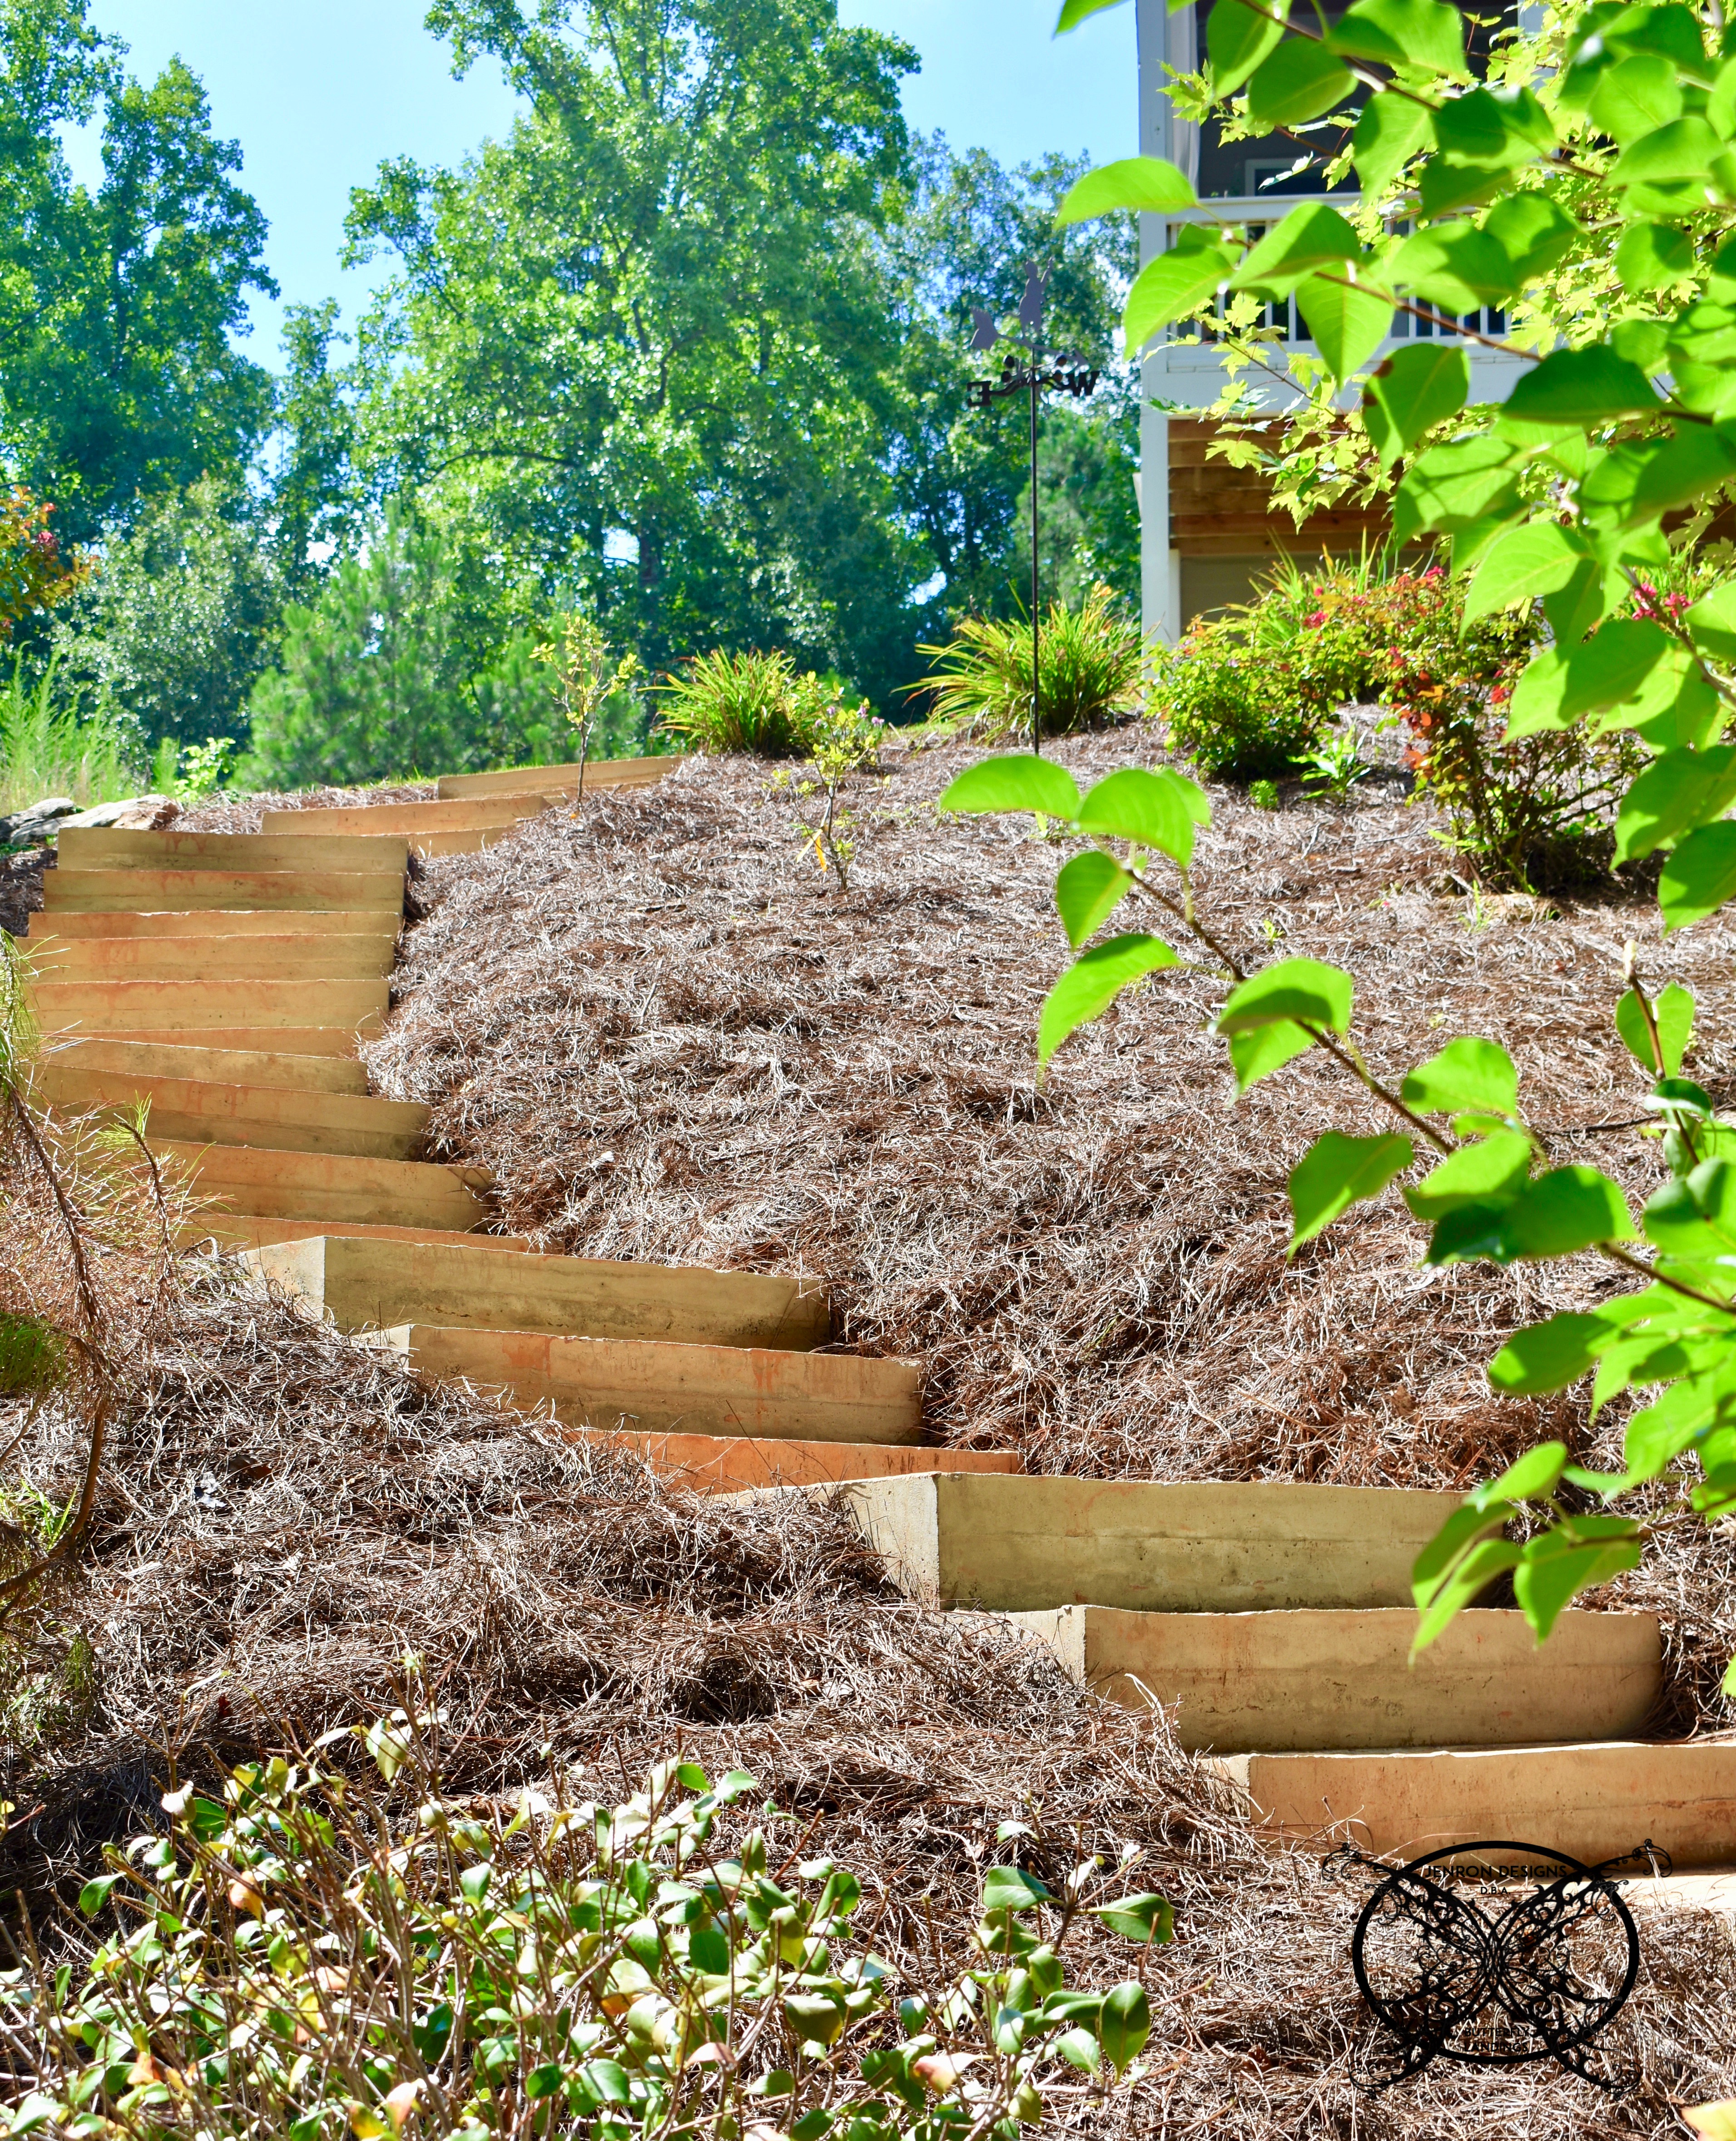
 This is a photo of the final run of steps, from the turn point on the landing, down the base of the hill. You can see from the turn it was a perfect pattern of 3 steps and landing, then repeated 3 more times until you reach the base.
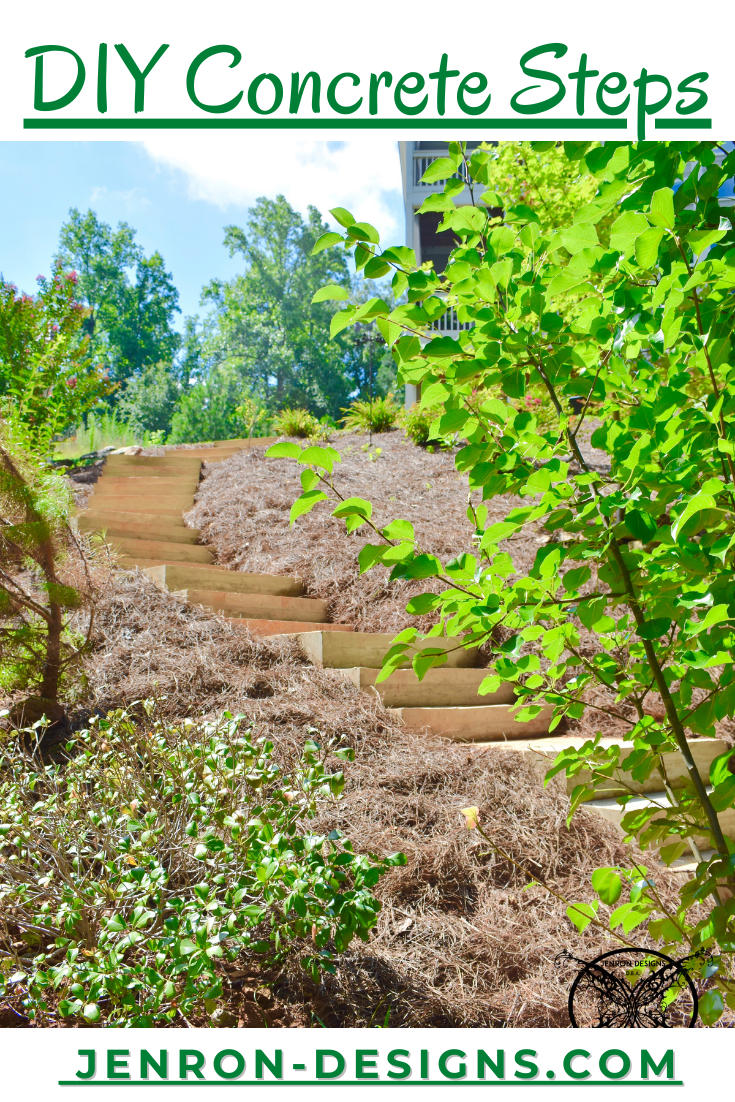
 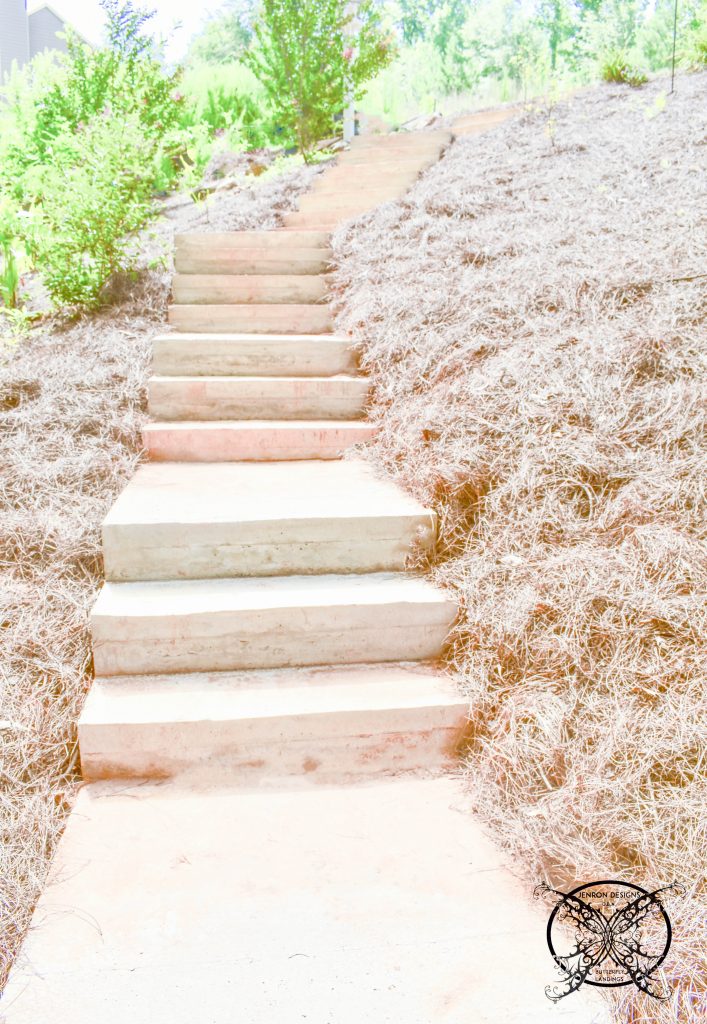 This is a a view from the bottom looking back up at all of our hard work after we got the fresh pine straw and a few pieces of landscape shrubs and trees added into the bare spots. While we still have a little more work to do, I am so happy to be able to easily get to the base of the hill.
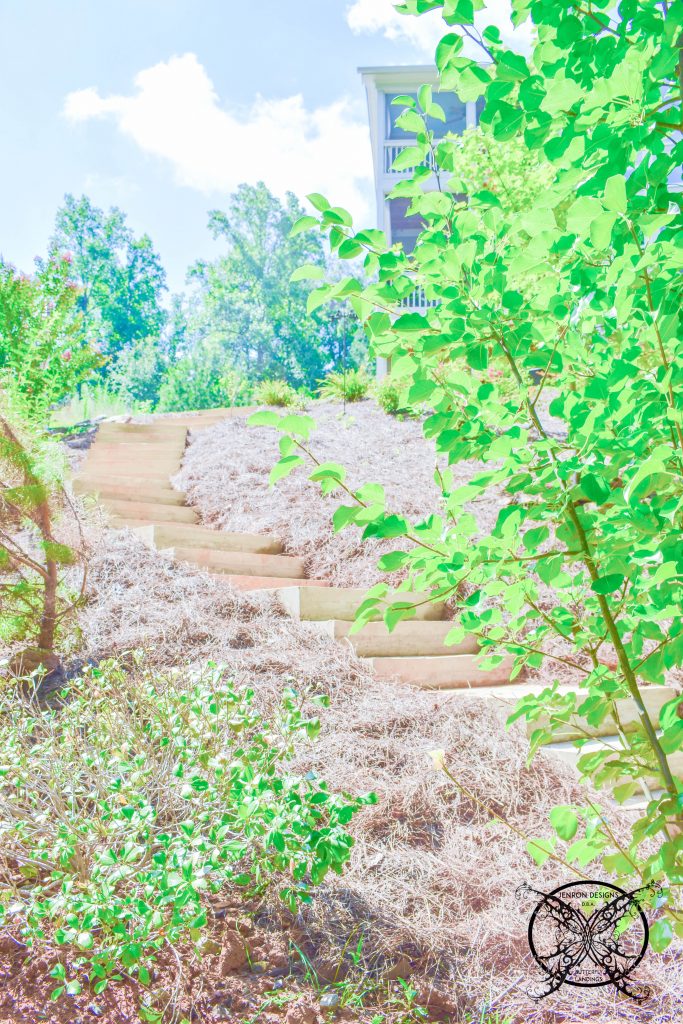 As a future project we are thinking we want to add a pea gravel, moss, or mulch walk path over to our natural wood lined archway. That are will need to be kept natural since adjoins to the creek and natural trail that backs up to our home.
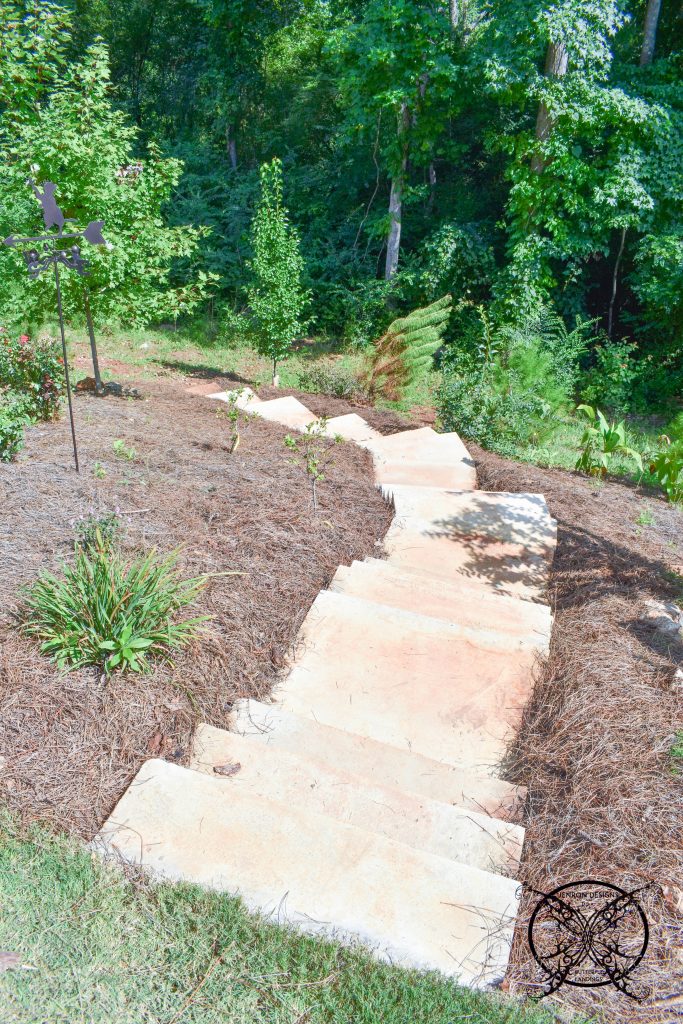 Here is a closer look at the area which we maintained a cut made originally by the builder, into the woods in order to access the walking path and creek from our backyard. Sadly, we have found ridiculous things left by the builder back there from the silt fence, an old fire 100 ft. hose, and many leftover building supplies that were not disposed of properly.
 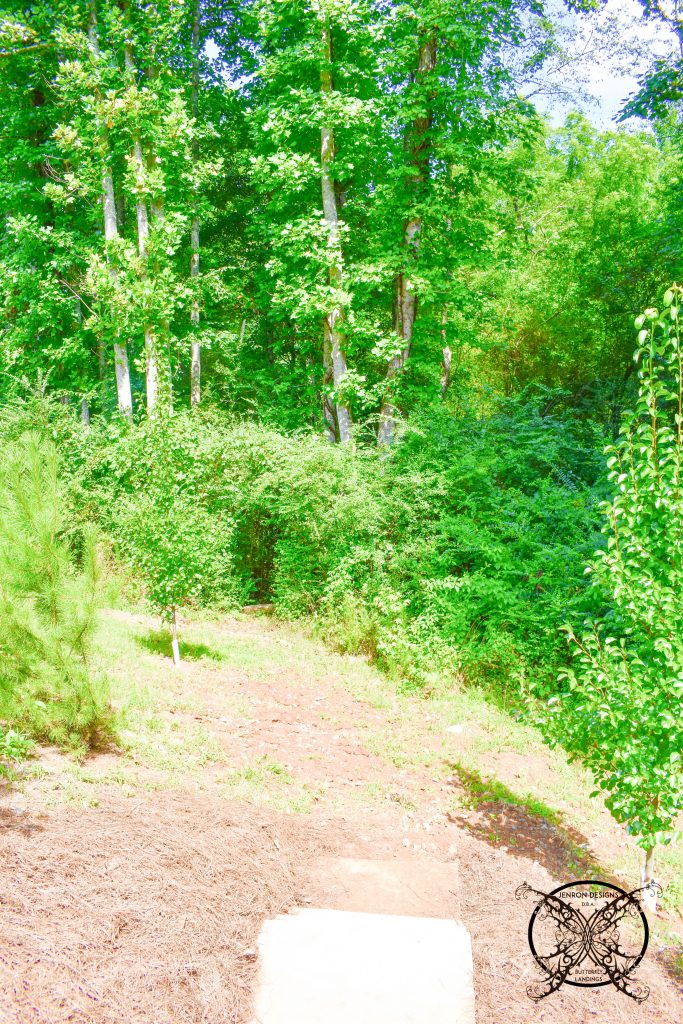 The majority of this path was a deer path and was already there; we have just decided to maintain it and keep it clear from overgrowth so we can access the beauty that lays behind it. The deer are a bit of a natural snake deterrent since they can stamped them pretty easily so that is helpful. However, the deer also eat a lot of my plants, so Ron has been known to “water” the way only men can, to keep them away from some of my more precious plants, and yes that does work.
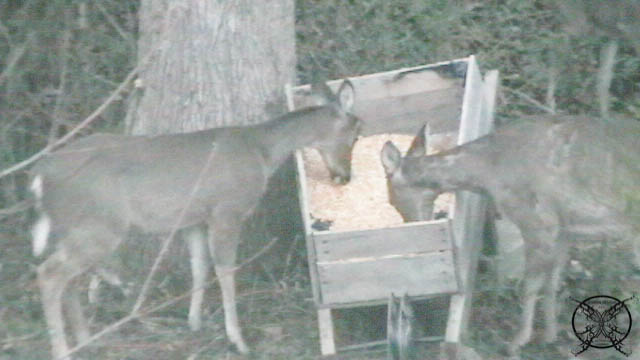
 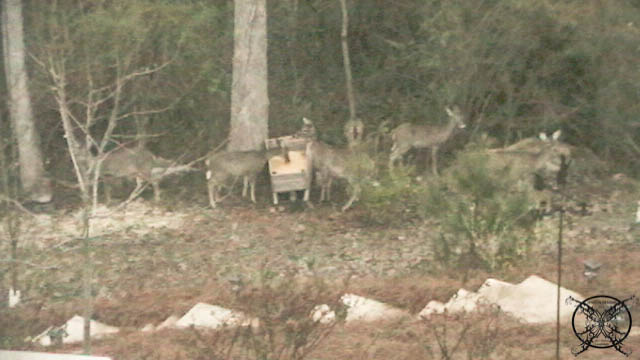 Post Update: after clearing the trail better and putting out some deer feed, and a salt/mineral block out, we now have even more deer travel through the yard on a regular basis. The picture above shown from our game camera has 8 deer visiting.
 Below is a picture of the overflow from Cogburn Creek, a large creek that runs through our the middle of our neighborhood. At the moment is quite low, but after a few of the rainstorms we have had this summer this lazy little creek looked more like some white water rapids.
 It also has a tendency to over the it’s banks which is quite a feat considering it has to rise 4-5 feet to do so in our area of creek. The erosion along the creek edge is crazy too since we sit right in bend of the creek, we have seen several trees wash away during the floods just because of the racing water that are eroding away at the root systems. That is why this is part of the 100 year flood zone line, which you are seeing in action.
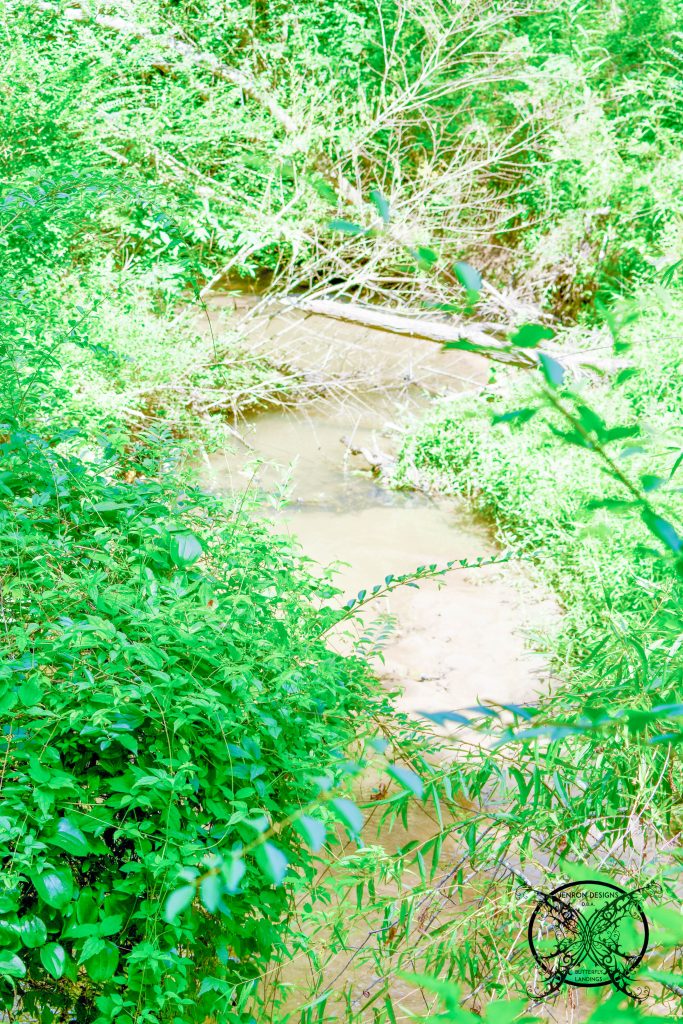 We actually have actually had a natural waterfall that has developed over the past 2 years from the beavers taking down a few trees and the natural water run off from the pond, located near our house, on this very trail. Let me tell you it sounds absolutely amazing when we have a lot of rain.
 I can actually hear it from my Sleeping Porch which is just another reason I stand behind my original words above about lot section and picking the right one. It might have taken some back breaking work but now I can access some of the best spaces in my neighborhood directly from my own backyard.
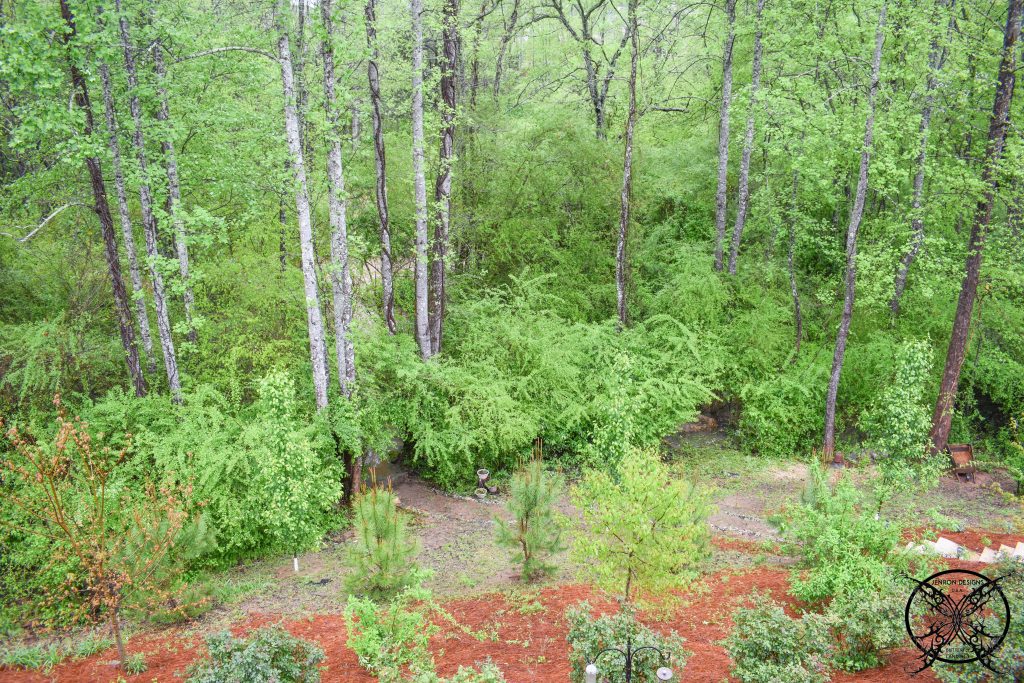 Onto our next project…. You can be the first to know what we are up too! Sign up for our monthly Designer Notes to stay in the know about all of our upcoming projects.
PIN ME for later and be sure to follow us on Pinterest at Jen @ JENRON DESIGNS
* This post contains affiliate links for your convenience. These involve no extra cost to you, but may result in me receiving a small commission should you decide to purchase after clicking on my links – for which I am very grateful! You can view my full advertising disclosure here.
Those look really nice. I like how rustic they look.
oh my gosh! They are beautiful, but what a huge project! Great job!
This is such a great idea! I love that you won’t have to worry about replacing them if they were made of wood. Really cool!
Joanna I agree, I our last home we had stairs made with railroad crosstie’s and the rotted when in 10 years. The only way to average them was to pour concrete inside the hollowed rotten inside and hope for the best. I vowed never again. LOL
Thank you Laura, we are actually planning to let them weather to see how the concrete ages then we may be painting, staining or possibly acid washing them for a little bit higher end finish. While I like the basic cast concrete look, I think it still need a little more polish plus the GA red clay keeps staining them, which is driving me nuts.
Wow, those turned out beautifully! Can’t wait to have my own home and begin projects!
Whew! What an awesome job!
And having to endure all that weather (rain) challenge.
An amazing out come.
No stumbling down the hill 😊
Goodness, those look absolutely gorgeous and you make it look so easy to do!
Wow, that is one impressive project and one that will last forever. I am also a gardener and garden designer and love to see these amazing DIY projects.
What a great job! You’ll use those for years to come!
Oh my goodness that is a lot of concrete, but those steps are magnificent and will last a lifetime. Your husband is so creative making the mold with the stair runners, what a smart guy.
Thank you VP it was a big job 🙂 Yes we are very happy to not tumble or slide down that hillside anymore, lol. I can now descend in a much more graceful manner than my previous “trips”.
Hmm that is a lot of concrete great job, on creating those from scratch.
Nice post. I discover something more challenging on diverse blogs everyday. It will always be stimulating you just read content using their company writers and practice a little from their website. I’d would prefer to apply certain with all the content on my small weblog no matter whether you don’t mind. Naturally I’ll supply you with a link with your internet weblog. Appreciate your sharing.
This is a cool way to create steps on a hill, got to pin this one for later.
Hey, you guys made great use of your back yard with this article. I am impressed with the valid points of interest you make here and I agree. In time people will discover your sites true potential.
Intimately, the post is actually the freshest on that laudable topic. I match in with your conclusions and also definitely will thirstily look forward to your approaching updates. Just saying thanks can not simply be adequate, for the outstanding lucidity in your writing. I am grabbing your rss feed to stay informed of your designer of updates. Solid work and much success in your business enterprise!
Great – I should definitely pronounce, impressed with your website. I had no trouble navigating through all tabs as well as related information ended up being truly simple to do to access. I recently found what I hoped for before you know it at all. Reasonably unusual. Is likely to appreciate it for those who add forums or anything, website theme . a tones way for your customer to communicate. Nice task.
This is such a great idea for a hilly backyard, This is really going to benefit me and my family for our project. By the way, I enjoy the way you write.
Hello. splendid job. I did not imagine this. This is an impressive article. Thanks!
Yeah that is pretty amazing you guys did a great job with adding those steps! What an outstanding post!
You made some really good points here that we never thought about for our backyard. I know we have looked on the internet for the subject matter before and found most individuals just use timbers or stone which is expensive or rots.
The perfect idea for our lake house and that super steep grade. I love the idea of concrete, that will be permeant and you know hubby can pour with the best of them so that will save us some moola too.
Wow! These are amazing- they are beautiful! You backyard views are amazing!
Jen, you guys never cease to amaze me! What an incredible addition to your backyard. Love that you’re able to hang out with the deer as you listen to the water rushing by. You’re so right …you picked the best piece of land!
This was such a fun post to read through!! As I was reading it I was thinking this *exactly* the kind of thing my husband would do down to building the forms and drawing schematics lol! He does concrete work actually so I know how backbreaking the digging can be. Good for you all for sticking through it – the end product looks fantastic!!
Thanks for sharing this Jen. I will definitely be trying this out!
Thank you,
Scott (from Ace Concreting Canberra)
Hey! Many thanks for this wonderful DIY. Thanks for this list of tips for my stairs and garden! Thank you very much for your guide, it is really help me with renovation!
OMG it looks amazing! I wish I had an outdoor space but sadly I live in the city
This is a very big DIY project but pretty awesome to have something like this… Pretty!
These turned out really nice! I would for sure hire you though to make these for me. Looks way too complicated for my diy skills!
LOL I am sure we would ever do this again but it was absolutely the way to install them and save a ton of money for this backyard, considering all of our quotes for pavers and stairs in our backyard started around $15,000- 20,000 and only went up from there. We did this project for well under $1,000 ourselves and our patio was just over $2,500 with a outdoor fireplace.
These turned out great!
You always have the best projects! This one really came out so pretty. I love the steps and glad to know how to add these to my home.
Hi! These look great. Can I ask how long the stairway is? I’m trying to figure out how many bags of concrete we would need if we did the same thing. Thank you!
Hi so that is kind of a tricky question since it is a twisting staircase but I think this might prove to be more helpful. Each step took approx 1-1/2 bags of concrete, so for each 3 step section we used approximately 3 bags. The concrete landings took a lot more due to thickness and overall square footage. This is why we built ours in stages as we went, versus ordering all the concrete at one time. Overall the whole staircase is around 30 feet long but it has varying platforms along the way. I hope this helps 🙂
Of course there is plenty of great ideas here to found for the DIYer
Great post like those steps and your garden.
I absolutely love this DIY project! The step-by-step instructions make it seem so manageable, and I can already envision how great these concrete steps will look in my garden. Thank you for sharing this creative idea! Can’t wait to try it out!
What a fantastic project! I love the idea of creating custom concrete garden steps. The step-by-step instructions are really clear and the photos are super helpful. Can’t wait to try this in my own backyard as we have such drainage issues, thank you for sharing!
I absolutely love this DIY project! The step-by-step instructions are so clear, and the finished garden steps look amazing. I can’t wait to try this in my own garden—thanks for the inspiration, Jen!
These DIY concrete garden steps are such a fantastic idea! I love how they blend durability with a rustic charm. The step-by-step instructions are super clear, making it feel approachable for beginners like me. Can’t wait to give this a try in my own garden! Thanks for the inspiration!
I absolutely love this DIY project! The steps look so sturdy and stylish. I can’t wait to try making my own concrete garden steps. Thanks for the detailed instructions and tips, they’re super helpful!
I absolutely love this DIY project! Your step-by-step instructions and tips made it so easy to follow. The finished garden steps look amazing and really elevate the outdoor space. Can’t wait to try this myself! Thank you for sharing!
This is such a fantastic DIY project! I love how you broke down the steps and made it easy to follow. The concrete garden steps look beautiful and would really enhance the outdoor space. I can’t wait to try this in my own garden. Thank you for the great tips!
I absolutely love this DIY concrete garden steps idea! The detailed instructions and tips you provided make it seem so achievable. I can’t wait to try this project in my own garden. Thank you for sharing such an inspiring post!
The steps look so sturdy and stylish, I absolutely love this DIY project, and I can’t wait to try making them in my own garden. The detailed instructions and tips you provided are super helpful. Thanks for sharing such an inspiring idea!
What a fantastic and creative way to enhance garden aesthetics! The step-by-step instructions are super clear and easy to follow. I can’t wait to try making my own concrete garden steps—thanks for the inspiration, Jenron!
The step-by-step instructions are super clear, and the design looks so charming in the garden. Can’t wait to try this out in my own yard. I absolutely love this DIY idea! Thanks for sharing such a fabulous project!
Love this DIY project! Your step-by-step instructions are so clear, and the finished garden steps look beautiful. I can’t wait to try making my own, and I appreciate all the helpful tips you included, especially about the concrete mix. Thanks for sharing such an inspiring idea!
I absolutely loved this tutorial! The step-by-step instructions made the process so much easier to follow. I can’t wait to try making my own concrete garden steps to enhance my garden. Thanks for sharing such a creative DIY project!
I absolutely love this idea! The step-by-step instructions are so clear, and the finished product looks fantastic. I can’t wait to try these concrete garden steps in my own backyard. Thank you for the inspiration!
I absolutely love this DIY project! The detailed steps and tips you provided make it seem so manageable. I can’t wait to try making my own concrete garden steps and add a unique touch to my yard. Thanks for sharing such great inspiration!
What a fantastic and detailed tutorial! I love the idea of adding a personal touch to my garden with DIY concrete steps. The tips on mixing and pouring are super helpful. Can’t wait to give this a try!