Adding a Herringbone Shiplap Accent Wall
Okay, welcome to the ORC FALL 2018: Week 3 Adding a Herringbone Shiplap Accent Wall.
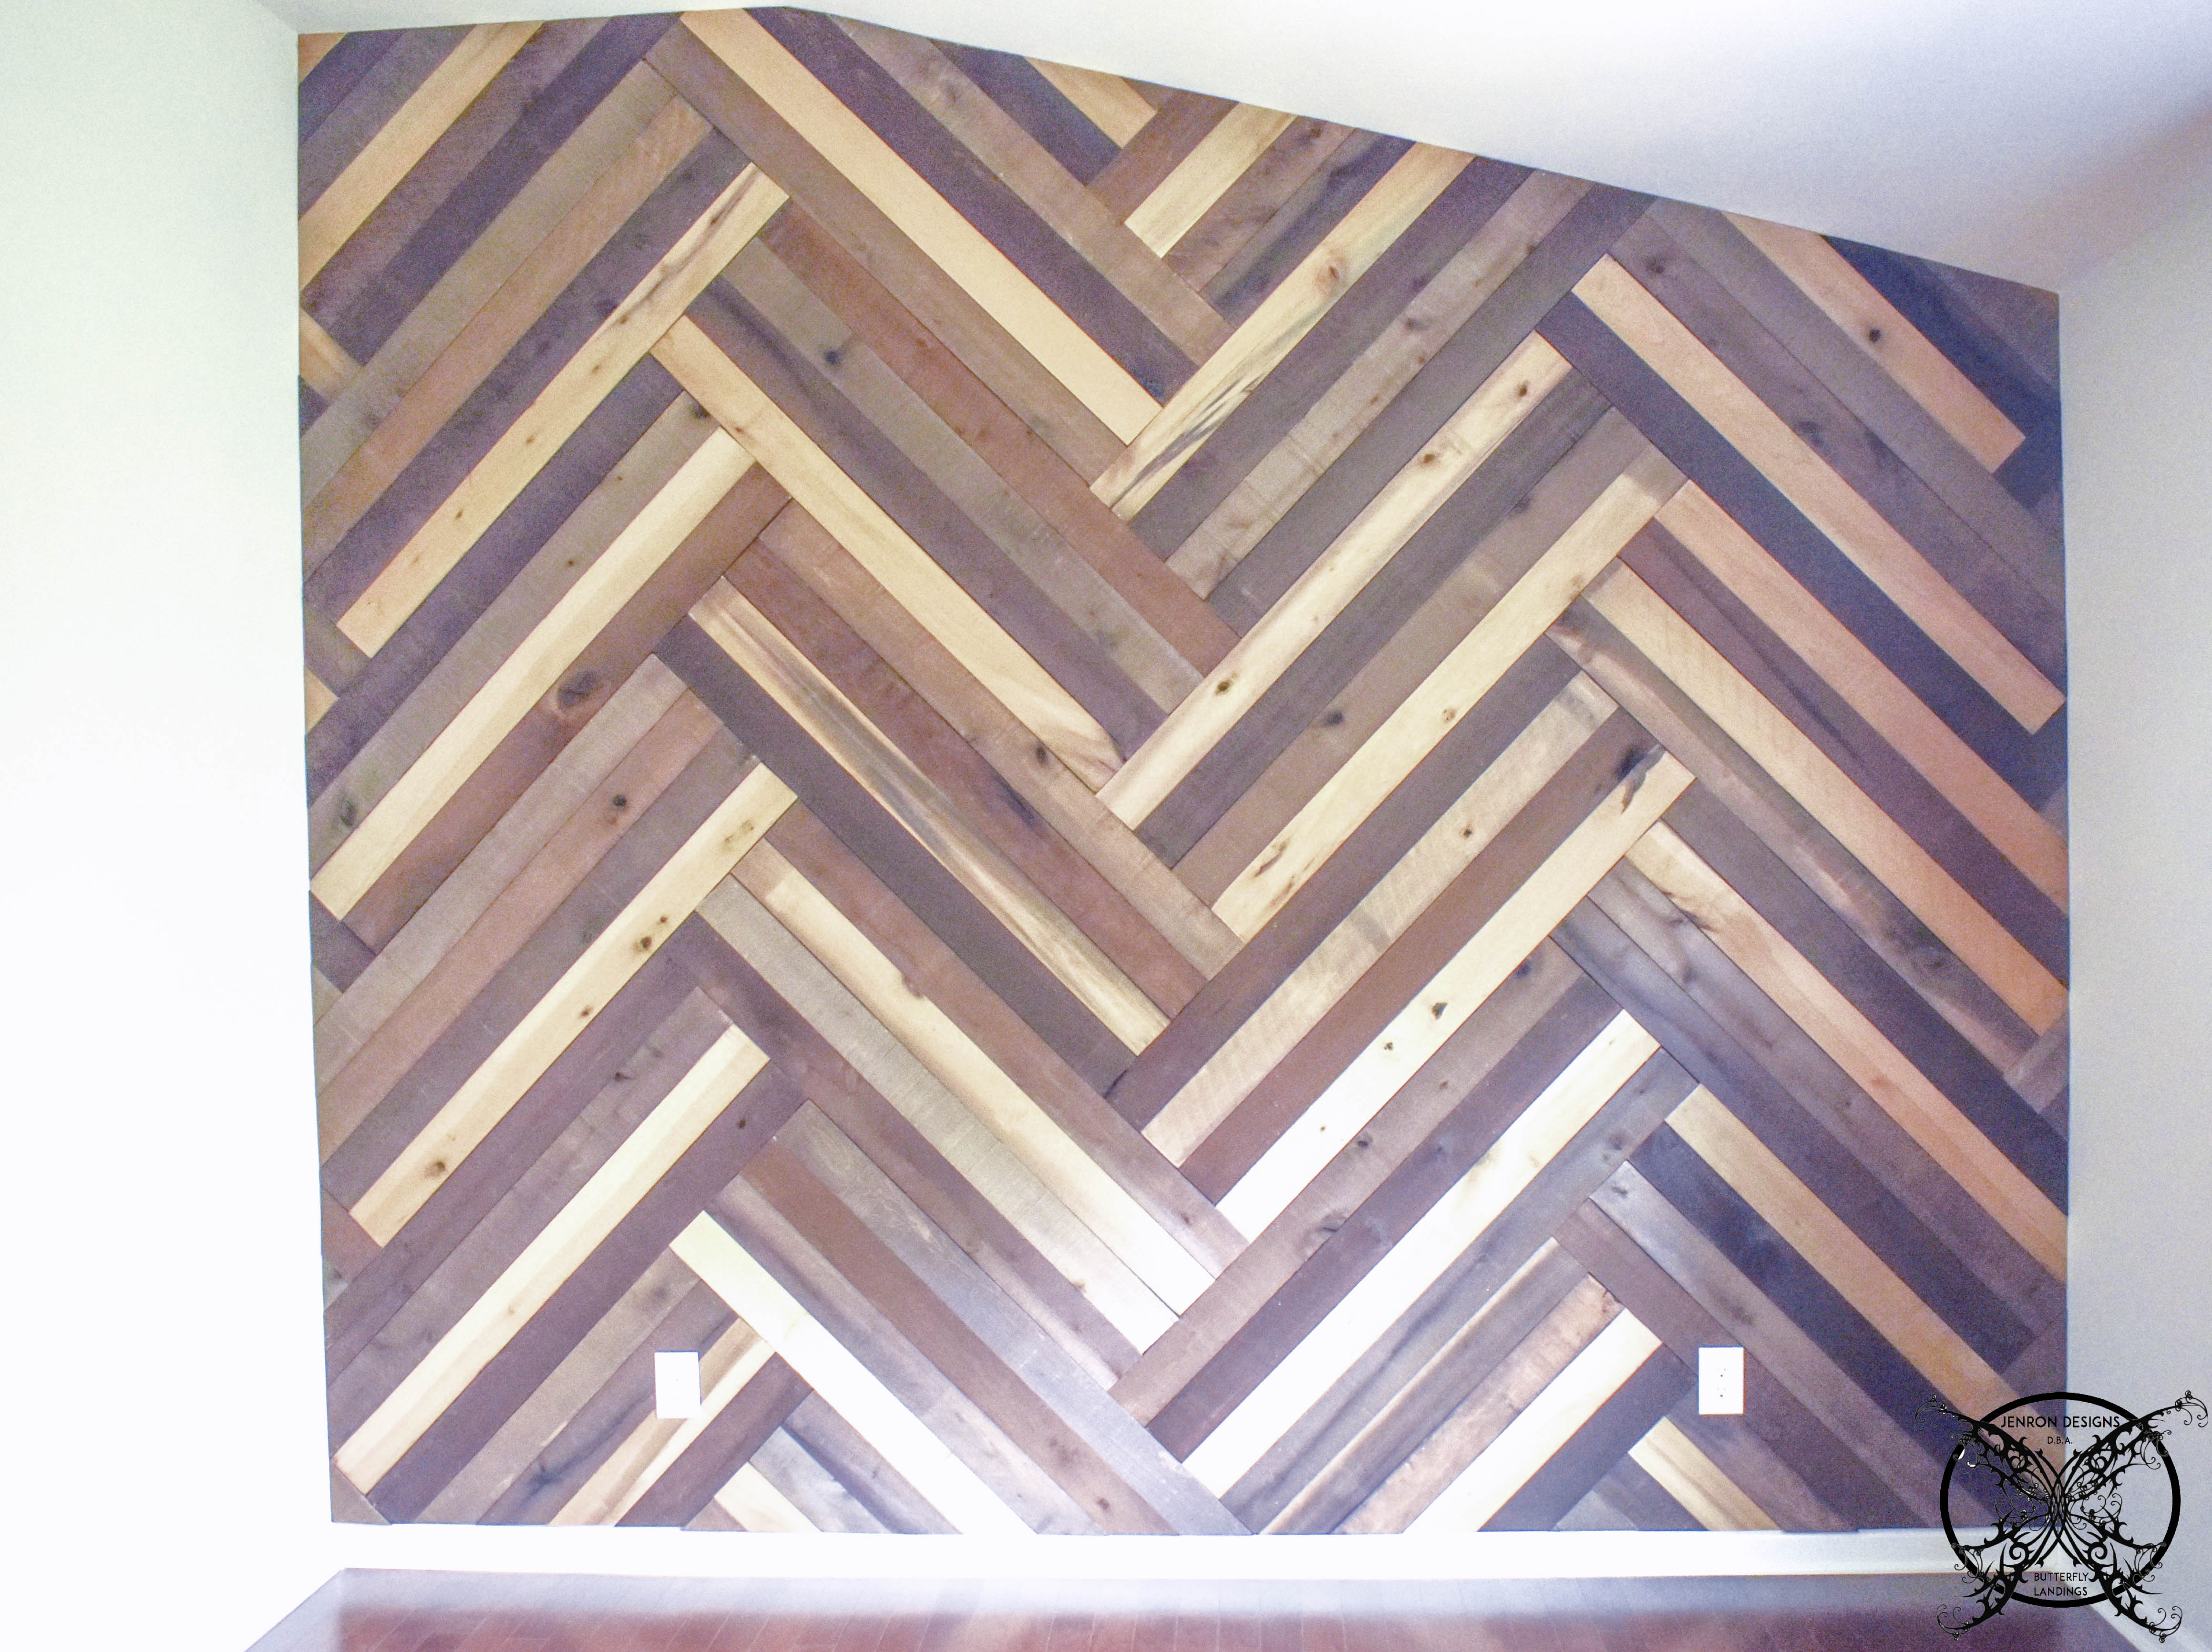
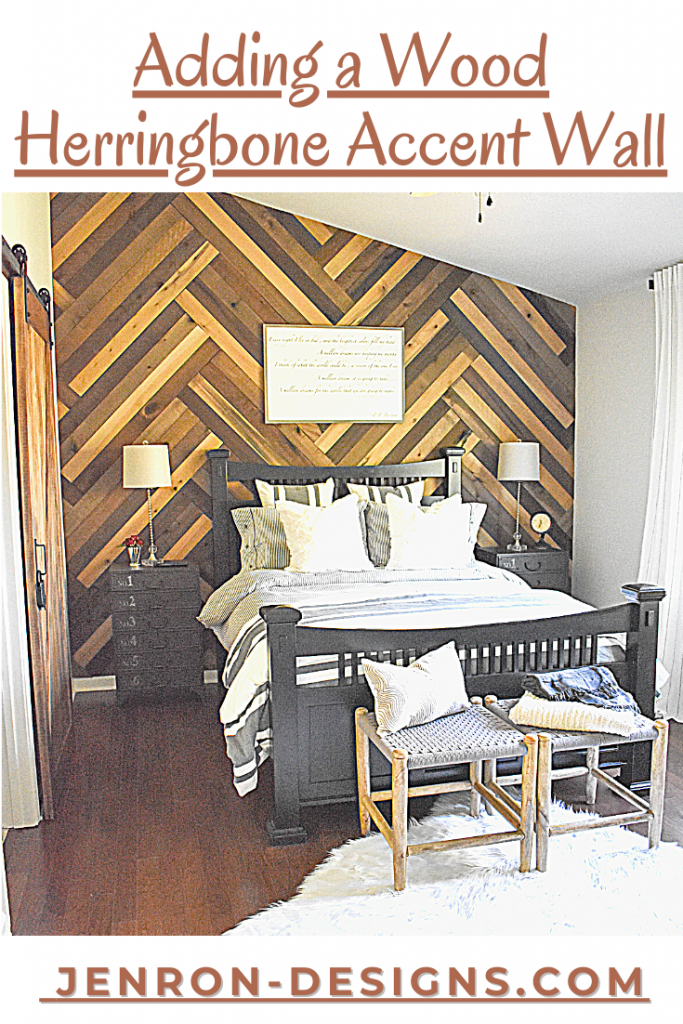
This week our primary focus this week will be Adding a Herringbone Shiplap Accent Wall which we have decided to add in a herringbone pattern. We are showing you step by step how we created this statement wall for our guest room.
WEEKS AT A GLANCE:
WEEK 1 WEEK 2 WEEK 3 WEEK 4 WEEK 5 REVEAL
 We are in ORC FALL 2018 : Week 3 Wood Accent Shiplap Wall. In case you are wondering what exactly The One Room Challenge is, so here is the scoop. This event was started by Linda Weinstein @ Calling It Home and is hosted twice a year, in April and October. For the past 14 seasons, the ORC has hosted over 250 interior design & decor bloggers, that have joined together to makeover one room in their homes. The participants have six weeks, from start to finish, in order to complete a full room transformation. To date, more than 2,200 rooms have been transformed through the One Room Challenge and many spaces, have been recognized and featured by several of the hosts seen here:

Inspiration Board & Designs Plan:

*Please note that this was a sponsored post and may contain affiliate links for your convenience. These involve no extra cost to you, but may result in me receiving a small commission – for which I am very grateful! You can view my full advertising disclosure here.
THE WOOD SHIPLAP ACCENT WALL:
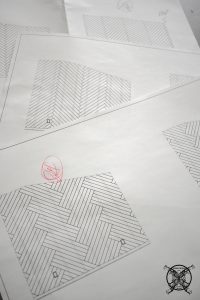
Okay so picking where we left off from Week 2 our accent wall is painted with a darker base coat in case there are any gaps between the wood. We have marked the studs lines with a laser level and we have decided on our board placement as a quadra panel herringbone design, verses a standard herringbone. Which you can see below in the drawings. What this means is each section will be grouped into a set of four boards to create a bolder herringbone pattern, which is not as busy for the eye.
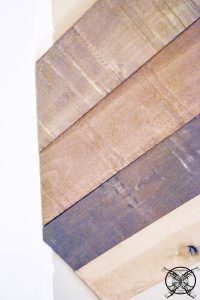
 The first step was to layout out our boards and pick a color pattern. We are using the Wall Board 1/2 in. x 4 in. x 4 ft. Weathered Hardwood Board. Since I want it feel random and not over placed I grouped the similar colored boards together so we could easily grab and go.
 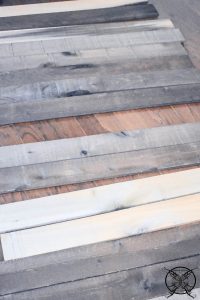 This also helps to verify the length of your boards since some of the reclaimed boards can have slightly varying lengths as well. Then we pick the center line found our angle and tacked the first board into place. We decided to start at the bottom since it would eventually be hidden behind the bed in case anything should go a-rye.
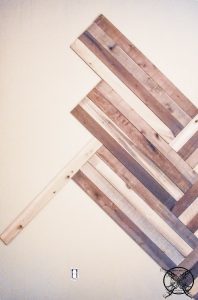
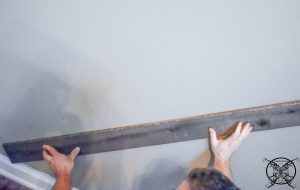 Ron layered the next 3 boards on top of the first and tacked them to wall using the studs lines as guides, and just like that we were off and running with our first quadra panel being complete.
 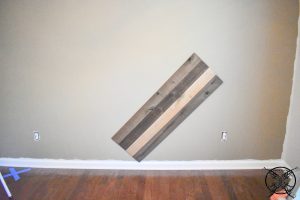 One thing that I did notice is the big color variation between the Weathered Hardwood Shiplap Board on the floor with direct sunlight verses the boards being placed on the wall vertically and the having light wash across the wood. For this reason I would have Ron hold up the boards after I would pre lay them out on the floor to make sure I was not getting too much of the same color in one area.
 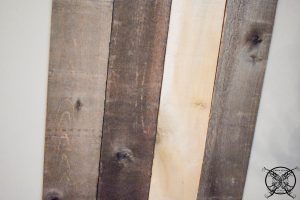 The next quadra panel section would run in the opposite direction and the first set. The first board of this set started by running perpendicular off the baseline of the first set of boards. Which is how you make the pattern, once this is laid in the rest is a piece of cake.
  You just continue to line up the boards in alternating colors and tack them to the pre drawn studs lines. You will not have to start making cuts until to reach the ceiling or the walls, so the vast majority of the wall will go up very quickly.
  Even when you get to next sections it is really all about lining up the boards to your based lines, as seen below. Then stacking the next four color alternating boards on top. We filled as much of the area as we could without making any cuts first, which was a huge time saver.
 I do want to address the board color line up. As you can see I did not adhere to a specific pattern of light, dark, gray, brown. I also would use multi boards of the same type in the same quadra panel layout. Sometime I would use two light boards flanking each end or every other board, just to keep the patterns random.
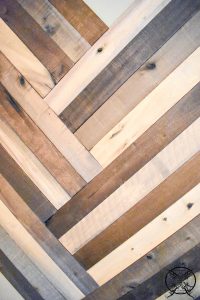 This will help to create an over all balance wall, so that you do not end up with too much of one specific color in one area. Which can give a over saturated effect and draw your eye to that particular placement of the boards. Also it is human nature to create a pattern, so it is very hard to make a randomized look too.
My Designer Tip: For me, I like to stand back and blur my eyes to see what color I needed in a specific spot. I do with everything from Christmas tree ribbon placement, floral arrangements, landscape design, to simple pillow place on a sofa or bed. This will help you to see large blocks of color in one area and get a more randomized pattern.
 As we reached the edges of the walls the ends of the boards needed to be shaved off to fit. This was done easily with a bevel and t-square to get the proper angle. Then we ran it through the miter box to cut the ends off.
 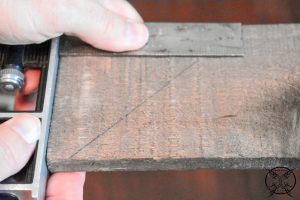 The same process was used for the vaulted ceiling which was a little trickier since it was sharper angle and a few of the boards had multiple cuts for the vault.
 We did save all of the small pieces that we cut off and they came in handy for the small triangular wall pieces. In fact a few of them fit almost exactly, like the world’s largest jigsaw puzzle, lol.
 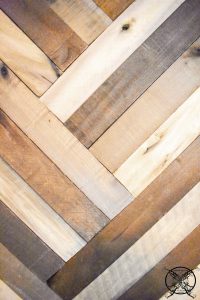 We are so in love with the way this reclaimed Weathered Hardwood Shiplap Board accent wall turned out. Then color are so warm and really capture that rustic retreat vibe we we going for with this room. The herringbone pattern also really elevates the feel of the rustic wood to give the room just little bit more of a chic vibe or even a little bit of mid century modern feel. Plus having all the variegation of the wood tones will allow us options for the barn door stain color, for next week and our gorgeous desk which I will reveal in week 5.
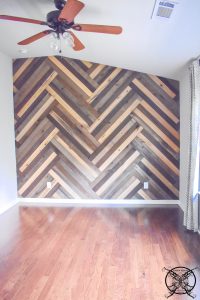 Although, I am thinking I hate those cherry wood blades on the ceiling fan! I do not like how they stand out at all, and I am not sure the black on the back side is where I want to go either. So I maybe be adding another project to week 4. I just will have to see how they sit with me this week, oh who am I kidding I hate them they are so going, lol!
THE GAME PLAN:
WEEK 1- Introduction, Inspiration Board, Project Outline, Starting Product Estimation & Procurement
WEEK 2- Clearing the Room, Painting the Walls Base Coat, Painting Tips Sponsored by HANDy Paint Products, CAD Drawing-Wood Wall Placement
WEEK 3- DIY Reclaimed Wood Wall Installation
WEEK 4 – DIY Barn Wood Sliding Door Staining Installation & TV Installation
WEEK 5- Picking Up Custom Orders, Accessories & Room Staging (Fan Blades to be refinished? TBD)
WEEK 6- FINAL REVEAL
PIN ME for later and be sure to follow us on Pinterest at Jen @ JENRON DESIGNS
Well this is just stunning! Great job with the pattern and color placement. Your room is really going to be amazing! ~~ Susie from The Chelsea Project
This must’ve been a fun project even though it required a lot of planning! The accent wall came out really nice. Can’t wait to see next week’s progress!
Thank you so much Susie! We are really loving how it looks so far and are so exited for the reveal!!!
Thanks Tee, while it did require a fair amount of planning the result made it all worth while. I will put in the hours up front to have a pretty result in the end any day of the week, plus there is something so gratifying about watch it come to fruition.
This is AMAZING! Wow! It’s so gorgeous! One of these days I want to do something like this with a wall in my house.
That wall is amazing!!!! Great job, what a statement it makes. And I vote yes to get rid of the fan blades too, lol!
I’m loving the chevron pattern and different gradients of the wood. Very gorgeous
I love the idea that is real wood and not just a wallpaper. It adds the texture to change completely the idea of the room!
Thank You Susanne, we love this wall so much. Just wait until you see what I got up my sleeve for the fans blades… somedays I shock myself, LOL!!!
Oooohh! I was so excited to see this go up! What a statement piece! The accent wall looks amazing 🙂
That wall is looking fantabulous! Keep it up! So much texture
Umm- this wall is absolutely stunning! What a cool idea and so well executed. Very nice!
Wow, you guys are serious, aren’t you? That is going to look amazing and I like the proposed colours and materials on your inspiration board. it sounds like a great project!
Thanks for the step-by-step guide! The final result is so exciting to see.
Wow! I love your wood wall! It adds so much warmth!
I’m totally obsessed this is such a great design!
Jennifer this looks AMAZING! I love the herringbone pattern. I toyed with doing that too but my wall just wasn’t big enough. I love it though. And the colors of your boards are so fun! I can’t wait to see the barn door.
This looks awesome! I can’t wait to see the final reveal! I do agree with you about the fan blades, haha!
I always love wood decor, it reminds me of the shire somehow. It just makes the house feel more comfortable and more like home XD keep it up!
Love this! Can’t wait for the reveal
This looks so good! Great job especially with that curved ceiling line!!!
So much Math but it’s worth it, so pretty!!
Wow it looks so good!! Way better than the wall we took down 😂😉
Jen, the wall looks FAB! Kudos on the pattern my friend.
Thank you Sarah, that says a lot coming from you, since I know you are not a fan of the wood walls, LOL just kidding, you place is looking great 🙂 . See I promised I would try to class my up a bit with that herringbone pattern.
This is timely for me as I was trying to decide between a decorative wall like this one or a traditional paint job. You’ve given me a lot to think about!
Sarah I am so glad this post came at such a good time I only want to inspire others to be creative in their designs 🙂 Good luck!
Leigh Ann thank goodness my husband is good at Math and did all of it….LOL!
Thank you Wendy they were the color that came in the boxes so I did not have a whole lot to do with the colors other than the placement…LOL. I would have liked a little more gray which is odd on the floor they looked very gray and on the wall they did not, lighting clearly was key here.
Thank you Emy we are going to have a lot of textures in this room.
Wow this is really one of your best projects to date. You just keeping better and better and I find myself on the edge of my seat looking forward to seeing what you will do next. I can not imagine that I am the only one, great work!
absolutely loving all the natural, exposed and stained wood combinations! Definitely making a come back!
You are so talented and creative! I
Love the wood paneling pattern. I would never be able to do this on my own. Great job!
Such helpful tips and tricks! You are so talented.
Good job on this gorgeous wall. Sometimes a wood wall can look really awful, but you really classed this one up with the herringbone pattern.
Now, what we have here is an excellent collection of design that has been pushed to the next level. I love a wood wall and I also love the herringbone pattern it is like fudge brownie ice cream all the good stuff in one scoop!
What a stunning accent wall! I seriously love it. It’s quite similar to the wall I painted in my office.
Is there nothing that you two can not do? I am always amazed at your DIY projects they always turn out beautiful and your are always coming up with fantastic new design concepts.
Wow, this looks fantastic! So striking! I can’t wait to see the end result!
Oh wow! That wall is amazing! Can’t wait to see it all come together! It’s going to be so cool!
Your wall is looking amazing. Such a great pattern. Very impressed!
Love that wall it is gorgeous!
I love how this came out! I might have to do this. It will make the room pop!
We are looking to do something similar to our bedroom. These would be perfect designs to show my husband.
I like that design for a floor.
This is BEAUTIFUL! I’d love to have something like this in my house.
What a fantastic project I love the pattern you created on this accent wall and the colors. It really makes this space something special now, from a blank wall to wow!